Objective
To learn how to install tor on ubuntu, this guide will show you the steps for Ubuntu 18.04 Bionic Beaver. This guide will also provide you with some basic configuration and usage of Tor network in order to conceal your identity.
Operating System and Software Versions
- Operating System: – Ubuntu 18.04 Bionic Beaver
- Software: – Tor version 0.3.2.9
Requirements
Privileged access to your Ubuntu System as root or via sudo command is required.
Conventions
- # – requires given linux commands to be executed with root privileges either directly as a root user or by use of
sudocommand - $ – requires given linux commands to be executed as a regular non-privileged user
Other Versions of this Tutorial
Instructions
Install Tor on Ubuntu
Let’s start by Tor installation on Ubuntu 18.04 system. To install Tor execute the below apt command:
$ sudo apt install tor
By default Tor listens for all requests on port 9050. Confirm that Tor is up and running on this specific port by using the ss command:
$ ss -nlt
State       Recv-Q Send-Q Local Address:Port               Peer Address:Port
LISTEN      0      128       0.0.0.0:22                    0.0.0.0:*
LISTEN      0      5       127.0.0.1:631                   0.0.0.0:*
LISTEN      0      128     127.0.0.1:9050                  0.0.0.0:*
You can also check for the Tor version by entering:
$ tor --version
Tor version 0.3.2.9 (git-64a719dd25a21acb).
Tor Network connection test
At this stage we are going to test our Tor installation by obtaining an external IP address via Tor network. First, check your external IP address:
$ wget -qO - https://api.ipify.org; echo
89.137.173.226
Next, use the torsocks command to obtain your external IP address via Tor network:
$ torsocks wget -qO - https://api.ipify.org; echo
185.220.101.13
Torify your shell
Set your shell to use torsocks as default for any command. This will allow you to use commands without prefixing them with the torsocks command. To enable torsocks for your current shell session enter:
$ source torsocks on
Tor mode activated. Every command will be torified for this shell.
Test your torified shell but this time without the torsocks command prefix:
$ wget -qO - https://api.ipify.org; echo
185.220.101.13
To make this change permanent for all your new shell sessions and after reboot enter:
$ echo ". torsocks on" >> ~/.bashrc
To disable Tor for your current shell enter:
$ source torsocks off
Tor mode deactivated. Command will NOT go through Tor anymore.
Enable Tor Control Port
Next, we are going to enable Tor’s Control Port which will allow as to communicate with Tor local installation. We will also password protect Tor connection with password eg. my-tor-password. First set your password variable with your password:
torpass=$(tor --hash-password "my-tor-password")
Next, enable Tor control port and insert our previously hashed password:
$ printf "HashedControlPassword $torpass\nControlPort 9051\n" | sudo tee -a /etc/tor/torrc
Check your /etc/tor/torrc configuration to confirm that hash password settings has been correctly included. The configuration should look similar to the below:
HashedControlPassword 16:AF74D4E29C8F0B9160F43D89DDED341A8F0387B6E40A6D0C58840FD2D6
ControlPort 9051
Restart Tor to apply changes:
$ sudo /etc/init.d/tor restart
Your Tor service should be now listening on both ports 9050 and 9051:
$ $ ss -nlt
State       Recv-Q Send-Q Local Address:Port               Peer Address:Port
LISTEN      0      128       0.0.0.0:22                    0.0.0.0:*
LISTEN      0      5       127.0.0.1:631                   0.0.0.0:*
LISTEN      0      128     127.0.0.1:9050                  0.0.0.0:*
LISTEN      0      128     127.0.0.1:6010                  0.0.0.0:*
LISTEN      0      128     127.0.0.1:9051                  0.0.0.0:*
Connect to Tor Control Port
Using Tor Control Port we are able to communicate with Tor and issue commands. For example let’s use the telnet command and request a new Tor circuit and clear cache:
$ telnet 127.0.0.1 9051
Trying 127.0.0.1...
Connected to 127.0.0.1.
Escape character is '^]'.
AUTHENTICATE "my-tor-password"
250 OK
SIGNAL NEWNYM
250 OK
SIGNAL CLEARDNSCACHE
250 OK
quit
250 closing connection
Connection closed by foreign host.
On Line 5 we have entered AUTHENTICATE command and our Tor password. On Line 7 and Line 9 we asked Tor for a new circuit and clean cache.
The communication with the Tor control port can also be shell scripted. Consider the following example of requesting a new clean circuit:
$ source torsocks off
Tor mode deactivated. Command will NOT go through Tor anymore.
$ torsocks wget -qO - https://api.ipify.org; echo
103.1.206.100
$ echo -e 'AUTHENTICATE "my-tor-password"\r\nsignal NEWNYM\r\nQUIT' | nc 127.0.0.1 9051
250 OK
250 OK
250 closing connection
$ torsocks wget -qO - https://api.ipify.org; echo
185.100.87.206
Configure Browser to use Tor network
Lastly, configure your Firefox browser to use local Tor host:
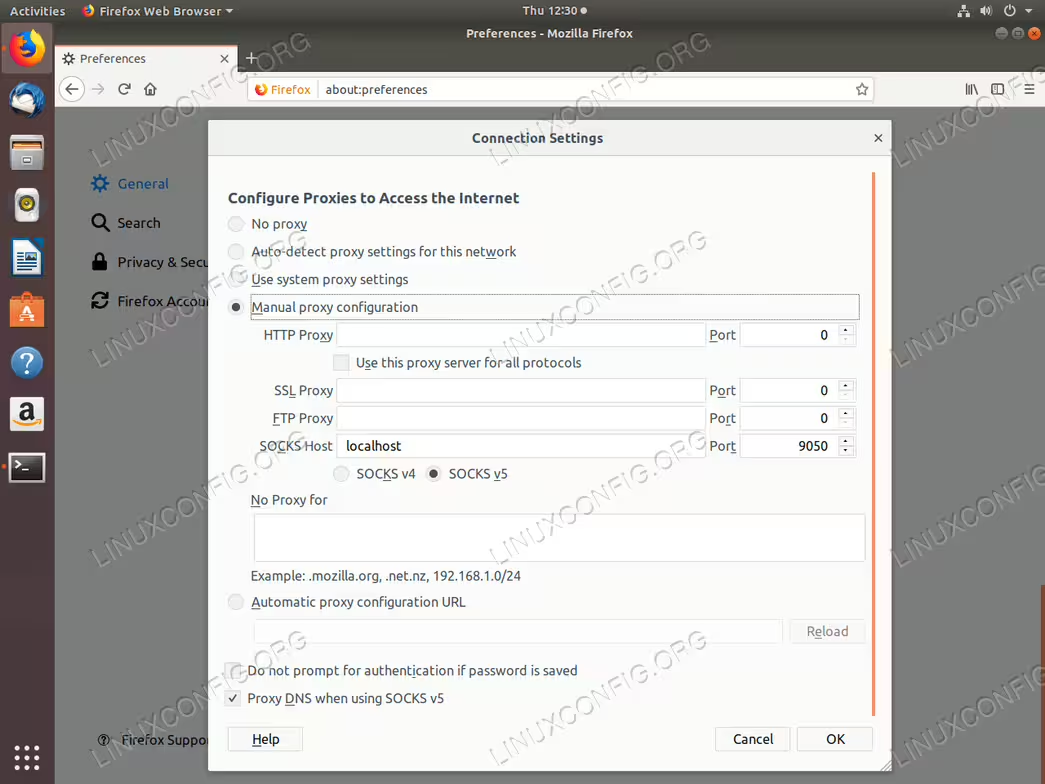
localhost and Port to 9050. Lastly, tick the Proxy DNS when using SOCKS v5 tick-box.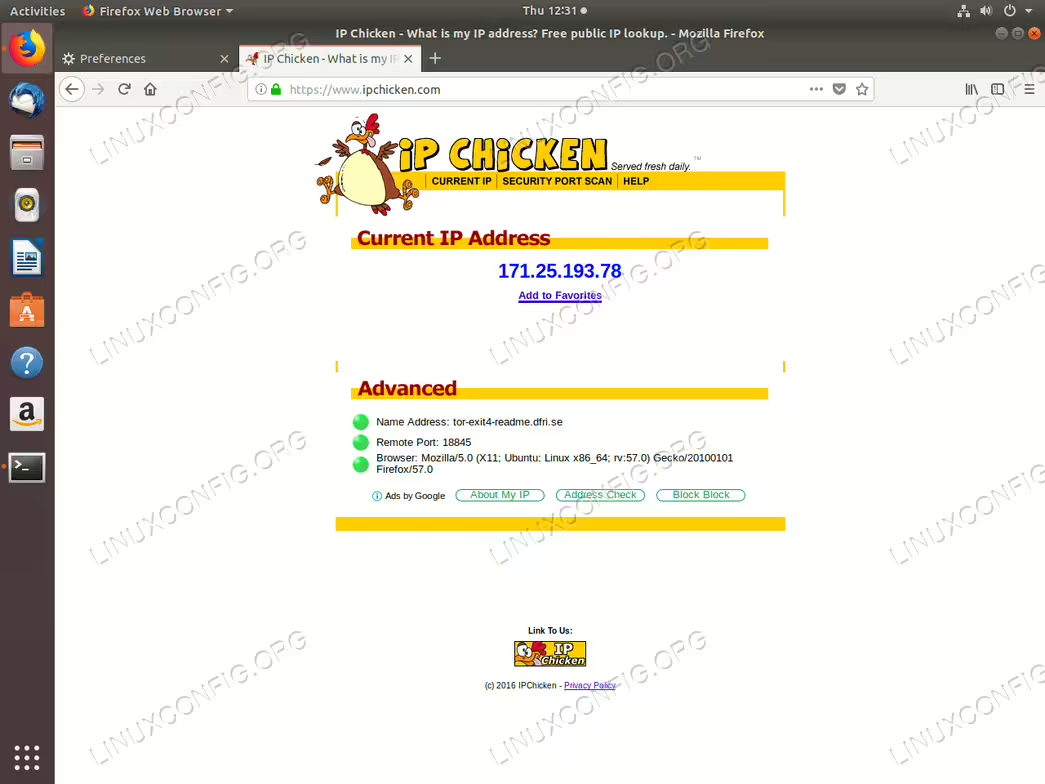
https://www.ipchicken.com/ Your external IP address should be concealed and Tor network IP address sould be shown here.