
How to refine lowres pictures on A1111

Introduction
While image generation AI has been buzzing lately with Flux1, I would like to introduce a photo refinement technique using A1111 and SD1.5 that I use regularly, even though it is the epitome of legacy at this point.
In my opinion, "this" is impossible with Forge, reForge, ComfyUI, or even SDXL or SD3. I might just be unaware, but "this technique" is a feat that can only be accomplished in A1111 using MultiDiffusion and SD1.5 tile.
As I mentioned in a previous article, the ControlNet tile in SD1.5 has the best performance for the purpose of "dramatically increasing the amount of detail while maintaining the original image" when combined with the MultiDiffusion Upscaler in A1111.
Since then, as mentioned in the article, a tile model for SDXL has been developed, but honestly, in terms of "increasing the amount of detail," it still does not reach SD1.5 tile. That is how amazing the performance of SD1.5 tile is. And for some reason, that performance is fully unleashed only when combined with MultiDiffusion in A1111.
I consider this single point enough to justify the existence of A1111. Especially when it comes to detailing human faces, not only SDXL and SD3, but even Flux1 cannot match A1111 + MultiDiffusion + SD1.5 tile. MultiDiffusion can be used in ComfyUI, but "this feat" cannot be done.
Kakudai V1 finishes with considerable quality in terms of human skin texture, but unfortunately, especially in full-body pictures, the face becomes almost a different person. Furthermore, regarding facial detailing, despite using the same SD1.5 tile, it is far inferior to A1111.
Regarding the issue of the face becoming a different person, I have created an improved version that improves the fidelity to the original image.
How to refine lowres pictures on A1111
The figure below is an example, but first, here is the original image.
The heroic figure of Kristin Faulkner, representing the USA, who won the Paris Olympics women's road race... although it is a low-resolution original image that I upscaled by 4x. By the way, I always call her "Kristin-san" on social media and elsewhere.

For the past five years, I have been watching cycling races focusing more on women than men. In recent years, I am even more knowledgeable about female athletes than male athletes.
In the current women's peloton, Eri Yonamine continues to be active on the front lines despite being in the veteran range, and although she has already retired, Mayuko Hagiwara, who is in charge of commentary for women's cycling on J-Sport, is a legendary person who won a stage in the Giro d'Italia Rosa, the pinnacle of women's cycling, in 2015.
Winning a stage in a Grand Tour is a feat that only Hagiwara-san has achieved among Japanese people, both men and women. Moreover, she achieved this feat while wearing the All-Japan Champion jersey. Since cycling itself is an extremely minor sport in Japan (many people only know the Tour de France), it is a feat known only to those who know.
Now, to the main point, the image quality has been improved while remaining almost faithful to the original image. The logo on the wear is the same. I will write in advance that the skin texture part cannot be improved with this method. (I will describe the improvement of that part later.)

Kristin-san actually has quite an amazing career before becoming a road racer.
Anna Kiesenhofer, who defeated the Dutch team, which had the strongest members at the time, to win the Tokyo Olympics, was also an incredible person who was a graduate of the University of Cambridge with a master's degree, a current postdoc at ETH Zurich, and a top-tier mathematician. Kristin-san is also an incredible person who graduated from Harvard, worked at a venture capital firm in Silicon Valley after graduation, and even held a concurrent job for a year after turning pro.
As a cyclist... she is a person who uses "breakaways" and "solo runs," which are rare for women, as her winning pattern.
In the women's peloton, there are not many athletes with the "breakaway specialist" style, which exists in a certain number in the men's peloton, but Kristin-san is one of the few "breakaway specialists" in the women's peloton.
The reason why there are few "breakaway specialists" in the women's peloton is not just a matter of physical style, but largely because the relationship of various dynamics within the peloton is not the same for men and women.
And here is how an old 620x410 pixel photo of my eternal hero, Greg LeMond—a truly clean champion who fought against doping—looks when upscaled four times.

While the face of the French hero, the great Bernard Hinault, has changed slightly... Mr. LeMond's image has a reasonable level of fidelity and reproduction.

Below is an image processed by the aforementioned Kakudai V1 EX with ollama Ver.II,
and you can see that it has improved considerably due to the refinements. Especially for full-body shots, Kakudai V1 might have the edge.

...So, if you have Kakudai V1 EX with ollama Ver.II, does that mean A1111 is unnecessary? Not at all. There are things that can only be achieved through high-resolution processing in A1111.
That is upscaling and high-resolution enhancement specialized for faces.
When upscaling full-body shots as shown above, there is no particular reason to use A1111, especially since the facial tracking capability has improved significantly with Kakudai V1 EX with ollama Ver.II.
However, it is a different story for close-up shots of faces, as shown below.
This is a low-resolution image of TAKA from the Japanese rock band I love, ONE OK ROCK...

When performing upscaling specialized for faces, the combination of SD1.5 + A1111 + multidiffusion + controlnet_SD1.5tile is the strongest. In particular, the increase in the amount of detail in the eyes cannot be replicated even with SDXL. However, the trade-off is that the realism of the skin is completely lost.

Now, for the specific settings, first configure i2i as shown below. Also, it goes without saying that the Multi Diffusion Upscaler is essential.

Furthermore, when using this method, if you are using a library older than Pytorch 2.3.1 + xu12.1, the modifications described in the article below are essential, as they result in a significant difference in VRAM consumption.
Please adjust the upscaler and scale factor as appropriate.
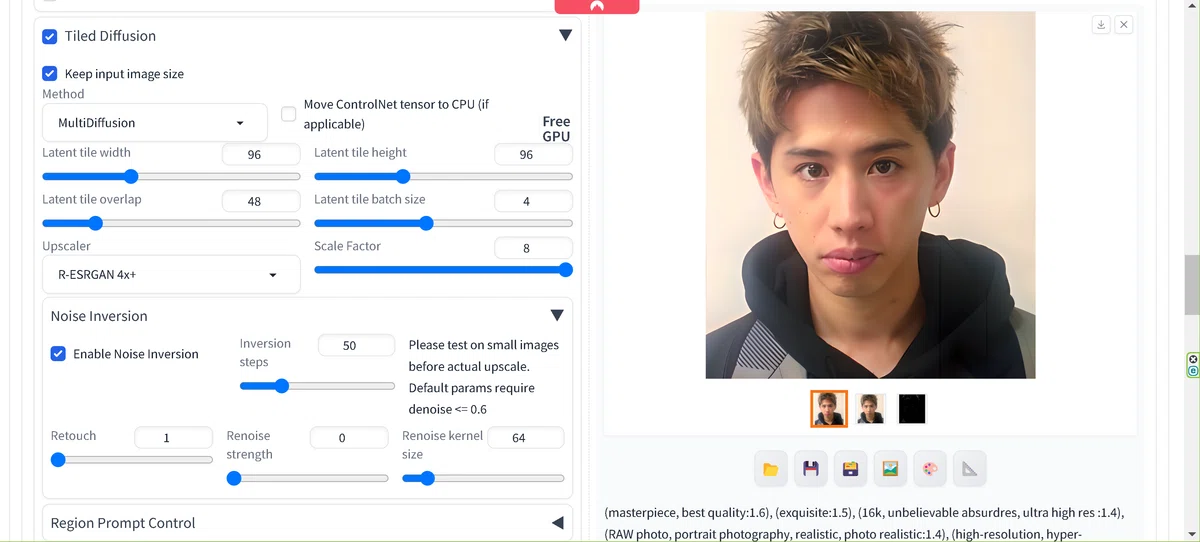

For ControlNet, specify tile and canny. You can also use just tile. If you want to enhance tracking, it is good to add canny. The settings remain at their default values.

I also use FreeU regularly.

As for the prompt, I have written quite a bit as a template. Please adjust it to your liking as needed. I also use quality-related LoRAs quite a bit.
(masterpiece, best quality:1.6), (exquisite:1.5), (16k, unbelievable absurdres, ultra high res :1.4), (RAW photo, portrait photography, realistic, photo realistic:1.4), (high-resolution, hyper-realistic:1.4), (impressively-detailed, ultra detailed, detailed face, detailed skin, naturalistic, painstakingly-detailed, photorealistic, precise, realistic, richly-detailed, sharp, skillfully-detailed, super-realistic:1.35),(perfect skin:1.1), (shiny skin:1.2),
BREAK
((beautiful face)), extremely delicate facial, (extremely detailed cg 16k wallpaper),an extremely delicate and beautiful, extremely detailed, intricate, hyper detailed, ultra high res, (detailed eyes, big eyes, black eyes), (detailed facial features),(detailed clothes features), HDR, 16k resolution, solo focus, looking at viewer,
,
BREAK
(perfect anatomy:1.1), (beautiful detailed face, perfect face, beautiful detailed eyes, double eyelid, long eyelashes:1.2), (realistic body, beautiful detailed legs:1.2), (2legs, 2arms, 4fingers and 1thumbs),lora:LowRA:0.2, Detailed Background,
BREAK
lora:more_details:0.4, lora:Shinyskin:0.3, (physically-based rendering, ray tracing:1.1), (Three-Point Lighting), huge filesize, amazing depth, rich colors, powerful imagery, psychedelic overtones, in-focus, ntricate, layered, lifelike, magnified, masterfully-detailed, multidimensional, multifaceted, multilayered, textured, well-defined, professional photograph, an extremely delicate and beautiful, extremely detailed CG unity 8k wallpaper, lora:GoodHands-vanilla:0.8,
wakame, easynegative, ng_deepnegative_v1_75t, (bad anatomy:1.5), (low quality:2), (normal quality:2), low resolution, lowres, lora:flat2:1.3, (inaccurate limb:1.3), [:(badhandv4:1.5):0.7], (bad-hands-5:1.5), negative_hand-neg, lora:Shinyskin-000018:-0.2, (BadDream, UnrealisticDream), (verybadimagenegative_v1.3:1.1), (grayscale),
BREAK
(missing leg, extra arm, extra leg:1.1), (missing hands, liquid fingers, split hands, missing fingers:1.1), interlocked fingers, bad arms, long body, long neck, extra digit, fewer digits, disconnected limbs, disfigured, disgusting, extra limb, extra limbs, floating limbs, missing limb, poorly drawn face, poorly drawn hands,
BREAK
pixelated, jpeg artifacts, (text), (logo), 2d, 3d, b&w, bad art, blur, blurry, cartoon, close up, deformed, illustration, kitsch, low-res, mangled, mutated, mutation, mutilated, noisy, old, out of focus, over saturation, oversaturated, poorly drawn, render, ugly, weird colors, badicturep, acnes, skin blemishes, bad_prompt_version2, tattoo,
BREAK
(spot:1.2), (mole:1.2), (freckles), (abs), (nude, nipple), beret, cap hat, hat, hair ornament,
To this, I add the prompt analyzed by tagger as shown in the figure below. For some reason, tagger recognizes TAKA as a woman, so I will correct that manually.

Generate with these settings.
Now, in this state, aside from the increase in detail, the skin texture cannot be helped, but when combined with the improved Kakudai V1 mentioned above, it turns out quite nicely.

+Kakudai V1
Below is an image reprocessed with Kakudai V1 Modified from the image above, which was upscaled in A1111. The skin texture becomes quite realistic.

In the case of Kakudai V1 Modified, as mentioned earlier, the facial tracking capability has been significantly improved, so for full-body images, there is also the option of applying Kakudai V1 Modified directly without going through A1111. I use them differently depending on my preference for the final result.

For the aforementioned image by Christine, reprocessing it with Kakudai V1 Modified after upscaling it in A1111 dramatically improves the sense of realism.

Applied Methods
I will explain one applied method.
As shown in the figure below, even if you process it with the Upscaler disabled, you can dramatically increase the detail in the facial area through powerful Noise Inversion.

I always finish the final version of the image at 8K size, 4320 pixels x 4320 pixels, but with this method, I first upscale the image to 8K size using some method, then use software like Adobe Photoshop to crop only the facial area and process it with the settings above.
After processing, the procedure is to paste the processed facial area back onto the original image.procedure.
The ControlNet settings are the same as above.
In this method, if limited to the facial area, it is possible to achieve even higher quality detail than performing Upscaling and Noise Inversion simultaneously as explained above.
However, with this method, VRAM consumption is even higher than when performing it simultaneously with Upscaling (assuming 8K size). In the case of an RTX 4070 12GB, when launching A1111 with cross attention settings,
(refer to the following regarding cross attention)
If the main memory is 128GB, it almost always completes without issues, but with 64GB, it fails with an OutOfMemory error with a very high probability.
For GPUs in the 16GB VRAM class or higher, it is thought that no errors will occur, but in the case of an environment equivalent to an RTX 4070 12GB, please refer to the article above and the article below, and use xformers.
BGM
Finally, 7 years ago, I was "here." Everyone around me was young, the age of my son or daughter, but... I was crying at TAKA's words.