


四、配置文件
1、配置文件简介
4.1.1、配置文件的作用
Sping Boot的配置文件的作用有以下两点
- 对一些默认配置的配置值进行修改
- 自定义一些配置值供程序使用
4.1.2、配置文件格式
SpringBoot可以识别三种格式的配置文件
-
roperties格式
传统格式/默认格式
【示例】

-
yml
主流格式
【示例】

-
yaml
不太常用
【示例】

4.1.3、配置文件的分类
配置文件分为默认配置文件和自定义配置文件两种
4.1.3.1、默认配置文件
(1)、默认配置文件名
Spring Boot的默认配置文件名为
- application.properties
- application.yml
- application.yaml
该配置文件在指定目录下可以被SpringBoot自动识别并加载
这三种格式的配置文件可以同时存在

(2)、文件格式加载顺序
默认配置文件是在SpringBoot项目启动的时候被自动加载的,其内部的相关设置会自动覆盖SpringBoot默认的对应设置项,所有的配置项均会保存到Spring容器之中
三种格式的配置文件同时存在时的加载顺序如下
- application.properties(最高)
- application.yml(次之)
- application.yaml(最低)
不同配置文件中相同配置按照加载优先级相互覆盖,不同配置文件中不同配置全部保留
【测试】测试配置文件的加载顺序
在springboot-01-001模块中定义三个配置文件
-
application.properties
server.port=8081 -
application.yml
server: port: 8082 application: name: name2 size: 100 -
application.yaml
server: application: name: name3 port: 8083 -
单测代码
package com.longdidi; import org.junit.jupiter.api.Test; import org.springframework.beans.factory.annotation.Value; import org.springframework.boot.test.context.SpringBootTest; @SpringBootTest class SpringbootTest01 { @Value("${server.port}") String port; @Value("${server.application.name}") String name; @Value("${server.size}") String size; @Test void contextLoads() { } @Test void test1() { System.out.println("启用的端口号:" + port); System.out.println("启用的名字:" + name); System.out.println("启用的大小:" + size); } } -
测试结果
1.配置文件的优先级 1.1、端口号在三个文件中都有,加载的是application.properties文件中的,因此该文件的优先级最高; 1.2、名字属性在application.yml和application.yaml文件中都存在,加载的是application.yml中的 因此的值application.yml的优先级次之,application.yaml的优先级最低 2.配置文件加载 2.1、名字属性在在application.yml和application.yaml文件中都存在,因为application.yml的优先级 高,因此application.yml会覆盖application.yaml中的同名配置文件 2.2、大小属性在application.yaml文件中存在,因此会被保留下来

(3)、默认配置文件位置
SpringBoot的全局默认配置文件想要被SpringBoot自动加载需要放置到指定的位置
我们配置的main/resources其实就是下面的classpath
-
file:./config/*/
根目录(项目文件夹)下的config/目录
-
file:./config/
根目录(项目文件夹)下的/config子目录中
-
file:./
根目录(项目文件夹)下
-
classpath:/
项目的resources目录中
-
classpath:/config/
项目的resources下的/config子目录中
在这四个位置的属性文件(application.properties或application.yml或application.yaml)会被SpringBoot自动识别并加载
可以在源码中看到关于配置文件位置的定义

(4)、配置文件优先级
不要在公共配置文件application.properties和自定义配置文件xxx.properties中配置相同的的配置项的不同值,因为公共配置文件的优先权最高,会覆盖掉自定义配置文件中的内容
可以这么理解:公共配置文件中的某个配置在启动时加载到Spring容器中,之后又在另外一个自定义配置文件中加载了同名的配置项,二者有不同的值,但是系统会检查二者的优先权,谁高谁留,谁低谁走,最后自定义配置文件中的值无效
优先级原则
其原则就是
- 根目录大于resources目录
- “/config/*/目录” > “/config目录” > “/目录”
- properties文件大于yml文件,yml文件大于yaml文件
注意这里的根目录一定是项目所在工程的根项目目录
-
根项目
如果项目本身就是一个独立的项目,那么根目录就是项目的目录
如下项目的根路径就是项目目录

-
子项目
如果项目本身为其它项目下的子项目,那么根路径是父项目的路径
如下

优先级顺序
-
第一优先级
项目根目录下的/config/*/子目录中
config/*/application.properties
config/*/application.yml
config/*/application.yaml
-
第二优先级
项目根目录下的/config子目录中
config/application.properties
config/application.yml
config/application.yaml
-
第三优先级
项目根目录下
application.properties
application.yml
application.yaml
-
第四优先级
项目的resources下的/config子目录中
resources/config/application.properties
resources/config/application.yml
resources/config/application.yaml
-
第五优先级
项目的resources目录中
resources/application.properties
resources/application.yml
resources/application.yaml
Spring Boot 会按照这个顺序来加载配置文件
如果在多个位置有相同的属性定义,那么最先检查的位置中的属性值将优先使用
示例图如下

优先级测试
创建springboot-04-002模块
-
file文件示例图

-
classpath文件示例图

-
启动测试
先加载的是./file/config/*/路径下的配置文件,其它顺序可以自行测试

4.1.3.2、自定义配置文件
SpringBoot支持自定义配置文件,自定义配置文件不能被SpringBoot自动加载,需要手动去进行加载
使用步骤
-
创建自定义配置文件
-
创建配置类
使用
@ConfigurationProperties注解来绑定配置文件中的属性,同时使用@PropertySource注解来指定配置文件的位置 -
使用配置类
在需要使用这些配置信息的地方通过Spring的依赖注入(@Autowired)来注入配置类实例,然后调用其getter方法来获取配置值
【测试】创建自定义模块springboot-04-003
-
编写配置文件
在
src/main/resources目录下新建自定义配置文件例如创建
config.properties并在其中编写需要的配置信息com.example.name=test com.example.age=25 -
创建配置类
创建一个配置类,使用
@ConfigurationProperties注解来绑定配置文件中的属性,同时使用@PropertySource注解来指定配置文件的位置package com.longdidi; import org.springframework.boot.context.properties.ConfigurationProperties; import org.springframework.context.annotation.PropertySource; import org.springframework.stereotype.Component; @Component @ConfigurationProperties(prefix = "com.example") // 绑定配置文件中的属性 @PropertySource("classpath:config.properties") // 指向定配置文件的位置 public class TestProperties { private String name; private int age; public String getName() { return name; } public void setName(String name) { this.name = name; } public int getAge() { return age; } public void setAge(int age) { this.age = age; } } -
使用配置类
在需要使用这些配置信息的地方通过Spring的依赖注入(@Autowired)来注入配置类实例,然后调用其getter方法来获取配置值
package com.longdidi; import org.springframework.beans.factory.annotation.Autowired; import org.springframework.web.bind.annotation.GetMapping; import org.springframework.web.bind.annotation.RestController; @RestController public class TestController { @Autowired private TestProperties testProperties; @GetMapping("/test") public String test() { return "Name: " + testProperties.getName() + ", Age: " + testProperties.getAge(); } } -
测试
启动项目访问http://localhost:8080/test

4.1.4、YML配置文件自动提示
在SpringBoot项目中,默认只有在".properties"配置文件中才能自动提示配置信息,yml和yaml配置文件都不会自动提示,并且YML文件和其它位置的properties文件也不是配置文件的图标
如下

这是因为SpringBoot默认不会自动加载这些配置文件,如果想要在YML配置文件中也有自动提示功能,则需要做如下配置
(1)、配置Spring
-
File ->ProjectStructure

-
Facets添加Spring配置

-
选择项目

(2)、修改配置
-
File ->ProjectStructure

-
选中对应项目/工程

-
点击OK后可查看已选择的文件

-
修改后查看文件图标

(3)、测试
在yml配置文件中输入port测试,看到已经可以做自动提示

2、YML配置文件
4.2.1、YML配置文件概述
SpringBoot采用集中式配置管理,所有的配置都编写到一个配置文件中:application.properties
如果配置非常多,层级不够分明,因此SpringBoot为了提高配置文件可读性,也支持YAML格式的配置文件:application.yml
YAML是一种人类可读的数据序列化格式,它通常用于配置文件,在各种编程语言中作为一种存储或传输数据的方式
YAML的设计目标是易于阅读和编写,同时保持足够的表达能力来表示复杂的数据结构
YAML文件的扩展名可以是.yaml或者.yaml
4.2.2、常见的数据交换格式
常见的数据存储和交换的格式有四种,它们各有特点和适用场景
Properties
- 这种格式主要用于Java应用程序中的配置文件。它是键值对的形式,每一行是一个键值对,使用等号或冒号分隔键和值。
- 特点是简单易懂,但在处理复杂结构的数据时显得力不从心。
XML (eXtensible Markup Language)
- XML是一种标记语言,用来描述数据的格式。它支持复杂的数据结构,包括嵌套和属性。
- XML文档具有良好的结构化特性,适合传输和存储结构化的数据。但是,XML文档通常体积较大,解析起来也比较耗资源。
JSON (JavaScript Object Notation)
- JSON是一种轻量级的数据交换格式,易于人阅读和编写,同时也易于机器解析和生成。它基于JavaScript的一个子集,支持多种数据类型,如数字、字符串、布尔值、数组和对象。
- JSON因为简洁和高效而广泛应用于Web应用程序之间进行数据交换。
YAML (YAML Ain’t Markup Language)
- YAML设计的目标之一就是让人类更容易阅读。它支持类似JSON的数据序列化,但提供了更多的灵活性,例如缩进来表示数据结构。
- YAML非常适合用来编写配置文件,因为它允许以一种自然的方式组织数据,并且可以包含注释和其他人类可读的元素。
总结来说这四种格式都可以用来存储和交换数据,但它们的设计初衷和最佳使用场景有所不同。选择哪种格式取决于具体的应用需求、数据复杂度、性能要求等因素。
4.2.3、语法规则
-
大小写敏感
-
YAML用
换行+空格来表示层级关系,每行结尾使用冒号结束缩进时不允许使用Tab键,只允许使用空格
缩进的空格数目不重要(大部分建议2个或4个空格),只要相同层级的元素左侧对齐即可
例如
-
properties文件中这样的配置myapp.name=mall -
yaml文件中就需要这样配置myapp: name: mall
-
-
同层级左侧对齐
例如
-
properties文件中有这样的配置myapp.name=mall myapp.count=10 -
yaml文件中就应该这样配置myapp: name: mall count: 10
-
-
属性名与属性值之间使用冒号+空格作为分隔
YAML使用
一个空格来分隔属性名和属性值例如
-
properties文件中这样的配置:name=jack -
yaml文件中需要这样配置myapp: name: mall
-
-
# 表示注释(从这个字符一直到行尾,都会被解析器忽略)
-
键必须是唯一的:在一个映射中键必须是唯一的
-
数据结构:YAML支持多种数据类型
包括以下几种类型
- 字符串:字符串可以不用引号标注
- 数字
- 布尔值
- 数组、list集合
- map键值对
- …
核心规则: 数据前面要加空格与冒号隔开
4.2.4、YML中的转义
普通文本也可以使用单引号或双引号括起来(当然普通文本也可以不使用单引号和双引号括起来)
-
单引号括起来
单引号内所有的内容都被当做普通文本,不转义(例如字符串中有\n,则\n被当做普通的字符串)
-
双引号括起来
双引号中有 \n 则会被转义为换行符
【示例】在测试模块springboot-04-004中测试
application.yml
# 测试单引号与双引号的转义区别
spring:
  name1: 'hello\tworld1\n'
  name2: "hello\tworld2\n"
Test01.java
package com.longdidi;

import org.junit.jupiter.api.Test;
import org.springframework.beans.factory.annotation.Value;
import org.springframework.boot.test.context.SpringBootTest;

@SpringBootTest
class Test01 {

    @Value("${spring.name1}")
    String name1;

    @Value("${spring.name2}")
    String name2;

    @Test
    public void test01() {
        System.out.println("name1:" + name1);
        System.out.println("name2:" + name2);
    }

}
测试结果

4.2.5、保留文本格式
"|"符号可以保留文本的格式,将文本写到这个符号的下层会自动保留格式
【示例】在模块springboot-04-004中测试
application.properties
# 测试|保留格式功能
test1:
  app1: |
    123
    234
    345
Test02.java单测代码
package com.longdidi;

import org.junit.jupiter.api.Test;
import org.springframework.beans.factory.annotation.Value;
import org.springframework.boot.test.context.SpringBootTest;

@SpringBootTest
class Test02 {

    @Value("${test1.app1}")
    String app1;

    @Test
    public void test01() {
        System.out.println("app1:" + app1);
    }

}
测试结果

4.2.6、文档切割
YAML 文件可以由一个或多个文档组成(也即相对独立的组织结构组成)
文档间使用"—" (三个横线)在每文档开始作为分隔符(如果只是单个文档则分隔符"—"可省略)
每个文档并不需要使用结束符"…"来表示结束,但是对于网络传输或者流来说,作为明确结束的符号有利于软件处理

4.2.7、数据表示形式
在模块springboot-04-005模块中测试
(1)、字面量(键值对)
纯量是最基本的、不可再分的值
包括
- 整数
- 浮点数
- 无穷数字
- 无效数字
- 空值
- Null
- 布尔值
- 时间
- 日期
使用":"(冒号) + 空格表示单个键值对
-
数值
数值直接以字面量的形式表示
#测试纯量的值 integer: 12345 # 读取yamL数据中的十进制数 second: 00000001 #读取yamL数据中的二进制数 octal: 012 # 读取yamL数据中的八进制数 hex: 0xFF # 读取yamL数据中的十六进制数 float: 1.23e+3 # 读取yamL数据中的浮点数,支持科学计数法 fixed: 13.67 # 读取yamL数据中的Double类型数据 -
布尔值
布尔值用true和false表示
isSet: true # 读取yamL数据中的布尔类型 -
无穷大数字
minmin: -.inf # 读取yamL数据中的负无穷大数据 -
无效数字
notNumber: .NaN # 读取yamL数据中的无效数字 -
读取空值
testempty: # 读取yamL数据中的空值 -
读取null值
null用"~"表示
testnull: ~ #读取yamL数据中的null值 -
时间
时间和日期之间使用T连接,最后使用+代表时区
#测试时间 time1: 2026-02-17T15:02:31+08:00 -
日期
日期必须使用yyyy-MM-dd格
#测试日期
date1: 1976-07-31
【示例】在模块springboot-04-005中测试
-
application.yml
#测试纯量的值 integer: 12345 # 读取yamL数据中的十进制数 second: 00000001 #读取yamL数据中的二进制数 octal: 012 # 读取yamL数据中的八进制数 hex: 0xFF # 读取yamL数据中的十六进制数 float: 1.23e+3 # 读取yamL数据中的浮点数,支持科学计数法 fixed: 13.67 # 读取yamL数据中的Double类型数据 minmin: -.inf # 读取yamL数据中的负无穷大数据 notNumber: .NaN # 读取yamL数据中的无效数字 testempty: # 读取yamL数据中的空值 testnull: ~ #读取yamL数据中的null值 isSet: true # 读取yamL数据中的布尔类型 testdate: 2025-08-23 # 读取yamL数据中的日期类型 datetime: 2025-08-23T02:02:00.1z # 读取yamL数据中的时间类型 -
SpringbootTest01.java
package com.longdidi; import org.junit.jupiter.api.Test; import org.springframework.beans.factory.annotation.Value; import org.springframework.boot.test.context.SpringBootTest; /** * 测试读取单一变量的值 */ @SpringBootTest class SpringbootTest01 { //读取yamL数据中的十进制数 @Value("${integer}") private Integer integer; //读取yamL数据中的二进制数 @Value("${second}") private Integer second; //读取yamL数据中的八进制数 @Value("${octal}") private Integer octal; //读取yamL数据中的十六进制数 @Value("${hex}") private Integer hex; //读取yamL数据中的浮点数 @Value("${float}") private Float floatnum; //读取yamL数据中的Double类型数据 @Value("${fixed}") private Double fixed; //读取yamL数据中的负无穷大数据 @Value("${minmin}") private Double minmin; //读取yamL数据中的无效数字 @Value("${notNumber}") private String notNumber; //读取yamL数据中的空值 @Value("${testempty}") private String testempty; //读取yamL数据中的null值 @Value("${testnull}") private String testnull; //读取yamL数据中的布尔类型 @Value("${isSet}") private Boolean isSet; //读取yamL数据中的日期类型 @Value("${testdate}") private String testdate; //读取yamL数据中的时间类型 @Value("${datetime}") private String datetime; @Test void testValue() { System.out.println("读取yamL数据中的十进制数=======:" + integer); System.out.println("读取yamL数据中的二进制数=======:" + second); System.out.println("读取yamL数据中的八进制数=======:" + octal); System.out.println("读取yamL数据中的十六进制数=======:" + hex); System.out.println("读取yamL数据中的浮点数=======:" + floatnum); System.out.println("读取yamL数据中的Double类型数据=======:" + fixed); System.out.println("读取yamL数据中的负无穷大数据=======:" + minmin); System.out.println("读取yamL数据中的无效数字=======:" + notNumber); System.out.println("读取yamL数据中的空值=======:" + testempty); System.out.println("读取yamL数据中的null值=======:" + testnull); System.out.println("读取yamL数据中的布尔类型=======:" + isSet); System.out.println("读取yamL数据中的日期类型=======:" + testdate); System.out.println("读取yamL数据中的时间类型=======:" + datetime); } } -
测试结果

(2)、字符串
字符串可以用引号表示,也可以不使用,可以使用双引号包裹特殊字符
-
字符串默认不使用引号表示
# 字符串默认不使用引号表示 str1: hello world -
字符串之中包含空格或特殊字符需要放在引号之中
#字符串之中包含空格或特殊字符需要放在引号之中 str2: 'hello: world' -
单引号不会对特殊字符转义,双引号会对特殊字符转义
#单引号不会对特殊字符转义,双引号会对特殊字符转义 str3: 'hello\tworld1\n' str4: "hello\tworld2\n" -
单引号之中如果还有单引号则必须连续使用两个单引号转义
#单引号之中如果还有单引号则必须连续使用两个单引号转义 str5: 'labor''s day' -
字符串可以写成多行,从第二行开始,必须有一个单空格缩进,换行符会被转为空格
# 字符串可以写成多行,从第二行开始,必须有一个单空格缩进,换行符会被转为空格 str6: this is a cat # 输出结果str6:this is a cat -
使用 “|” 和文本内容
使用 “|” 表示的块保留块中已有的回车换行
# 使用 "|" 和文本内容缩进表示的块:保留块中已有的回车换行 str7: | Foo Bar {this: 'Foo\nBar\n'} -
使用 “>” 和文本内容
使用 “>” 将块中回车替换为空格,最终连接成一行
# 使用 ">" 和文本内容缩进表示的块:将块中回车替换为空格,最终连接成一行 str8: > Foo Bar -
+表示保留文字块末尾的换行,-表示删除字符串末尾的换行
# +表示保留文字块末尾的换行,-表示删除字符串末尾的换行 str9: |+ Foo str10: |- Foo -
字符串之中可以插入 HTML 标记
#  字符串之中可以插入 HTML 标记
str11: |
  <p style="color: red">
    dog
  </p>
【测试】在模块springboot-04-005中测试
-
application.yml
##################测试字符串 # 1、字符串默认不使用引号表示 str1: hello world # 2、字符串之中包含空格或特殊字符需要放在引号之中 str2: 'hello: world' # 3、单引号不会对特殊字符转义,双引号会对特殊字符转义 str3: 'hello\tworld1\n' str4: "hello\tworld2\n" # 4、单引号之中如果还有单引号则必须连续使用两个单引号转义 str5: 'labor''s day' # 5、字符串可以写成多行,从第二行开始,必须有一个单空格缩进,换行符会被转为空格 str6: this is a cat # 6、使用 "|" 和文本内容缩进表示的块:保留块中已有的回车换行 str7: | Foo Bar {this: 'Foo\nBar\n'} # 7、使用 ">" 和文本内容缩进表示的块:将块中回车替换为空格,最终连接成一行 str8: > Foo Bar # 8、+表示保留文字块末尾的换行,-表示删除字符串末尾的换行 str9: |+ Foo str10: |- Foo # 9、字符串之中可以插入 HTML 标记 str11: | <p style="color: red"> dog </p> -
SpringbootTest02.java
package com.longdidi; import org.junit.jupiter.api.Test; import org.springframework.beans.factory.annotation.Value; import org.springframework.boot.test.context.SpringBootTest; @SpringBootTest class SpringbootTest02 { @Value("${str1}") String str1; @Value("${str2}") String str2; @Value("${str3}") String str3; @Value("${str4}") String str4; @Value("${str5}") String str5; @Value("${str6}") String str6; @Value("${str7}") String str7; @Value("${str8}") String str8; @Value("${str9}") String str9; @Value("${str10}") String str10; @Value("${str11}") String str11; @Test public void test01() { System.out.println("1===>字符串默认不使用引号表示str1:" + str1); System.out.println("2===>字符串之中包含空格或特殊字符需要放在引号之中str2:" + str2); System.out.println("3===>单引号不会对特殊字符转义str3:" + str3); System.out.println("3===>双引号会对特殊字符转义str4:" + str4); System.out.println("4===>单引号之中如果还有单引号则必须连续使用两个单引号转义str5:" + str5); System.out.println("5===>字符串可以写成多行,从第二行开始,必须有一个单空格缩进,换行符会被转为空格str6:" + str6); System.out.println("6===>使用 \"|\" 和文本内容缩进表示的块保留块中已有的回车换行str7:" + str7); System.out.println("7===>使用 \">\" 将块中回车替换为空格,最终连接成一行str8:" + str8); System.out.println("8===>+表示保留文字块末尾的换行str9:" + str9); System.out.println("8===>-表示删除字符串末尾的换行str10:" + str10); System.out.println("9===>字符串之中可以插入 HTML 标记str11:" + str11); } } -
测试结果

(3)、数组
在属性名书写位置的下方使用减号作为数据开始符号,每行书写一个数据,减号与数据间空格分隔
-
单个数组项
使用"-"(横线) + 单个空格表示单个列表项
#数组 likes: - game - music - sleep -
一组数据
使用"[]“表示一组数据,数据之间使用”,"逗号分隔
#数组
address: [北京,上海,重庆]
(4)、对象
-
语法格式
#对象 key1: key2: key...N: value值 -
使用示例
#对象
user:
  name: 赵丽颖
  age: 18
  address: 北京
(5)、对象+数组
-
格式1
users: - name: zhangsan age: 9 - name: lisi age: 20 -
格式2
users1: - name: zhangsan age: 9 - name: lisi age: 20 -
格式3
#这种格式中大括号内的键值之间不需要空格
users3: [{name:zhangsan,age:18},{name:lisi,age:17}]
(6)、锚点引用
- 使用 “&” 定义数据锚点(即要复制的数据)
- << 表示合并到当前数据
- 使用 “*” 引用上述锚点数据(即数据的复制目的地)
#############锚点使用
defaults: &defaults
  adapter: postgres
  host: localhost
development:
  database: myapp_development
  <<: *defaults
test:
  database: myapp_test
  <<: *defaults

#相当于
defaults1:
  adapter: postgres
  host: localhost
development1:
  database: myapp_development
  adapter: postgres
  host: localhost
test1:
  database: myapp_test
  adapter: postgres
  host: localhost
(7)、Map
使用"{}"表示一个键值表
语法
- key: {key1: value1, key2: value2, …}
示例
#键值表
items: {number: 1234, descript: cpu, price: ¥800.00}
(8)、组合表示
每个结构都可以嵌套组成复杂的表示结构
#组合,相当于{Color: [blue, red, green]}
Color:
  - blue
  - red
  - green

div:
  - border: {color: red, width: 2px}
  - background: {color: green}
  - padding: [0, 10px, 0, 10px]

# 使用缩进表示的键值表与列表项
# 相当于下面的JSON表示
# item: [{item:cpu, model:i3, price:¥800.00}, {item:HD, model:WD, price: ¥450.00}]
item:
  - item: cpu
    model: i3
    price: ¥800.00
  - item: HD
    model: WD
    price: ¥450.00
4.2.8、引用属性值
在配置文件中可以使用**${属性名}**方式引用属性值

如果属性中出现特殊字符,可以使用双引号包裹起来作为字符解析

3、绑定属性值
4.3.1、@Value()注解读取
@Value注解可以将application.properties/application.yml文件中的配置信息注入/绑定到java对象的属性上
(1)、读取单一值
- 使用@Value配合SpEL读取单个数据
- 如果数据存在多层级,依次书写层级名称即可
【测试】在模块springboot-04-006中测试
-
application.yml
#测试纯量的值 integer: 12345 # 读取yamL数据中的十进制数 second: 00000001 #读取yamL数据中的二进制数 octal: 012 # 读取yamL数据中的八进制数 hex: 0xFF # 读取yamL数据中的十六进制数 float: 1.23e+3 # 读取yamL数据中的浮点数,支持科学计数法 fixed: 13.67 # 读取yamL数据中的Double类型数据 minmin: -.inf # 读取yamL数据中的负无穷大数据 notNumber: .NaN # 读取yamL数据中的无效数字 testempty: # 读取yamL数据中的空值 testnull: ~ #读取yamL数据中的null值 isSet: true # 读取yamL数据中的布尔类型 testdate: 2025-08-23 # 读取yamL数据中的日期类型 datetime: 2025-08-23T02:02:00.1z # 读取yamL数据中的时间类型 -
ConfigTests01.java
package com.longdidi; import org.junit.jupiter.api.Test; import org.springframework.beans.factory.annotation.Value; import org.springframework.boot.test.context.SpringBootTest; /** * 测试读取单一变量的值 */ @SpringBootTest class ConfigTests01 { //读取yamL数据中的十进制数 @Value("${integer}") private Integer integer; //读取yamL数据中的二进制数 @Value("${second}") private Integer second; //读取yamL数据中的八进制数 @Value("${octal}") private Integer octal; //读取yamL数据中的十六进制数 @Value("${hex}") private Integer hex; //读取yamL数据中的浮点数 @Value("${float}") private Float floatnum; //读取yamL数据中的Double类型数据 @Value("${fixed}") private Double fixed; //读取yamL数据中的负无穷大数据 @Value("${minmin}") private Double minmin; //读取yamL数据中的无效数字 @Value("${notNumber}") private String notNumber; //读取yamL数据中的空值 @Value("${testempty}") private String testempty; //读取yamL数据中的null值 @Value("${testnull}") private String testnull; //读取yamL数据中的布尔类型 @Value("${isSet}") private Boolean isSet; //读取yamL数据中的日期类型 @Value("${testdate}") private String testdate; //读取yamL数据中的时间类型 @Value("${datetime}") private String datetime; @Test void testValue() { System.out.println("读取yamL数据中的十进制数=======:" + integer); System.out.println("读取yamL数据中的二进制数=======:" + second); System.out.println("读取yamL数据中的八进制数=======:" + octal); System.out.println("读取yamL数据中的十六进制数=======:" + hex); System.out.println("读取yamL数据中的浮点数=======:" + floatnum); System.out.println("读取yamL数据中的Double类型数据=======:" + fixed); System.out.println("读取yamL数据中的负无穷大数据=======:" + minmin); System.out.println("读取yamL数据中的无效数字=======:" + notNumber); System.out.println("读取yamL数据中的空值=======:" + testempty); System.out.println("读取yamL数据中的null值=======:" + testnull); System.out.println("读取yamL数据中的布尔类型=======:" + isSet); System.out.println("读取yamL数据中的日期类型=======:" + testdate); System.out.println("读取yamL数据中的时间类型=======:" + datetime); } } -
测试结果

(2)、读取数组的值
语法格式: @Value(“${对象名.属性名1.属性名2…属性名[数组下标]}”)
语法:
- 数组值使用“[下标]”获取
- 属性值使用“.”获取
【测试】在模块springboot-04-006中测试
-
application.yml
#数组 likes: - game - music - sleep #数组 address: [ 北京,上海,重庆 ] -
ConfigTest02.java
package com.longdidi; import org.junit.jupiter.api.Test; import org.springframework.beans.factory.annotation.Value; import org.springframework.boot.test.context.SpringBootTest; /** * 测试读取数组的值 */ @SpringBootTest class ConfigTests02 { //读取yamL数据中的数组数据 @Value("${likes[0]}") private String like; //读取yamL数据中的数组数据 @Value("${address[1]}") private String address; @Test void testValue() { System.out.println("like=======:" + like); System.out.println("address=======:" + address); } } -
测试结果

(3)、读取对象的值
语法: @Value(“${一级属性名.二级属性名…}”)
- 属性值使用“.”获取
【示例】在模块springboot-04-006中测试
-
application.yml
#对象 user: age: 18 address: province: 北京市 -
ConfigTest03.java
package com.longdidi; import org.junit.jupiter.api.Test; import org.springframework.beans.factory.annotation.Value; import org.springframework.boot.test.context.SpringBootTest; /** * 测试读取对象的值 */ @SpringBootTest class ConfigTests03 { //读取yamL数据中的对象1层数据 @Value("${user.age}") private String age; //读取yamL数据中的对象2层数据 @Value("${user.address.province}") private String province; @Test void testValue() { System.out.println("age=======:" + age); System.out.println("province=======:" + province); } } -
测试

(4)、读取对象+数组
语法
- 数组值使用“[下标]”获取
- 属性值使用“.”获取
【示例】在模块springboot-04-006中测试
-
application.yml
#对象+数组 user1: - age: 18 address: 北京市 - age: 20 address: 上海市 #数组 color: - [ blue, red, green ] # 列表项本身也是一个列表 - [ Age, Bag ] testborder: - border: [红色,绿色,蓝色] - padding: { number: 1234, descript: cpu, price: ¥800.00 } -
ConfigTests04.java
package com.longdidi; import org.junit.jupiter.api.Test; import org.springframework.beans.factory.annotation.Value; import org.springframework.boot.test.context.SpringBootTest; /** * 测试读取数组对象的值 */ @SpringBootTest class ConfigTests04 { //读取yamL数据中的数组对象数据 @Value("${user1[0].address}") private String address1; //读取yamL数据中的数组对象数据 @Value("${color[0][1]}") private String color0; //读取yamL数据中的数组对象数据 @Value("${testborder[0].border[2]}") private Object border; //读取yamL数据中的数组对象数据 @Value("${testborder[1].padding.number}") private Object padding; @Test void testValue() { System.out.println("address1=======:" + address1); System.out.println("color0=======:" + color0); System.out.println("border=======:" + border); System.out.println("padding=======:" + padding); } } -
测试

(5)、读取字符串的值
- 单引号中的特殊字符不会转义
- 双引号中的特殊字符会转义
【测试】在模块springboot-04-006中测试
-
application.yml
##################################测试字符串 ##################测试字符串 # 1、字符串默认不使用引号表示 str1: hello world # 2、字符串之中包含空格或特殊字符需要放在引号之中 str2: 'hello: world' # 3、单引号不会对特殊字符转义,双引号会对特殊字符转义 str3: 'hello\tworld1\n' str4: "hello\tworld2\n" # 4、单引号之中如果还有单引号则必须连续使用两个单引号转义 str5: 'labor''s day' # 5、字符串可以写成多行,从第二行开始,必须有一个单空格缩进,换行符会被转为空格 str6: this is a cat # 6、使用 "|" 和文本内容缩进表示的块:保留块中已有的回车换行 str7: | Foo Bar {this: 'Foo\nBar\n'} # 7、使用 ">" 和文本内容缩进表示的块:将块中回车替换为空格,最终连接成一行 str8: > Foo Bar # 8、+表示保留文字块末尾的换行,-表示删除字符串末尾的换行 str9: |+ Foo str10: |- Foo # 9、字符串之中可以插入 HTML 标记 str11: | <p style="color: red"> dog </p> -
ConfigTests05.java
package com.longdidi; import org.junit.jupiter.api.Test; import org.springframework.beans.factory.annotation.Value; import org.springframework.boot.test.context.SpringBootTest; @SpringBootTest public class ConfigTests05 { @Value("${str1}") String str1; @Value("${str2}") String str2; @Value("${str3}") String str3; @Value("${str4}") String str4; @Value("${str5}") String str5; @Value("${str6}") String str6; @Value("${str7}") String str7; @Value("${str8}") String str8; @Value("${str9}") String str9; @Value("${str10}") String str10; @Value("${str11}") String str11; @Test public void test01() { System.out.println("1===>字符串默认不使用引号表示str1:" + str1); System.out.println("2===>字符串之中包含空格或特殊字符需要放在引号之中str2:" + str2); System.out.println("3===>单引号不会对特殊字符转义str3:" + str3); System.out.println("3===>双引号会对特殊字符转义str4:" + str4); System.out.println("4===>单引号之中如果还有单引号则必须连续使用两个单引号转义str5:" + str5); System.out.println("5===>字符串可以写成多行,从第二行开始,必须有一个单空格缩进,换行符会被转为空格str6:" + str6); System.out.println("6===>使用 \"|\" 和文本内容缩进表示的块保留块中已有的回车换行str7:" + str7); System.out.println("7===>使用 \">\" 将块中回车替换为空格,最终连接成一行str8:" + str8); System.out.println("8===>+表示保留文字块末尾的换行str9:" + str9); System.out.println("8===>-表示删除字符串末尾的换行str10:" + str10); System.out.println("9===>字符串之中可以插入 HTML 标记str11:" + str11); } } -
测试

(6)、读取键值表的值
语法: @Value(“${一级属性名.二级属性名…}”)
- 属性值使用“.”获取
【测试】在模块springboot-04-006中测试
-
application.yml
#键值表 items: { number: 1234, descript: cpu, price: ¥800.00 } -
ConfigTests06.java
package com.longdidi; import org.junit.jupiter.api.Test; import org.springframework.beans.factory.annotation.Value; import org.springframework.boot.test.context.SpringBootTest; /** * 测试读取键值表的值 */ @SpringBootTest public class ConfigTests06 { //读取yamL数据中键值表数据 @Value("${items.number}") private String number; @Test void testValue() { System.out.println("number=======:" + number); } } -
测试

(7)、读取锚点引用的值
语法: @Value(“${一级属性名.二级属性名…}”)
- 属性值使用“.”获取
【测试】在模块springboot-04-006中测试
-
application.yml
###########################引用 #############锚点使用 defaults: &defaults adapter: postgres host: localhost development: database: myapp_development <<: *defaults test: database: myapp_test <<: *defaults #相当于 defaults1: adapter: postgres host: localhost development1: database: myapp_development adapter: postgres host: localhost test1: database: myapp_test adapter: postgres host: localhost -
ConfigTests07.java
package com.longdidi; import org.junit.jupiter.api.Test; import org.springframework.beans.factory.annotation.Value; import org.springframework.boot.test.context.SpringBootTest; /** * 测试读取锚点值 */ @SpringBootTest public class ConfigTests07 { //读取yamL数据中锚点数据数据 @Value("${defaults.adapter}") private String adapter1; @Value("${defaults.host}") private String host1; @Value("${development.adapter}") private String adapter2; @Value("${development.host}") private String host2; @Value("${development.database}") private String database2; @Value("${test.adapter}") private String adapter3; @Value("${test.host}") private String host3; @Value("${test.database}") private String database3; @Test void testValue() { System.out.println("adapter1=======:" + adapter1); System.out.println("host1=======:" + host1); System.out.println("adapter2=======:" + adapter2); System.out.println("host2=======:" + host2); System.out.println("database2=======:" + database2); System.out.println("adapter3=======:" + adapter3); System.out.println("host3=======:" + host3); System.out.println("database3=======:" + database3); } } -
测试

4.3.2、Environment读取
SpringBoot框架在启动的时候会将系统配置、环境信息全部封装到Environment对象中。如果要获取这些环境信息可以调用Environment接口的方法
在Spring Boot中,Environment接口提供了访问应用程序环境信息的方法,比如活动配置文件、系统环境变量、命令行参数等。Environment接口由Spring框架提供,Spring Boot应用程序通常会使用Spring提供的实现类AbstractEnvironment及其子类来实现具体的环境功能。
Environment对象封装的主要数据包括:
- Active Profiles: 当前激活的配置文件列表。Spring Boot允许应用程序定义不同的环境配置文件(如开发环境、测试环境和生产环境),通过激活不同的配置文件来改变应用程序的行为。
- System Properties: 系统属性,通常是操作系统级别的属性,比如操作系统名称、Java版本等。
- System Environment Variables: 系统环境变量,这些变量通常是由操作系统提供的,可以在启动应用程序时设置特定的值。
- Command Line Arguments: 应用程序启动时传递给主方法的命令行参数。
- Property Sources:
Environment还包含了一个PropertySource列表,这个列表包含了从不同来源加载的所有属性。PropertySource可以来自多种地方,比如配置文件、系统属性、环境变量等。
【测试】在模块springboot-04-007中测试
-
application.yml
#测试纯量的值 integer: 12345 # 整数标准形式 #对象 user: age: 18 address: province: 北京市 #数组 likes: - music - sleep #数组 address: [ 北京,重庆 ] #对象+数组 user1: - age: 18 address: 北京市 - age: 20 address: 上海市 #数组 color: - [ blue, red, green ] # 列表项本身也是一个列表 - [ Age, Bag ] testborder: - border: [ 红色,绿色, ] - padding: { number: 1234, descript: cpu, price: ¥800.00 } #键值表 items: { number: 1234, descript: cpu, price: ¥800.00 } #测试引号 baseDir: c:\windows tempDir1: ${baseDir}\temp tempDir2: '${baseDir}\temp \t1 \t2 \t3' tempDir3: "${baseDir}\temp \t1 \t2 \t3" -
ConfigTests01.java
package com.longdidi; import org.junit.jupiter.api.Test; import org.springframework.beans.factory.annotation.Autowired; import org.springframework.boot.test.context.SpringBootTest; import org.springframework.core.env.Environment; /** * 测试使用Environment获取变量的值 */ @SpringBootTest class ConfigTests01 { @Autowired private Environment env; @Test void testValue() { System.out.println("integer=======:" + env.getProperty("integer")); System.out.println("user.age=======:" + env.getProperty("user.age")); System.out.println("user.address.province=======:" + env.getProperty("user.address.province")); System.out.println("likes[0]=======:" + env.getProperty("likes[0]")); System.out.println("address[1]=======:" + env.getProperty("address[1]")); System.out.println("user1[0].address=======:" + env.getProperty("user1[0].address")); System.out.println("color[0][1]=======:" + env.getProperty("color[0][1]")); System.out.println("testborder[0].border[2]=======:" + env.getProperty("testborder[0].border[2]")); System.out.println("testborder[1].padding.number=======:" + env.getProperty("testborder[1].padding.number")); System.out.println("items.number=======:" + env.getProperty("items.number")); System.out.println("tempDir1=======:" + env.getProperty("tempDir1")); System.out.println("tempDir2=======:" + env.getProperty("tempDir2")); System.out.println("tempDir3=======:" + env.getProperty("tempDir3")); } }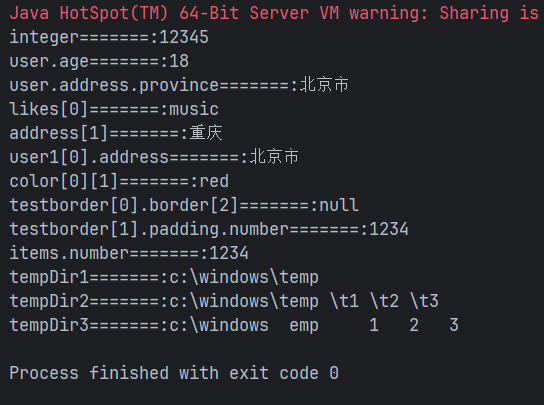 -
测试结果
4.3.3、@PropertySource()注解读取
SpringBoot支持自定义配置文件,自定义配置文件不能被SpringBoot自动加载,需要手动去进行加载
无论对于哪里的配置文件,当需要使用其中配置内容的时候,就在当前类的顶部加注@PropertySource(“classpath:xxx.properties”)注解加载指定的配置文件
步骤
-
声明为配置类
配置类上使用@Configuration标注以便纳入IOC容器管理
-
指定数据来源
用这个注解来指定数据来源
@PropertySource(“classpath:配置文件路径”)
-
指定前缀
使用@ConfigurationProperties(prefix = “前缀”)注解指定前缀
【示例】在模块springboot-04-008中测试
-
mail.properties
# mail.properties文件 mail.host=smtp.sina.com mail.port=25 -
MailConfig.java
package com.longdidi.config; import org.springframework.boot.context.properties.ConfigurationProperties; import org.springframework.context.annotation.Configuration; import org.springframework.context.annotation.PropertySource; // 声明为配置类 @Configuration // 指定前缀 @ConfigurationProperties(prefix = "mail") // 用这个注解来指定数据来源 @PropertySource("classpath:mail.properties") public class MailConfig { public String host; public String port; public String getHost() { return host; } public void setHost(String host) { this.host = host; } public String getPort() { return port; } public void setPort(String port) { this.port = port; } @Override public String toString() { return "MailConfig{" + "host='" + host + '\'' + ", port='" + port + '\'' + '}'; } } -
MailConfigController
package com.longdidi.controller; import com.longdidi.config.MailConfig; import org.springframework.beans.factory.annotation.Autowired; import org.springframework.web.bind.annotation.RequestMapping; import org.springframework.web.bind.annotation.RestController; @RestController public class MailConfigController { @Autowired private MailConfig mailConfig; @RequestMapping("/testMail") public String test01() { return mailConfig.toString(); } } -
测试
http://localhost:8080/testMail

4.3.4、读取XML配置
如果项目中有这种老的Spring XML配置文件可以使用@ImportResource(“classpath:xml配置文件路径”)注解可以让XML生效
该注解需要添加到SpringBoot主入口类上
【示例】在模块springboot-04-008中测试
-
applicationContext.xml
<?xml version="1.0" encoding="UTF-8"?> <beans xmlns="http://www.springframework.org/schema/beans" xmlns:xsi="http://www.w3.org/2001/XMLSchema-instance" xsi:schemaLocation="http://www.springframework.org/schema/beans http://www.springframework.org/schema/beans/spring-beans.xsd"> <bean id="phone" class="com.longdidi.bean.Phone"> <property name="size" value="15cm"/> <property name="price" value="8000"/> </bean> </beans> -
Phone类
package com.longdidi.bean; public class Phone { private String size; private String price; public String getSize() { return size; } public void setSize(String size) { this.size = size; } public String getPrice() { return price; } public void setPrice(String price) { this.price = price; } @Override public String toString() { return "Phone{" + "size='" + size + '\'' + ", price='" + price + '\'' + '}'; } } -
加载xml配置文件
在Springboot入口程序上添加@ImportResource(“classpath:/applicationContext.xml”)注解来加载xml配置文件
package com.longdidi; import com.longdidi.config.App3Config; import org.springframework.boot.SpringApplication; import org.springframework.boot.autoconfigure.SpringBootApplication; import org.springframework.boot.context.properties.ConfigurationPropertiesScan; import org.springframework.boot.context.properties.EnableConfigurationProperties; import org.springframework.context.annotation.ImportResource; @ImportResource("classpath:/applicationContext.xml") @EnableConfigurationProperties(App3Config.class) @ConfigurationPropertiesScan(basePackages = "com.longdidi.config") @SpringBootApplication public class Springboot04008Application { public static void main(String[] args) { SpringApplication.run(Springboot04008Application.class, args); } } -
PhoneController
package com.longdidi.controller; import com.longdidi.bean.Phone; import jakarta.annotation.Resource; import org.springframework.web.bind.annotation.RequestMapping; import org.springframework.web.bind.annotation.RestController; @RestController public class PhoneController { @Resource Phone phone; @RequestMapping("/testPhone") public String test01() { return phone.toString(); } } -
测试
http://localhost:8080/testPhone

4、配置属性绑定到Bean
SpringBoot配置文件中的信息除了可以使用@Value注解读取之外,也可以将配置信息一次性赋值给Bean对象的属性
将配置项与一个JavaBean绑定起来使用,这样绑定一次就可以随时使用
-
要绑定的bean需纳入IOC容器管理
将bean纳入IOC容器管理有以下几种方式
-
@Component:目的是为了这个JavaBean在项目启动时候被扫描到并加载到Spring容器之中
-
@Configuration注解:
@Configuration注解的底层就是@Component,但是二者意义不同
@Configuration注解侧重配置之意,@Component侧重组件之意
当然配置也是项目组件之一,在这里要将配置文件属性与JavaBean绑定,当然更侧重配置之意
-
@EnableConfigurationProperties
标注在SpringBoot主入口程序上
指定要加载的配置类文件
-
@ConfigurationPropertiesScan
标注在SpringBoot主入口程序上
指定要扫描的包路径
-
-
指定要绑定的属性前缀
被绑定的bean需要使用
@ConfigurationProperties(prefix = "前缀")注解进行标注,prefix用来指定前缀可以将其理解为绑定专用注解

它的作用就是将指定的前缀的配置项的值与JavaBean的字段绑定
注意:为了绑定成功,一般将字段的名称与配置项键的最后一个键名相同,这样整个键在去掉前缀的情况下就和字段名称一致,以此来进行绑定

-
bean中的所有属性都提供了
setter方法,因为底层是通过setter方法给bean属性赋值的
-
定义属性文件
在配置文件中根据指定的前缀来定义配置项
将配置与JavaBean绑定之后就可以通过JavaBean来获取配置的内容,而且JavaBean已经被@Component注解或者@Configuration注解加载到Spring容器,可以使用自动注入的方式在其他类中随便使用
4.4.1、四种绑定方式示例
(1)、@Component
因为application.properties文件会被自动加载,也就是说配置项会被自动加载到Spring容器之中,省去了手动加载的配置
在要与属性绑定的JavaBean的类定义顶部加@Component注解和@ConfigurationProperties(prefix=“key”)注解
-
@Component
目的是为了这个JavaBean可以被SpringBoot项目启动时候被扫描到并加载到Spring容器之中
-
@ConfigurationProperties(prefix=“key”)
注解加注在JavaBean类定义之上,就是属性绑定注解
可以将其理解为绑定专用注解
它的作用就是将指定的前缀的配置项的值与JavaBean的字段绑定,这里要注意,为了绑定的成功,一般将字段的名称与配置项键的最后一个键名相同,这样整个键在去掉前缀的情况下就和字段名称一致,以此来进行绑定
【示例】在模块springboot-04-008中测试
-
application.yml
# @Component app1: name: jack1 age: 30 email: jack1@123.com -
App1Config.java
package com.longdidi.config; import org.springframework.boot.context.properties.ConfigurationProperties; import org.springframework.stereotype.Component; @Component @ConfigurationProperties(prefix = "app1") public class App1Config { private String name; private Integer age; private String email; @Override public String toString() { return "App1Config{" + "name='" + name + '\'' + ", age=" + age + ", email='" + email + '\'' + '}'; } public String getName() { return name; } public void setName(String name) { this.name = name; } public Integer getAge() { return age; } public void setAge(Integer age) { this.age = age; } public String getEmail() { return email; } public void setEmail(String email) { this.email = email; } } -
App1ConfigController.java
package com.longdidi.controller; import com.longdidi.config.App1Config; import org.springframework.beans.factory.annotation.Autowired; import org.springframework.web.bind.annotation.RequestMapping; import org.springframework.web.bind.annotation.RestController; @RestController public class App1ConfigController { @Autowired private App1Config app1Config; @RequestMapping("/testApp1") public String test01() { return app1Config.toString(); } } -
测试
访问http://localhost:8080/testApp1

说明:
-
被绑定的bean需要使用
@ConfigurationProperties(prefix = "app1")注解进行标注,prefix用来指定前缀
-
配置文件中的
name、age、email要和bean对象的属性名name、age、email对应上(属性名相同)并且bean中的所有属性都提供了
setter方法,因为底层是通过setter方法给bean属性赋值的
-
bean的属性需要是
非static的属性
(2)、@Configuration
以上操作中使用了@Component注解进行了标注来纳入IoC容器的管理
也可以使用另外一个注解@Configuration,用这个注解将Bean标注为配置类
@Configuration注解的底层就是@Component,但是二者意义不同
@Configuration注解侧重配置之意,@Component侧重组件之意
当然配置也是项目组件之一,在这里要将配置文件属性与JavaBean绑定,当然更侧重配置之意
多数情况下我们会选择使用这个注解,因为该Bean对象的属性对应的就是配置文件中的配置信息
【示例】在模块springboot-04-008中测试
-
application.yml
# @Configuration app2: name: jack2 age: 30 email: jack2@123.com -
App2Config.java
package com.longdidi.config; import org.springframework.boot.context.properties.ConfigurationProperties; import org.springframework.context.annotation.Configuration; @Configuration @ConfigurationProperties(prefix = "app2") public class App2Config { private String name; private Integer age; private String email; @Override public String toString() { return "App2Config{" + "name='" + name + '\'' + ", age=" + age + ", email='" + email + '\'' + '}'; } public String getName() { return name; } public void setName(String name) { this.name = name; } public Integer getAge() { return age; } public void setAge(Integer age) { this.age = age; } public String getEmail() { return email; } public void setEmail(String email) { this.email = email; } } -
App2ConfigController.java
package com.longdidi.controller; import com.longdidi.config.App2Config; import org.springframework.beans.factory.annotation.Autowired; import org.springframework.web.bind.annotation.RequestMapping; import org.springframework.web.bind.annotation.RestController; @RestController public class App2ConfigController { @Autowired private App2Config app2Config; @RequestMapping("/testApp2") public String test01() { return app2Config.toString(); } } -
测试
http://localhost:8080/testApp2


(3)、@EnableConfigurationProperties
@EnableConfigurationProperties标注在SpringBoot主入口程序上
指定要加载的配置类文件

【示例】在模块springboot-04-008中测试
-
application.yml
# @EnableConfigurationProperties app3: name: jack3 age: 30 email: jack3@123.com -
App3Config.java
配置类中使用@ConfigurationProperties注解绑定前缀
package com.longdidi.config; import org.springframework.boot.context.properties.ConfigurationProperties; @ConfigurationProperties(prefix = "app3") public class App3Config { private String name; private Integer age; private String email; @Override public String toString() { return "App3Config{" + "name='" + name + '\'' + ", age=" + age + ", email='" + email + '\'' + '}'; } public String getName() { return name; } public void setName(String name) { this.name = name; } public Integer getAge() { return age; } public void setAge(Integer age) { this.age = age; } public String getEmail() { return email; } public void setEmail(String email) { this.email = email; } } -
启动类配置
启动类上使用@EnableConfigurationProperties(App3Config.class)指定配置类
package com.longdidi; import com.longdidi.config.App3Config; import org.springframework.boot.SpringApplication; import org.springframework.boot.autoconfigure.SpringBootApplication; import org.springframework.boot.context.properties.EnableConfigurationProperties; @EnableConfigurationProperties(App3Config.class) @SpringBootApplication public class Springboot04008Application { public static void main(String[] args) { SpringApplication.run(Springboot04008Application.class, args); } } -
App3ConfigController.java
package com.longdidi.controller; import com.longdidi.config.App3Config; import org.springframework.beans.factory.annotation.Autowired; import org.springframework.web.bind.annotation.RequestMapping; import org.springframework.web.bind.annotation.RestController; @RestController public class App3ConfigController { @Autowired private App3Config app3Config; @RequestMapping("/testApp3") public String test01() { return app3Config.toString(); } } -
测试
http://localhost:8080/testApp3

(4)、@ConfigurationPropertiesScan
@ConfigurationPropertiesScan标注在SpringBoot主入口程序上
指定要扫描的路径
【测试】在模块springboot-04-008中测试
-
application.yml
# @ConfigurationPropertiesScan app4: name: jack4 age: 30 email: jack4@123.com -
App4Config.java
使用@ConfigurationProperties注解配置前缀
package com.longdidi.config; import org.springframework.boot.context.properties.ConfigurationProperties; @ConfigurationProperties(prefix = "app4") public class App4Config { private String name; private Integer age; private String email; @Override public String toString() { return "App4Config{" + "name='" + name + '\'' + ", age=" + age + ", email='" + email + '\'' + '}'; } public String getName() { return name; } public void setName(String name) { this.name = name; } public Integer getAge() { return age; } public void setAge(Integer age) { this.age = age; } public String getEmail() { return email; } public void setEmail(String email) { this.email = email; } } -
启动类配置
使用@ConfigurationPropertiesScan注解扫描配置类的路径
package com.longdidi; import org.springframework.boot.SpringApplication; import org.springframework.boot.autoconfigure.SpringBootApplication; import org.springframework.boot.context.properties.ConfigurationPropertiesScan; //@EnableConfigurationProperties(App3Config.class) @ConfigurationPropertiesScan(basePackages = "com.longdidi.config") @SpringBootApplication public class Springboot04008Application { public static void main(String[] args) { SpringApplication.run(Springboot04008Application.class, args); } } -
App4ConfigController.java
package com.longdidi.controller; import com.longdidi.config.App4Config; import org.springframework.beans.factory.annotation.Autowired; import org.springframework.web.bind.annotation.RequestMapping; import org.springframework.web.bind.annotation.RestController; @RestController public class App4ConfigController { @Autowired private App4Config app4Config; @RequestMapping("/testApp4") public String test01() { return app4Config.toString(); } } -
测试
http://localhost:8080/testApp4

4.4.2、绑定类型示例
(1)、绑定简单Bean

【示例】在模块springboot-04-008中测试
-
application.yml
# 绑定简单bean user1: name: lucy email: lucy@123.com -
User1Config.java
package com.longdidi.config; import org.springframework.boot.context.properties.ConfigurationProperties; import org.springframework.context.annotation.Configuration; @Configuration @ConfigurationProperties(prefix = "user1") public class User1Config { private String name; private String email; public String getName() { return name; } public void setName(String name) { this.name = name; } public String getEmail() { return email; } public void setEmail(String email) { this.email = email; } @Override public String toString() { return "User1Config{" + "name='" + name + '\'' + ", email='" + email + '\'' + '}'; } } -
User1ConfigController.java
package com.longdidi.controller; import com.longdidi.config.User1Config; import org.springframework.beans.factory.annotation.Autowired; import org.springframework.web.bind.annotation.RequestMapping; import org.springframework.web.bind.annotation.RestController; @RestController public class User1ConfigController { @Autowired private User1Config user1Config; @RequestMapping("/testUser1") public String test01() { return user1Config.toString(); } } -
测试
http://localhost:8080/testUser1

(2)、绑定嵌套Bean
当一个Bean中嵌套了一个Bean也可以将配置信息绑定到该Bean上

【示例】在模块springboot-04-008中测试
-
application.yml
# 绑定嵌套bean person: name: lucy email: lucy@123.com address: city: BJ street: ChaoYang -
Person.java
package com.longdidi.bean; import org.springframework.boot.context.properties.ConfigurationProperties; import org.springframework.context.annotation.Configuration; @Configuration(proxyBeanMethods = false) @ConfigurationProperties(prefix = "person") public class Person { private String name; private String email; private Address address; public String getName() { return name; } public void setName(String name) { this.name = name; } public String getEmail() { return email; } public void setEmail(String email) { this.email = email; } public Address getAddress() { return address; } public void setAddress(Address address) { this.address = address; } @Override public String toString() { return "Person{" + "name='" + name + '\'' + ", email='" + email + '\'' + ", address=" + address + '}'; } } -
Address.java
package com.longdidi.bean; public class Address { private String city; private String street; public String getCity() { return city; } public void setCity(String city) { this.city = city; } public String getStreet() { return street; } public void setStreet(String street) { this.street = street; } @Override public String toString() { return "Address{" + "city='" + city + '\'' + ", street='" + street + '\'' + '}'; } } -
PersonConfigController.java
package com.longdidi.controller; import com.longdidi.bean.Person; import org.springframework.beans.factory.annotation.Autowired; import org.springframework.web.bind.annotation.RequestMapping; import org.springframework.web.bind.annotation.RestController; @RestController public class PersonConfigController { @Autowired private Person person; @RequestMapping("/testPerson") public String test01() { return person.toString(); } } -
测试
http://localhost:8080/testPerson

(3)、绑定到Map/List/Array
绑定时要看除去前缀以后,剩下的部分每个层级是什么数据类型,就在JavaBean中对应的层级定义什么样的数据类型

【示例】在模块springboot-04-008中测试
-
application.yml
# 绑定到Map/list/数组 more: data: # 数组第一种形式:数组中元素是简单类型 names1: - tom2 - smith2 # 数组第二种形式:数组中元素是简单类型 names2: [jack, lucy] # 数组中元素是bean # addrArray: addr-array: - city: BeiJing2 street: ChaoYang2 - city: TianJin2 street: NanKai2 # List集合:集合中的元素是bean # addrList: addr-list: - city: BeiJing_List2 street: ChaoYang_List2 - city: TianJin_List2 street: NanKai_List2 # Map集合:String,Bean addrs: addr1: city: BeiJing_Map2 street: ChaoYang_Map2 addr2: city: TianJin_Map2 street: NanKai_Map2 -
More1Config.java
package com.longdidi.config; import com.longdidi.bean.Address; import org.springframework.boot.context.properties.ConfigurationProperties; import java.util.Arrays; import java.util.List; import java.util.Map; @ConfigurationProperties(prefix = "more.data") public class More1Config { // 组第一种形式:数组中元素是简单类型 private String[] names1; // 数组第二种形式:数组中元素是简单类型 private String[] names2; // 数组:数组中元素是bean private Address[] addrArray; // List集合:集合中的元素是bean private List<Address> addrList; // Map集合:String,Bean private Map<String, Address> addrs; public String[] getNames1() { return names1; } public void setNames1(String[] names1) { this.names1 = names1; } public String[] getNames2() { return names2; } public void setNames2(String[] names2) { this.names2 = names2; } public Address[] getAddrArray() { return addrArray; } public void setAddrArray(Address[] addrArray) { this.addrArray = addrArray; } public List<Address> getAddrList() { return addrList; } public void setAddrList(List<Address> addrList) { this.addrList = addrList; } public Map<String, Address> getAddrs() { return addrs; } public void setAddrs(Map<String, Address> addrs) { this.addrs = addrs; } @Override public String toString() { return "More1Config{" + "names1=" + Arrays.toString(names1) + ", names2=" + Arrays.toString(names2) + ", addrArray=" + Arrays.toString(addrArray) + ", addrList=" + addrList + ", addrs=" + addrs + '}'; } } -
Address.java
package com.longdidi.bean; public class Address { private String city; private String street; public String getCity() { return city; } public void setCity(String city) { this.city = city; } public String getStreet() { return street; } public void setStreet(String street) { this.street = street; } @Override public String toString() { return "Address{" + "city='" + city + '\'' + ", street='" + street + '\'' + '}'; } } -
More1ConfigController
package com.longdidi.controller; import com.longdidi.config.More1Config; import org.springframework.beans.factory.annotation.Autowired; import org.springframework.web.bind.annotation.RequestMapping; import org.springframework.web.bind.annotation.RestController; @RestController public class More1ConfigController { @Autowired private More1Config more1Config; @RequestMapping("/testMore1") public String test01() { return more1Config.toString(); } } -
测试
http://localhost:8080/testMore1

(4)、绑定到第三方对象
将配置文件中的信息绑定到某个Bean对象上,如果这个Bean对象没有源码,是第三方库提供的,此时可以单独编写一个方法,在方法上使用以下两个注解进行标注:
- @Bean
- @ConfigurationProperties

【示例】在模块springboot-04-008中测试
假设有这样一个类Street,代码如下:
package com.longdidi.bean;

public class Street {
    private String city;
    private String street;

    public void setCity(String city) {
        this.city = city;
    }

    public void setStreet(String street) {
        this.street = street;
    }

    @Override
    public String toString() {
        return "Street{" +
                "city='" + city + '\'' +
                ", street='" + street + '\'' +
                '}';
    }
}
当然这里是模拟的,应该看不到这个类的源码,只知道有这样一个字节码Street.class。也可以看到这个Street类上没有添加任何注解
假设要将以下配置绑定到这个Bean上
# 绑定到源码
other:
  abc:
    city: BEIJING
    street: tongzhouqu
实现代码如下
package com.longdidi.config;

import com.longdidi.bean.Street;
import org.springframework.boot.context.properties.ConfigurationProperties;
import org.springframework.context.annotation.Bean;
import org.springframework.context.annotation.Configuration;

// 指定该类是一个配置类
@Configuration
public class StreetConfig {
    // 假设Street类是第三方库提供的类,使用以下方式可以完成配置到bean的属性的绑定
    // 纳入IoC容器的管理
    @Bean
    // 将配置文件中凡是以 other.abc 开头的配置数据绑定到Street对象的属性上
    @ConfigurationProperties(prefix = "other.abc")
    public Street street() {
        return new Street();
    }

}
编写测试类
package com.longdidi.controller;

import com.longdidi.config.StreetConfig;
import org.springframework.beans.factory.annotation.Autowired;
import org.springframework.web.bind.annotation.RequestMapping;
import org.springframework.web.bind.annotation.RestController;

@RestController
public class StreetConfigController {
    @Autowired
    StreetConfig streetConfig;

    @RequestMapping("/testStreet")
    public String test01() {
        return streetConfig.street().toString();
    }
}
测试http://localhost:8080/testStreet

4.4.3、自定义配置绑定到Bean
之前所讲的内容是将Spring Boot框架默认的配置文件application.properties或application.yml作为数据的来源绑定到Bean上
如果是自定义的配置文件,可以使用@PropertySource注解指定配置文件的位置,这个配置文件可是.properties,也可以是.xml
配置类需要使用三个注解标注
- @Configuration:指定该类为配置类,纳入Spring容器的管理
- @ConfigurationProperties(prefix = “group”):将配置文件中的值赋值给Bean对象的属性
- @PropertySource(“classpath:a/b/group-info.properties”):指定额外的配置文件
【示例】在模块springboot-04-008中测试
-
创建配置文件
在
resources目录下新建a目录,在a目录下新建b目录,b目录中新建group-info.properties文件,进行如下的配置group.name=IT group.leader=LaoDu group.count=20 -
定义Java类
Group,然后进行注解标注package com.longdidi.config; import org.springframework.boot.context.properties.ConfigurationProperties; import org.springframework.context.annotation.Configuration; import org.springframework.context.annotation.PropertySource; // 声明为配置类 @Configuration // 指定前缀 @ConfigurationProperties(prefix = "group") // 用这个注解来指定数据来源 @PropertySource("classpath:/a/b/group-info.properties") public class GroupConfig { private String name; private String leader; private Integer count; @Override public String toString() { return "GroupConfig{" + "name='" + name + '\'' + ", leader='" + leader + '\'' + ", count=" + count + '}'; } public void setName(String name) { this.name = name; } public void setLeader(String leader) { this.leader = leader; } public void setCount(Integer count) { this.count = count; } } -
创建测试类
package com.longdidi.controller;

import com.longdidi.config.GroupConfig;
import org.springframework.beans.factory.annotation.Autowired;
import org.springframework.web.bind.annotation.RequestMapping;
import org.springframework.web.bind.annotation.RestController;

@RestController
public class GroupConfigController {
    @Autowired
    GroupConfig groupConfig;

    @RequestMapping("/testGroup")
    public String test01() {
        return groupConfig.toString();
    }
}
-
测试
http://localhost:8080/testGroup

5、配置文件合并
一个项目中所有的配置全部编写到application.properties文件中会导致配置臃肿、不易维护
有时我们会将配置编写到不同的文件中
例如:application-mysql.properties专门配置mysql的信息,application-redis.properties专门配置redis的信息,最终将两个配置文件合并到一个配置文件中
4.5.1、properties文件合并
可以使用spring.config.import来加载多个properties配置文件
【示例】在springboot-04-009模块中测试
-
定义application-mysql.properties属性文件
spring.datasource.username=root spring.datasource.password=123456 -
定义application-redis.properties属性文件
spring.data.redis.host=localhost spring.data.redis.port=6379 -
定义application.properties属性文件
spring.config.import=classpath:application-mysql.properties,classpath:application-redis.properties -
编写配置类
package com.longdidi.config; import org.springframework.beans.factory.annotation.Value; import org.springframework.context.annotation.Configuration; @Configuration public class AppConfig { @Value("${spring.datasource.username}") private String mysqlUsername; @Value("${spring.datasource.password}") private String mysqlPassword; @Value("${spring.data.redis.host}") private String redisHost; @Value("${spring.data.redis.port}") private String redisPort; public void printInfo() { System.out.println(mysqlUsername + "," + mysqlPassword + "," + redisHost + "," + redisPort); } } -
编写单元测试
package com.longdidi; import com.longdidi.config.AppConfig; import org.junit.jupiter.api.Test; import org.springframework.beans.factory.annotation.Autowired; import org.springframework.boot.test.context.SpringBootTest; @SpringBootTest class Tests01 { @Autowired private AppConfig appConfig; @Test void test01() { appConfig.printInfo(); } } -
测试

4.5.2、yml文件合并
在yml文件中可以使用如下配置合并多个配置文件
spring:
  config:
    import:
      - classpath:配置文件1.yml
      - classpath:配置文件2.yml
【示例】在springboot-04-009模块中测试
-
定义application-mysql.yml属性文件
spring: datasource: username: rootyml password: 123456yml -
定义application-redis.yml属性文件
spring: data: redis: host: localhostyml port: 6379 -
定义application.yml属性文件
spring: config: import: - classpath:/config/application-mysql.yml - classpath:/config/application-redis.yml # import: [classpath:/config/application-mysql.yml, classpath:/config/application-redis.yml] -
编写配置类
package com.longdidi.config; import org.springframework.beans.factory.annotation.Value; import org.springframework.context.annotation.Configuration; @Configuration public class AppConfig { @Value("${spring.datasource.username}") private String mysqlUsername; @Value("${spring.datasource.password}") private String mysqlPassword; @Value("${spring.data.redis.host}") private String redisHost; @Value("${spring.data.redis.port}") private String redisPort; public void printInfo() { System.out.println(mysqlUsername + "," + mysqlPassword + "," + redisHost + "," + redisPort); } } -
编写单元测试
package com.longdidi; import com.longdidi.config.AppConfig; import org.junit.jupiter.api.Test; import org.springframework.beans.factory.annotation.Autowired; import org.springframework.boot.test.context.SpringBootTest; @SpringBootTest class Tests02 { @Autowired private AppConfig appConfig; @Test void test01() { appConfig.printInfo(); } } -
测试

6、多环境切换
在Spring Boot中多环境配置文件名需要满足application-{profile}.properties的格式,其中{profile}对应你的环境标识
比如
application-dev.properties:开发环境
application-prod.properties:生产环境
想要使用对应的环境,可以通过下面的方式设置
-
配置文件方式
在application.properties中使用spring.profiles.active属性来设置,值对应上面提到的{profile},这里就是指dev、prod这2个
-
启动参数方式
命令行启动的时候带上参数
java -jar xxx.jar --spring.profiles.active=dev
-
注解指定
在Spring Boot中,多环境切换是指在一个应用程序中支持多种运行环境配置的能力
这通常用于区分开发(development)、测试(testing)、预生产(staging)和生产(production)等不同阶段的环境。
这种功能使得开发者能够在不同的环境中使用不同的配置,比如数据库连接信息、服务器端口、环境变量等,而不需要更改代码。这对于维护一个可移植且易于管理的应用程序非常重要。
在Spring Boot中多环境配置文件名需要满足application-{profile}.properties的格式,其中{profile}对应你的环境标识
比如
application-dev.properties:开发环境
application-prod.properties:生产环境
想要使用对应的环境,可以通过下面的方式设置
-
配置文件方式
在application.properties中使用spring.profiles.active属性来设置,值对应上面提到的{profile},这里就是指dev、prod这2个
-
启动参数方式
命令行启动的时候带上参数
java -jar xxx.jar --spring.profiles.active=dev
使用步骤
- 使用“spring.config.activate.on-profile”或者“spring. profiles”指定当前环境的名称
- 使用“spring.profiles.active”指定要使用哪个环境
- 使用“—”定义一组配置,可以定义多组配置

4.6.1、单个配置文件方式
【示例】springboot-04-010模块测试
-
aplication.yml
spring: profiles: active: proc # 指定要使用哪一个环境 --- server: port: 8081 spring: #profiles: dev # 用 spring.profiles 设置配置文件的名称,是开发环境 config: activate: on-profile: dev --- server: port: 8082 spring: #profiles: test # 用 spring.profiles 设置配置文件的名称,是测试环境 config: activate: on-profile: test --- server: port: 8083 spring: #profiles: proc # 用 spring.profiles 设置配置文件的名称,是生产环境 config: activate: on-profile: proc -
Test01.java
package com.longdidi; import org.junit.jupiter.api.Test; import org.springframework.beans.factory.annotation.Value; import org.springframework.boot.test.context.SpringBootTest; @SpringBootTest class Test01 { @Value("${server.port}") private String port; @Test void testValue() { System.out.println("启动端口:" + port); } } -
测试结果

4.6.2、多个配置文件方式
(1)、Active激活环境
【示例】springboot-04-010模块测试
在类路径下创建config目录,在config目录下创建application.yml、application-dev.yml、application-test.yml文件
-
application.yml
spring: profiles: active: dev # 指定要使用哪一个环境 -
application-dev.yml
env: dev环境 -
application-test.yml
env: test环境 -
Test02.java
package com.longdidi; import org.junit.jupiter.api.Test; import org.springframework.beans.factory.annotation.Value; import org.springframework.boot.test.context.SpringBootTest; @SpringBootTest class Test02 { @Value("${env}") private String env; @Test void testValue() { System.out.println("当前环境:" + env); } } -
测试

(2)、Include加载其它配置
-
根据功能对配置文件中的信息进行拆分,并制作成独立的配置文件,命名规则如下
- application-devDB.yml
- application-devRedis.yml
- application-devMVC.yml
-
使用include属性加载其它配置
-
多个环境间使用逗号分隔
-
环境间的加载顺序是“include”配置的属性文件+“主文件”
-
当主环境dev与其他环境有相同属性时,主环境属性生效
-
其他环境中有相同属性时,最后加载的环境属性生效
-
【示例】在测试模块springboot-04-11中进行
application.yml
server:
  port: 8080
spring:
  profiles:
    active: dev
    include: devDb,devRedis
application-dev.yml
env: dev文件
application-devDb.yml
env: db文件
address: 保定市
application-devRedis.yml
env: redis文件
address: 北京市
单测类
package com.longdidi;

import org.junit.jupiter.api.Test;
import org.springframework.beans.factory.annotation.Value;
import org.springframework.boot.test.context.SpringBootTest;

@SpringBootTest
class Test01 {
    @Value("${env}")
    private String env;

    @Value("${address}")
    private String address;

    @Test
    void testValue() {
        System.out.println("环境变量:" + env);
        System.out.println("地址:" + address);
    }

}
测试结果

(3)、Group分组
-
根据功能对配置文件中的信息进行拆分,并制作成独立的配置文件,命名规则如下
- application-devDB.yml
- application-devRedis.yml
- application-devMVC.yml
-
使用group分组
从SpringBoot2.4版开始使用group属性替代include属性,降低了配置书写量
- 多个环境间使用逗号分隔
- 环境间的加载顺序是“主文件”+“include”配置的属性文件
- 使用group属性定义多种主环境与子环境的包含关系
- 环境中有相同属性时,最后加载的环境属性生效

【示例】在模块springboot-04-012中测试
application.yml
server:
  port: 8080
spring:
  profiles:
    active: dev
    group:
      "dev": devDb,devRedis
      "test": devDb,devRedis
      "pro": devDb,devRedis
application-dev.yml
env: dev文件
application-devDb.yml
env: db文件
address: 保定市
application-devRedis.yml
env: redis文件
address: 北京市
单测类
package com.longdidi;

import org.junit.jupiter.api.Test;
import org.springframework.beans.factory.annotation.Value;
import org.springframework.boot.test.context.SpringBootTest;

@SpringBootTest
class Test01 {
    @Value("${env}")
    private String env;

    @Value("${address}")
    private String address;

    @Test
    void testValue() {
        System.out.println("====================================>环境变量:" + env);
        System.out.println("====================================>地址:" + address);
    }
}
测试结果

7、外部化配置
(1)、什么是外部化配置
外部化配置是指将配置信息存储在应用程序代码之外的地方,这样配置信息可以独立于代码进行管理,这样方便了配置的修改并且修改后不需要重新编译代码、也不需要重新部署项目
(2)、外部化配置的方式
SpringBoot支持多种外部化配置方式,包括但不限于
- properties文件
- YAML文件
- 系统环境变量
- 命令行参数
- …
(3)、外部化配置的优势
- 灵活性:配置文件可以独立于应用程序部署,这使得可以根据运行环境的不同来调整配置,而无需修改代码
- 易于维护:配置变更不需要重新构建和部署应用程序,降低了维护成本
- 安全性:敏感信息如数据库密码、API密钥等可以存储在外部,并且可以限制谁有权限访问这些配置信息
- 共享性:多实例或多服务可以共享相同的配置信息,减少重复配置的工作量
- 版本控制:配置文件可以存放在版本控制系统中,便于跟踪历史版本和回滚配置
总之外部化配置使得配置更加灵活、安全、易于管理和共享,是现代云原生应用中非常推荐的做法
(4)、外部化配置对比传统配置
在传统的SSM三大框架中如果修改XML的配置后需要对应用重新打包、重新部署
使用SpringBoot框架的外部化配置后,修改配置后不需要对应用重新打包、也不需要重新部署,最多重启一下服务即可
(5)、外部配置与内部配置顺序
外部化的配置优先级高于内部化配置
这是因为使用外部化配置更加方便
修改外部化配置后无需重新编译、打包、部署,只要重新启动应用即可
(6)、外部化配置测试
创建springboot-04-13模块
打包方式设置为jar包方式
不需要做任何改动,直接启动项目查看控制台输出的端口号(默认使用8080端口)

将项目打成jar包

将jar包拷贝到其它任何地方,比如我这里拷贝到"I:\testjar"目录下
在该目录下创建application.properties(或application.yml)配置文件,在配置文件中指定一些属性(这里指定端口号为8083)
打开DOS窗口,进入到"I:\testjar"目录下,使用"jar -jar springboot-04-013-0.0.1-SNAPSHOT.jar"命令启动

8、配置加载优先级
Spring Boot是基于jar包运行的,打成jar包的程序可以直接通过下面命令运行
java -jar xxx.jar
可以通过以下命令修改tomcat端口号
java -jar xx.jar --server.port=9090
可以看出命令行中连续的两个减号“–”就是对application.properties中的属性值进行赋值的标识
所以“java -jar xx.jar --server.port=9090”等价于在application.properties中添加属性“server.port=9090”
如果怕命令行有风险可以使用SpringApplication.setAddCommandLineProperties(false)禁用它
实际上Spring Boot应用程序有多种途径可以获取配置的属性值
这些方式优先级如下
- 命令行参数
- SPRING_APPLICATION_JSON中的属性(环境变量或系统属性中的内联JSON嵌入)
- ServletConfig初始化参数
- ServletContext初始化参数
- 来自java:comp/env的JNDI属性
- JVM系统属性(System.getProperties())
- 操作系统环境变量
- RandomValuePropertySource配置的random.*属性值
- jar外部的application-{profile}.properties或application.yml(带spring.profile)配置文件
- jar内部的application-{profile}.properties或application.yml(带spring.profile)配置文件
- jar外部的application.properties或application.yml(不带spring.profile)配置文件
- jar内部的application.properties或application.yml(不带spring.profile)配置文件
- @Configuration注解类上的@PropertySource
- 通过SpringApplication.setDefaultProperties指定的默认属性


 扫一扫
扫一扫


 3521
3521

 被折叠的 条评论
为什么被折叠?
被折叠的 条评论
为什么被折叠?
 到【灌水乐园】发言


