When you run tests with Gradle the Test task by default produces reports in HTML and XML formats. For JUnit 5 (the JUnit Platform / Jupiter), you need to tell Gradle to use the JUnit Platform, and you can enable or customize the test reports using the test task configuration. Let us delve into understanding how Java JUnit can be used to generate HTML reports in Gradle efficiently, providing clear and detailed insights into test execution and results.
1. What is Gradle?
Gradle is an advanced build automation tool that helps developers compile, test, and package code efficiently for Java and other languages. It combines the flexibility of Ant with the dependency management capabilities of Maven, making it a popular choice for modern software projects. Gradle uses a domain-specific language (DSL) based on Groovy or Kotlin, allowing developers to define build logic in a clean and readable way. It supports incremental builds, which means it only rebuilds the parts of the project that have changed, resulting in faster execution times.
1.1 Key Points
- Uses Groovy or Kotlin DSL for customizable build scripts
- Supports multi-project and dependency management efficiently
- Integrates seamlessly with IDEs like IntelliJ IDEA, Eclipse, and Android Studio
- Offers powerful plugin support for testing, packaging, and deployment
- Provides incremental and parallel builds for improved performance
1.2 Benefits
- Speeds up the build process with incremental compilation
- Enhances productivity through automation and reusable tasks
- Supports both small single-module and large multi-module projects
- Improves dependency resolution and version management
- Enables easy integration with continuous integration (CI) pipelines
2. Setting Up JUnit in Gradle
To generate comprehensive test reports in Java with Gradle and JUnit, it is important to properly configure your Gradle project to use the JUnit Platform. Gradle provides seamless integration with JUnit 5, enabling developers to automate testing, generate HTML reports, and analyze results in a structured manner. The setup process involves adding the JUnit dependency, configuring the test task, and enabling reporting options. Below are minimal working examples.
- Adding JUnit 5 dependency to the project
- Configuring the test task to use the JUnit Platform
- Enabling HTML and XML reports for better test visibility
2.1 Single Module Project Report
Let’s build a tiny single-module Java project that uses JUnit 5 and produces an HTML report using Gradle. This section covers creating a simple build.gradle file, writing a basic test class, running tests, and viewing the generated HTML report output.
2.1.1 Creating build.gradle File
The following build.gradle configuration sets up a simple Java project using the Groovy DSL. It applies the Java plugin, includes JUnit 5 as the testing dependency, and enables HTML and XML test report generation.
// build.gradle (Groovy DSL)
plugins {
  id 'java'
}

repositories {
  mavenCentral()
}

dependencies {
  testImplementation 'org.junit.jupiter:junit-jupiter:5.10.0' // pick a recent version
}

test {
  useJUnitPlatform() // enable JUnit 5 (Platform)
  // Keep HTML and XML reports enabled (they are true by default)
  reports {
    junitXml.required.set(true)
    html.required.set(true)
  }
}
This Gradle script configures the project to use the java plugin and fetches dependencies from mavenCentral(). The testImplementation block adds JUnit 5 to the classpath. The test block enables the JUnit Platform and ensures both XML and HTML reports are generated after test execution. The reports are stored under build/reports/tests/test.
2.1.2 Code Example
Below is a simple JUnit 5 test class that validates basic arithmetic operations using assertions. This will serve as our sample test to demonstrate the HTML reporting feature.
package com.example;

import org.junit.jupiter.api.Test;
import static org.junit.jupiter.api.Assertions.*;

class CalculatorTest {
  @Test void addTwoNumbers() {
    assertEquals(5, 2 + 3, "2 + 3 should equal 5");
  }

  @Test void divideByZeroThrows() {
    assertThrows(ArithmeticException.class, ()->{ int x = 1 / 0; });
  }
}
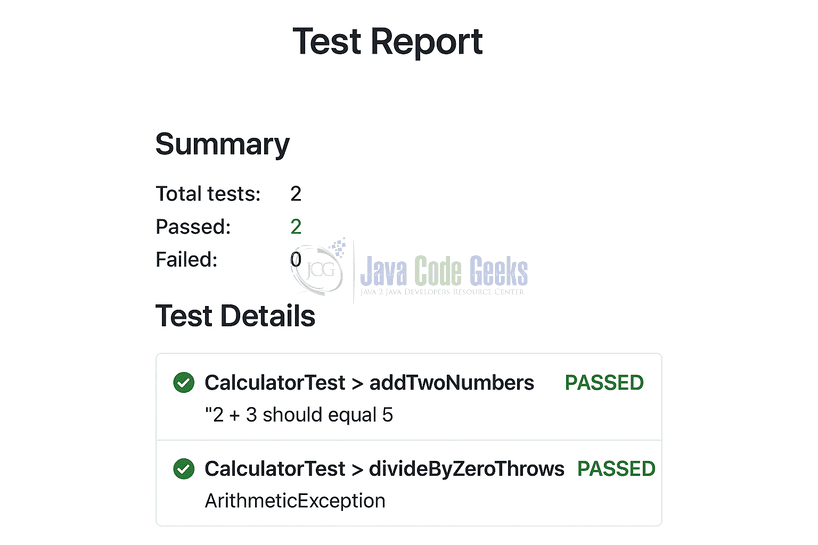
The first test verifies that 2 + 3 equals 5, while the second test checks if dividing by zero correctly throws an ArithmeticException. These simple tests are enough to demonstrate how JUnit integrates with Gradle to produce readable HTML test reports.
2.1.3 Run Tests and Output
To execute the tests and generate the HTML report, open your terminal inside the project directory and run the following command:
gradle test
Once the build completes, you will see the similar output in the console:
> Task :test

CalculatorTest > addTwoNumbers PASSED
CalculatorTest > divideByZeroThrows PASSED

BUILD SUCCESSFUL in 2s
3 actionable tasks: 3 executed
The console output indicates that both test cases passed successfully. Gradle automatically generates a detailed HTML report located at build/reports/tests/test/index.html.
2.2 Multi-Module Project Report
In a multi-module Gradle project, each subproject executes its own test task and generates individual HTML reports. To provide a unified view of all test results, Gradle allows the use of the TestReport task. This task aggregates results from multiple subprojects and produces a single combined HTML report, making it easier to monitor the overall test status of large projects.
2.2.1 Creating build.gradle File
The following example shows how to configure a multi-module project with JUnit 5 tests in each subproject, and how to aggregate the reports into a single HTML report.
// root build.gradle
subprojects {
    apply plugin: 'java'

    repositories {
        mavenCentral()
    }

    dependencies {
        testImplementation 'org.junit.jupiter:junit-jupiter:5.10.0'
    }

    test {
        useJUnitPlatform()
        reports {
            junitXml.required.set(true)
            html.required.set(true)
        }
    }
}

// Aggregation task: collect test results from subprojects
task aggregateTestReport(type: TestReport) {
    destinationDir = file("$buildDir/reports/tests/aggregate") // output directory for aggregated report

    // collect test tasks from subprojects
    reportOn = subprojects.collect { proj ->
        proj.tasks.matching { it.name == 'test' }
    }.flatten()
}

// Optionally make 'check' depend on the aggregate report
aggregateTestReport.mustRunAfter subprojects*.tasks*.test
check.dependsOn aggregateTestReport
Each subproject applies the Java plugin, adds JUnit 5 as a dependency, and configures its test task to generate both HTML and XML reports. The aggregateTestReport task collects all test tasks from the subprojects and produces a single HTML report at build/reports/tests/aggregate. Linking the aggregateTestReport to the check task ensures that it runs automatically after all subproject tests have completed.
2.2.2 Code Example
Assume a multi-module structure with two subprojects: moduleA and moduleB, each containing a simple JUnit 5 test class.
// moduleA/src/test/java/com/example/CalculatorTest.java
package com.example;

import org.junit.jupiter.api.Test;
import static org.junit.jupiter.api.Assertions.*;

class CalculatorTest {
    @Test void addNumbers() {
        assertEquals(10, 7 + 3);
    }
}

// moduleB/src/test/java/com/example/StringUtilsTest.java
package com.example;

import org.junit.jupiter.api.Test;
import static org.junit.jupiter.api.Assertions.*;

class StringUtilsTest {
    @Test void concatStrings() {
        assertEquals("HelloWorld", "Hello" + "World");
    }
}
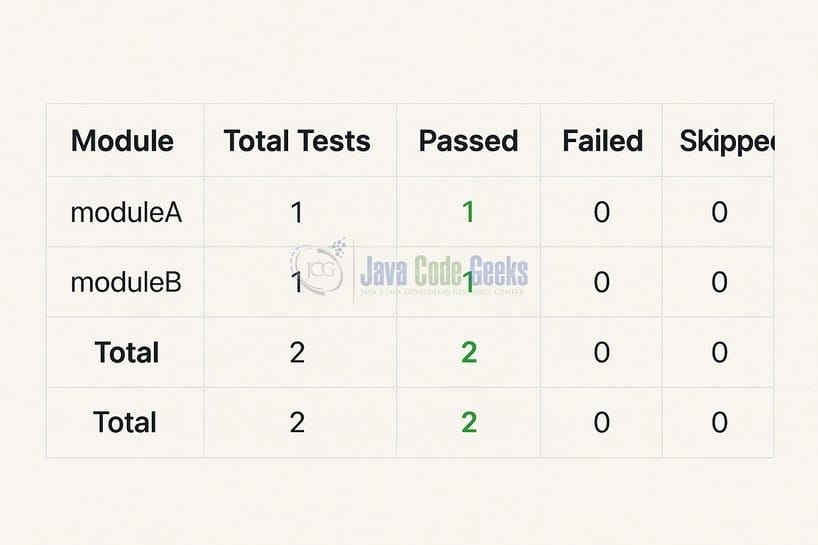
Each module contains its own test class. When executed, each test task produces a module-specific HTML report, which can be individually reviewed. The aggregation task then collects all results into a unified report for easy overview.
2.2.3 Run Tests and Output
To execute tests for all subprojects and generate the aggregated HTML report, run the following command from the root project directory:
gradle clean check
Once the build completes, you will see a similar output in the console:
> Task :moduleA:test
CalculatorTest > addNumbers PASSED

> Task :moduleB:test
StringUtilsTest > concatStrings PASSED

> Task :aggregateTestReport
BUILD SUCCESSFUL in 4s
The output shows that all tests in each subproject passed. The aggregated HTML report is available at build/reports/tests/aggregate/index.html.
3. Conclusion
Generating HTML test reports with Gradle and JUnit 5 is straightforward: make sure you depend on org.junit.jupiter and call useJUnitPlatform(). The standard test task already produces an HTML report at build/reports/tests/<task>/index.html. For multi-module projects, use Gradle’s TestReport task to aggregate reports into a single HTML page.
