In distributed systems, failures are expected. Services can become slow, unavailable, or completely unresponsive due to network issues, overload, or downstream dependencies. A circuit breaker helps us design systems that fail gracefully instead of cascading failures across our architecture. This guide demonstrates how to implement a circuit breaker using Resilience4j.
1. Understanding Circuit Breakers in Distributed Architectures
A circuit breaker is a design pattern used to detect failures and prevent cascading outages in distributed systems. It wraps calls to remote services and monitors their success or failure rates. When failures exceed a defined threshold, the circuit “opens,” preventing further calls and allowing the system to recover gracefully.
This pattern is essential in microservices architectures, where one failing service can easily bring down others if not properly isolated. By short-circuiting calls when a system is unhealthy, circuit breakers reduce latency, prevent resource exhaustion, and improve overall system stability.
1.1 Design Principles Behind a Circuit Breaker
A good circuit breaker implementation should:
- Detect failures based on configurable thresholds.
- Transition between states predictably.
- Allow controlled recovery attempts.
- Provide observability and metrics.
- Be non-blocking and efficient.
These principles are exactly what Resilience4j implements.
1.2 Circuit Breaker States and Lifecycle
A circuit breaker operates using three primary states:
- CLOSED: All requests are allowed, and failures are monitored
- OPEN: Requests are blocked immediately to prevent further damage
- HALF_OPEN: A limited number of requests are allowed to test recovery
These transitions are based on failure rates, wait durations, and configured thresholds. Understanding this lifecycle helps you properly tune your application behaviour.
2. Building a Circuit Breaker with Resilience4j
Resilience4j provides both annotation-based and programmatic approaches for implementing circuit breakers. It integrates seamlessly with Spring Boot and eliminates the need to manually manage states and failure tracking.
Project Dependencies (pom.xml)
        <dependency>
            <groupId>org.springframework.boot</groupId>
            <artifactId>spring-boot-starter-actuator</artifactId>
        </dependency>
        <dependency>
            <groupId>org.springframework.boot</groupId>
            <artifactId>spring-boot-starter-web</artifactId>
        </dependency>
        <dependency>
            <groupId>io.github.resilience4j</groupId>
            <artifactId>resilience4j-spring-boot3</artifactId>
        </dependency>
        <dependency>
            <groupId>org.springframework.boot</groupId>
            <artifactId>spring-boot-starter-aop</artifactId>
        </dependency>
These dependencies enable Resilience4j features, monitoring through Actuator, and annotation-based interception using AOP.
Basic Circuit Breaker Configuration (application.yml)
spring:
  application:
    name: resilience4j-spring-boot-app

management:
  endpoints:
    web:
      exposure:
        include: health,info,metrics

resilience4j:
  circuitbreaker:
    instances:
      externalService:
        registerHealthIndicator: true
        slidingWindowSize: 10
        minimumNumberOfCalls: 5
        failureRateThreshold: 50
        waitDurationInOpenState: 10s
        permittedNumberOfCallsInHalfOpenState: 3
        automaticTransitionFromOpenToHalfOpenEnabled: true
The management.endpoints.web.exposure.include section enables key Actuator endpoints such as health, info, and metrics. These endpoints provide visibility into our application’s runtime behaviour and are useful for monitoring the state of our circuit breakers and overall system health.
Under the resilience4j.circuitbreaker.instances.externalService configuration, we define a circuit breaker instance named externalService. The slidingWindowSize determines how many recent calls are considered when calculating the failure rate, while minimumNumberOfCalls ensures that the circuit breaker only evaluates performance after a sufficient number of requests have been made.
The failureRateThreshold of 50 means that if half of the recorded calls fail, the circuit breaker will transition to the OPEN state. The waitDurationInOpenState specifies how long the circuit remains open before attempting recovery. During recovery, permittedNumberOfCallsInHalfOpenState allows a limited number of test requests to pass through.
Finally, automaticTransitionFromOpenToHalfOpenEnabled ensures that the circuit breaker automatically moves from OPEN to HALF_OPEN after the wait duration, without requiring external intervention.
3. Implementing the Service Layer with @CircuitBreaker
@Service
public class ExternalService {

    private static final Logger logger = LoggerFactory.getLogger(ExternalService.class);

    @CircuitBreaker(name = "externalService", fallbackMethod = "fallback")
    public String callExternalService() {
        logger.info("Attempting to call external service");

        try {
            // Simulate failure
            if (Math.random() < 0.7) {
                throw new RuntimeException("External service failure");
            }

            logger.info("External service call succeeded");
            return "Successful response from external service";

        } catch (Exception ex) {
            logger.error("External service call failed: {}", ex.getMessage());
            throw ex;
        }
    }

    public String fallback(Throwable t) {
        logger.warn("Fallback triggered due to: {}", t.toString());
        return "Fallback response: service is currently unavailable";
    }
}
Here, the @CircuitBreaker annotation wraps the method call. If failures exceed the configured threshold, the circuit opens and calls are redirected to the fallback method instead of executing the main logic. This allows the application to degrade gracefully without crashing or blocking.
The controller below exposes an endpoint to trigger the circuit breaker logic. Each request invokes the service method, allowing us to observe how Resilience4j manages failures and state transitions in real time.
@RestController
public class ApiController {

    private final ExternalService externalService;

    public ApiController(ExternalService externalService) {
        this.externalService = externalService;
    }

    @GetMapping("/api/test")
    public String test() {
        return externalService.callExternalService();
    }
}
Testing the Circuit Breaker
You can test the setup by repeatedly calling:
curl -X GET http://localhost:8080/api/test
Initially, requests may succeed or fail randomly. Once the failure threshold is exceeded, the circuit opens and responses will switch to the fallback message. After the configured wait duration, the circuit transitions to HALF_OPEN and allows limited test calls.
4. Programmatic Circuit Breaker Usage
While annotations are convenient, Resilience4j also supports programmatic control for advanced use cases.
@Configuration
public class CircuitBreakerConfiguration {

    @Bean
    public CircuitBreaker customCircuitBreaker() {
        CircuitBreakerConfig config = CircuitBreakerConfig.custom()
                .failureRateThreshold(50)
                .waitDurationInOpenState(java.time.Duration.ofSeconds(10))
                .slidingWindowSize(10)
                .build();

        return CircuitBreakerRegistry.of(config)
                .circuitBreaker("customCircuitBreaker");
    }
}
This configuration creates a circuit breaker programmatically using a registry. It gives us full control over behaviour and is useful when we need dynamic configurations or custom logic.
Using Programmatic Circuit Breaker in a Service
@Service
public class ProgrammaticService {

    private final CircuitBreaker circuitBreaker;

    public ProgrammaticService(CircuitBreaker circuitBreaker) {
        this.circuitBreaker = circuitBreaker;
    }

    public String callExternalService() {
        Supplier<String> supplier = CircuitBreaker.decorateSupplier(
                circuitBreaker,
                () -> {
                    if (Math.random() < 0.7) {
                        throw new RuntimeException("Failure");
                    }
                    return "Success";
                }
        );

        try {
            return supplier.get();
        } catch (Exception e) {
            return "Fallback programmatic";
        }
    }
}
Here, the circuit breaker wraps a Supplier function. In callExternalService(), the core logic is wrapped with CircuitBreaker.decorateSupplier, which executes a simulated service call that fails 70% of the time. The circuit breaker tracks these failures and manages its state (CLOSED, OPEN, HALF_OPEN) to prevent repeated calls to a failing service.
The try-catch block provides a simple fallback: if the call fails or the circuit is OPEN, it returns "Fallback programmatic". This approach is flexible and gives fine-grained control over execution, exception handling, and resilience behaviour without relying on annotations.
5. Extending Resilience: Retries, TimeLimiter, Rate Limiting, and Bulkheads
Resilience4j provides additional patterns to handle different failure scenarios:
- Retries: Automatically retry failed requests
- Rate Limiting: Control request throughput
- Bulkheads: Isolate resources to prevent total system failure
- TimeLimiter: Limit call duration to prevent slow responses from blocking the system
Configuration for Retries, Rate Limiting, TimeLimiter and Bulkheads
  retry:
    instances:
      externalService:
        maxAttempts: 3
        waitDuration: 2s

  ratelimiter:
    instances:
      externalService:
        limitForPeriod: 5
        limitRefreshPeriod: 10s
        timeoutDuration: 2s

  bulkhead:
    instances:
      externalService:
        maxConcurrentCalls: 3
        maxWaitDuration: 1s

  timelimiter:
    instances:
      externalService:
        timeoutDuration: 2s
        cancelRunningFuture: true
- Retry: Retries failed calls up to 3 times, waiting 2 seconds between attempts.
- RateLimiter: Limits calls to 5 per 10 seconds, with a 2-second timeout for acquiring permission.
- Bulkhead: Restricts concurrent calls to 3 and waits up to 1 second if slots are full.
- TimeLimiter: Ensures a call does not exceed 2 seconds; if it does, it is cancelled automatically to free resources.
Together, these configurations provide comprehensive resilience, preventing slow, failing, or overloaded services from impacting the system.
Implementing Service with Multiple Resilience Patterns
The method now returns a
CompletableFuture and wraps the logic inside CompletableFuture.supplyAsync(). This is required because @TimeLimiter only works with asynchronous return types.The fallback method was also updated to return CompletableFuture so it matches the method signature.
@Service
public class ExternalService {

    private static final Logger logger = LoggerFactory.getLogger(ExternalService.class);

    @Retry(name = "externalService")
    @TimeLimiter(name = "externalService", fallbackMethod = "fallback")
    @RateLimiter(name = "externalService")
    @Bulkhead(name = "externalService")
    @CircuitBreaker(name = "externalService", fallbackMethod = "fallback")
    public CompletableFuture<String> callExternalService() {

        logger.info("Attempting to call external service");

        return CompletableFuture.supplyAsync(() -> {
            try {
                // Simulate failure
                if (Math.random() < 0.7) {
                    throw new RuntimeException("External service failure");
                }

                logger.info("External service call succeeded");
                return "Successful response from external service";

            } catch (Exception ex) {
                logger.error("External service call failed: {}", ex.getMessage());
                throw ex; // Required for Resilience4j to capture failure
            }
        });
    }

    public CompletableFuture<String> fallback(Throwable t) {
        logger.warn("Fallback triggered due to: {}", t.toString());
        return CompletableFuture.completedFuture(
                "Fallback response: service is currently unavailable"
        );
    }
}
This method combines multiple resilience patterns. If a call fails, it is retried, rate-limited, and isolated via a bulkhead. If failures persist and the circuit opens, the fallback method is triggered. This layered defence significantly enhances system reliability.
6. Monitoring with Actuator
Spring Boot Actuator provides visibility into an application’s health and resilience mechanisms. When combined with Resilience4j, it allows us to monitor circuit breaker states, rate limiters, retries, and bulkheads in real time, making it easier to debug failures and understand system behaviour under load.
Actuator and Resilience4j Configuration
management:
  endpoints:
    web:
      exposure:
        include: health, metrics, circuitbreakers, ratelimiters, retries, bulkheads
  endpoint:
    health:
      show-details: ALWAYS
  health:
    circuitbreakers:
      enabled: true
    ratelimiters:
      enabled: true

resilience4j:
  circuitbreaker:
    configs:
      default:
        registerHealthIndicator: true
This configuration exposes multiple Actuator endpoints over HTTP, including health, metrics, and Resilience4j-specific endpoints like circuitbreakers, ratelimiters, retries, and bulkheads. The show-details: ALWAYS ensures that full health information is returned instead of a minimal response.
Enabling circuitbreakers and ratelimiters under management.health allows their states to be included in the health endpoint. Additionally, registerHealthIndicator: true ensures that each circuit breaker automatically contributes its status to the overall application health.
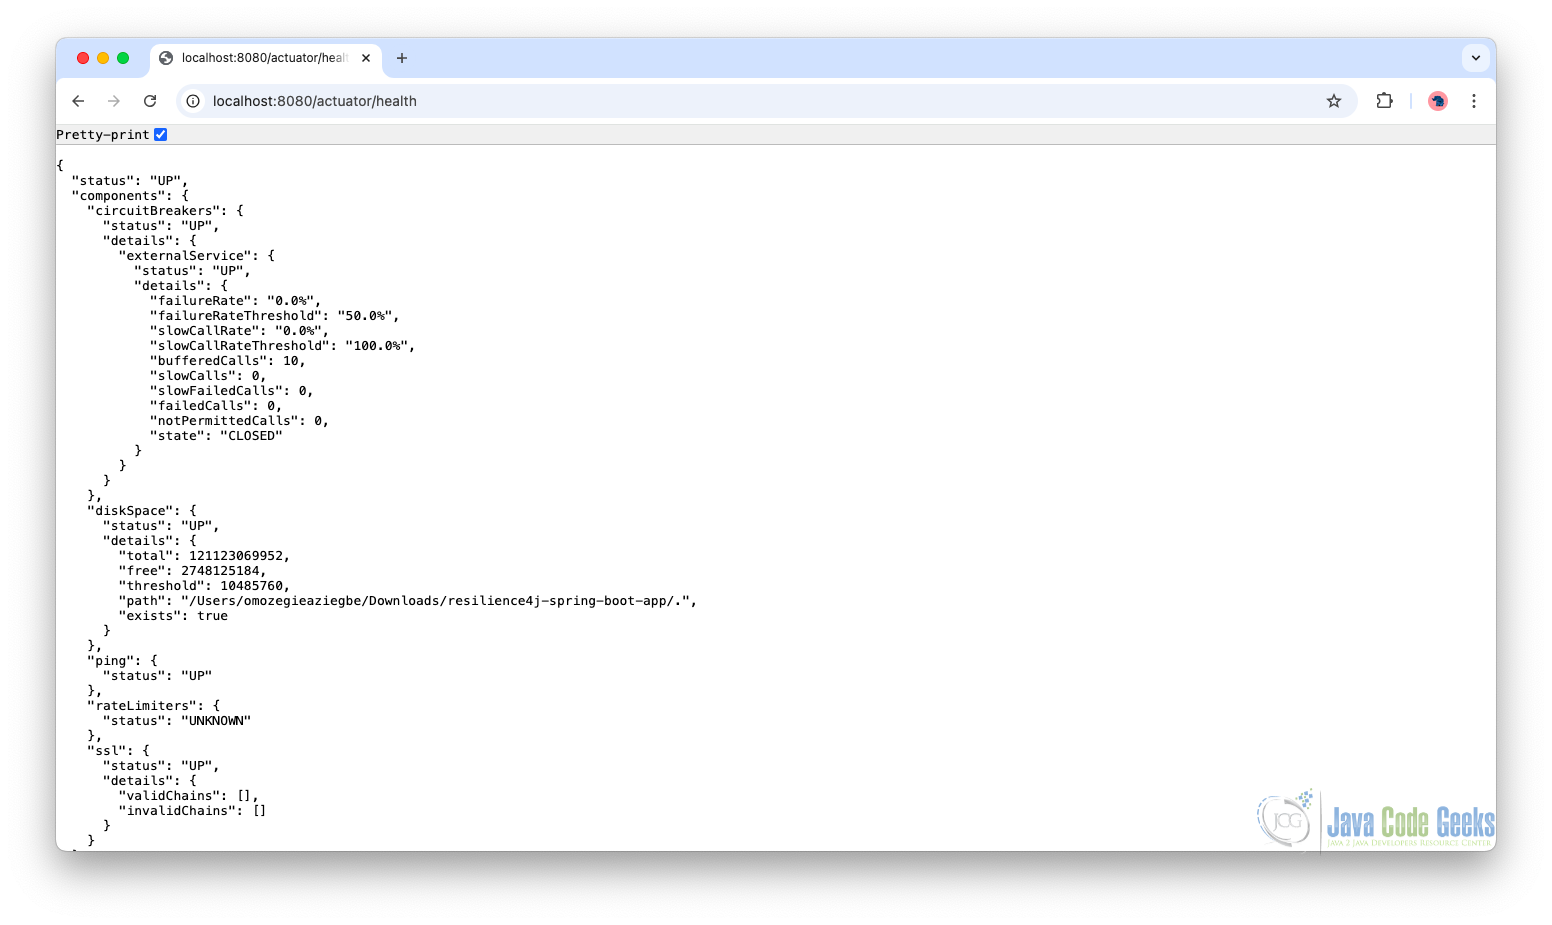
Accessing the Health Endpoint
Once the application is running, you can access:
curl http://localhost:8080/actuator/health
curl http://localhost:8080/actuator/metrics
curl http://localhost:8080/actuator/circuitbreakers
Example Health Endpoint Output:
7. Conclusion
Building a circuit breaker with Resilience4j in Spring Boot gives us a practical and production-ready way to handle failures in distributed systems. By combining circuit breakers with retries, rate limiting, bulkheads, and time limiters, we create a layered resilience strategy that protects our application from cascading failures and performance bottlenecks.
Through both annotation-based and programmatic approaches, we gain flexibility in how resilience is applied. With Actuator integration, we also gain visibility into system behavior, making it easier to monitor, debug, and optimize our application.
8. Download the Source Code
This guide demonstrates how to implement a circuit breaker using Resilience4j.
You can download the full source code of this example here: circuit breaker in spring boot resilience4j
