Swagger (also known as OpenAPI) is widely used for documenting RESTful APIs. When working on large applications with multiple controllers, the Swagger UI can become cluttered with endpoints. To make it more manageable and intuitive, grouping endpoints by resources or domains (e.g., Users, Orders, Products) is essential. Swagger provides annotations like @Tag to achieve this in Spring Boot applications. Let us delve into understanding how Swagger allows us to group endpoints by resources for better API documentation and organization.
1. Introduction to Swagger and @Tag Annotation
Swagger UI is a powerful tool that provides a web-based interface for developers to interact with and understand RESTful APIs. It helps teams visualize and test endpoints, ensuring better collaboration and faster integration across services.
Behind Swagger lies the OpenAPI Specification (OAS), which defines a standard way to describe REST APIs. One of its core features is the ability to organize endpoints using metadata, such as tags and descriptions, making large APIs more manageable and easier to consume.
The @Tag annotation is a part of the springdoc-openapi library, which integrates seamlessly with Spring Boot applications. This annotation allows developers to categorize controller methods under logical groups or resources such as “User”, “Order”, or “Product”.
Using @Tag annotations helps in:
- Creating intuitive documentation
- Improving API discoverability
- Enhancing the developer experience by reducing cognitive load
Example of @Tag:
@Tag(name = "User", description = "Operations related to users")
2. Setting up the Spring Boot Project
Before diving into Swagger annotations and endpoint grouping, it’s essential to have a Spring Boot project properly set up. In this section, we’ll walk through creating a Spring Boot application with all the necessary dependencies to enable Swagger documentation via the springdoc-openapi library.
Start by creating a Spring Boot project with the following dependencies:
- Spring Web
- Spring Boot DevTools
- springdoc-openapi-ui
2.1 Adding Dependencies (pom.xml)
To use Swagger with Spring Boot, you need to include the springdoc-openapi dependency in your pom.xml. This enables automatic generation of OpenAPI documentation and serves the Swagger UI at runtime.
<dependency>
    <groupId>org.springdoc</groupId>
    <artifactId>springdoc-openapi-starter-webmvc-ui</artifactId>
    <version>latest__jar__version</version>
</dependency>
Once the project is set up, navigate to http://localhost:8080/swagger-ui.html to see the Swagger UI.
2.2 Creating Controller Classes With Swagger @Tag Annotation
Now that the Swagger setup is in place, you can start creating REST controllers. Using the @Tag annotation from io.swagger.v3.oas.annotations.tags, you can group API endpoints under meaningful resource names such as “User” or “Product”. This helps organize the Swagger UI and makes your API documentation easier to navigate.
2.2.1 UserController.java
This controller defines endpoints for user-related operations. The @Tag annotation assigns the label “User” to these endpoints, which will appear as a separate group in Swagger UI.
package com.example.demo.controller;

import io.swagger.v3.oas.annotations.tags.Tag;
import org.springframework.web.bind.annotation.*;

@RestController
@RequestMapping("/users")
@Tag(name = "User", description = "Operations related to users")
public class UserController {

    @GetMapping("/{id}")
    public String getUserById(@PathVariable("id") Long id) {
        return "User with ID " + id;
    }

    @PostMapping
    public String createUser(@RequestBody String user) {
        return "User created: " + user;
    }
}
2.2.2 ProductController.java
This controller manages product-related endpoints. By applying the @Tag annotation with the name “Product”, you ensure that product APIs are grouped separately from other resource types in the Swagger documentation.
package com.example.demo.controller;

import io.swagger.v3.oas.annotations.tags.Tag;
import org.springframework.web.bind.annotation.*;

@RestController
@RequestMapping("/products")
@Tag(name = "Product", description = "Operations related to products")
public class ProductController {

    @GetMapping("/{id}")
    public String getProductById(@PathVariable("id") Long id) {
        return "Product with ID " + id;
    }

    @PostMapping
    public String createProduct(@RequestBody String product) {
        return "Product created: " + product;
    }
}
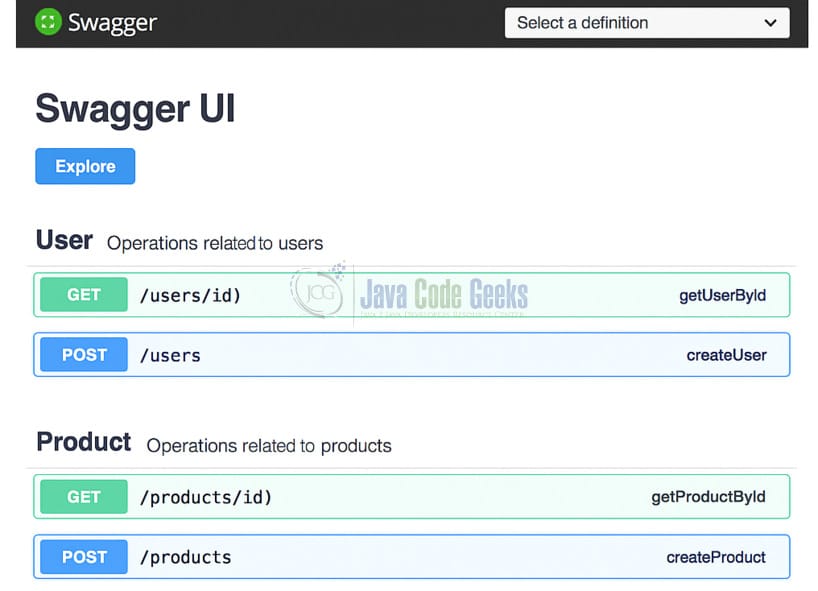
2.3 Swagger UI Output
After setting up the controllers and applying the @Tag annotations, Swagger UI will automatically organize your endpoints into separate sections based on the defined tags. This visual grouping improves readability and enhances the developer experience when interacting with your API.
When you run the Spring Boot application and navigate to /swagger-ui.html, you will see endpoints grouped under:
- User
- Product
This improves clarity and allows consumers to quickly find relevant endpoints based on resource type.
3. Conclusion
Grouping endpoints in Swagger using the @Tag annotation is an effective way to enhance API documentation readability. As your application grows, organizing endpoints by domain or resource allows developers and stakeholders to navigate and understand APIs efficiently. Spring Boot with springdoc-openapi makes it easy to integrate and configure this feature.
