Hello Friends! Today I am going to share very useful blog for In App Purchase in Android. Google provide In App Billing faculty in Android. In App Purchase is a very easy and secure way for make payment online. Please follow my blog step by step:
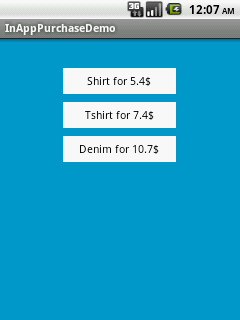
Screen Shot
- Create a new Project in Android.
- Create MainActivity.java class.
- Add activity_main.xml in your res/layout folder.
- Add Billing services and permission in Manifest.xml.
Do’s
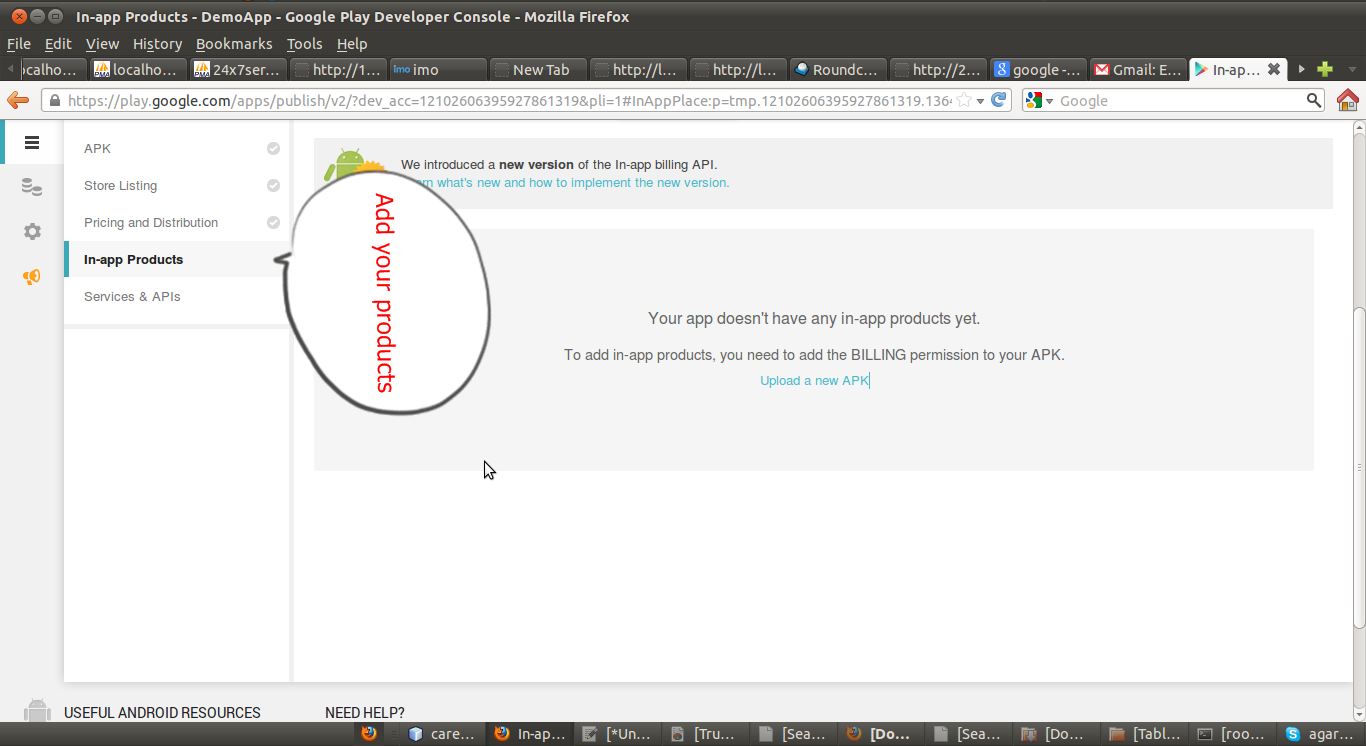
- Create sign apk for your application.
- Upload your apk on Google play store.
- Create product for your application.
- wait for 6-12 hour for update item’s on store.
- Copy Key of your Google account and paste it into BillingSecurity.java class Line number 135-
String base64EncodedPublicKey = "PUT YOUR PUBLIC KEY HERE";
- Give Billing permissions in Manifest.xml
- Add
IMarketBillingService.java in com.android.vending.billing package.
Don’t
- Don’t use emulator for testing its does not support Billing Services.
- Don’t use unsigned apk for Billing services.
- Don’t share your key with any one.
My Code-
1)MainActivity.java
package com.manish.inapppurchase;

import android.app.Activity;
import android.content.Context;
import android.content.Intent;
import android.os.Bundle;
import android.os.Handler;
import android.util.Log;
import android.view.View;
import android.view.View.OnClickListener;
import android.widget.Button;
import android.widget.Toast;

public class MainActivity extends Activity implements OnClickListener {
 Button btn1, btn2, btn3;
 private Context mContext=this;
 private static final String TAG = "Android BillingService";
 @Override
 protected void onCreate(Bundle savedInstanceState) {
  super.onCreate(savedInstanceState);
  setContentView(R.layout.activity_main);
  btn1 = (Button) findViewById(R.id.button1);
  btn2 = (Button) findViewById(R.id.button2);
  btn3 = (Button) findViewById(R.id.button3);
  btn1.setOnClickListener(this);
  btn2.setOnClickListener(this);
  btn3.setOnClickListener(this);

   startService(new Intent(mContext, BillingService.class));
         BillingHelper.setCompletedHandler(mTransactionHandler);
 }
 public Handler mTransactionHandler = new Handler(){
  public void handleMessage(android.os.Message msg) {
   Log.i(TAG, "Transaction complete");
   Log.i(TAG, "Transaction status: "+BillingHelper.latestPurchase.purchaseState);
   Log.i(TAG, "Item purchased is: "+BillingHelper.latestPurchase.productId);

   if(BillingHelper.latestPurchase.isPurchased()){
    showItem();
   }
  };

};
 @Override
 public void onClick(View v) {
  if (v == btn1) {
   if(BillingHelper.isBillingSupported()){
    BillingHelper.requestPurchase(mContext, "android.test.purchased");
         } else {
          Log.i(TAG,"Can't purchase on this device");
          btn1.setEnabled(false); // XXX press button before service started will disable when it shouldnt
         }
   Toast.makeText(this, "Shirt Button", Toast.LENGTH_SHORT).show();
  }
  if (v == btn2) {
   if(BillingHelper.isBillingSupported()){
    BillingHelper.requestPurchase(mContext, "android.test.purchased");
         } else {
          Log.i(TAG,"Can't purchase on this device");
          btn2.setEnabled(false); // XXX press button before service started will disable when it shouldnt
         }
   Toast.makeText(this, "TShirt Button", Toast.LENGTH_SHORT).show();
  }
  if (v == btn3) {
   if(BillingHelper.isBillingSupported()){
    BillingHelper.requestPurchase(mContext, "android.test.purchased");
         } else {
          Log.i(TAG,"Can't purchase on this device");
          btn3.setEnabled(false); // XXX press button before service started will disable when it shouldnt
         }
   Toast.makeText(this, "Denim Button", Toast.LENGTH_SHORT).show();
  }

 }

 private void showItem() {
  //purchaseableItem.setVisibility(View.VISIBLE);
 }

 @Override
 protected void onPause() {
  Log.i(TAG, "onPause())");
  super.onPause();
 }

 @Override
 protected void onDestroy() {
  BillingHelper.stopService();
  super.onDestroy();
 }
}
2)activity_main.xml
<RelativeLayout xmlns:android="http://schemas.android.com/apk/res/android"
    xmlns:tools="http://schemas.android.com/tools"
    android:layout_width="match_parent"
    android:layout_height="match_parent"
    android:background="#0099CC"
    tools:context=".MainActivity" >

    <Button
        android:id="@+id/button1"
        android:layout_width="150dp"
        android:layout_height="35dp"
        android:layout_alignParentTop="true"
        android:layout_centerHorizontal="true"
        android:layout_marginTop="40dp"
        android:background="#FFFFFF"
        android:text="Shirt for 5.4$" />

    <Button
        android:id="@+id/button2"
        android:layout_width="150dp"
        android:layout_height="35dp"
        android:layout_below="@+id/button1"
        android:layout_centerHorizontal="true"
        android:layout_marginTop="10dp"
        android:background="#FFFFFF"
        android:text="Tshirt for 7.4$" />

    <Button
        android:id="@+id/button3"
        android:layout_width="150dp"
        android:layout_height="35dp"
        android:layout_below="@+id/button2"
        android:layout_centerHorizontal="true"
        android:layout_marginTop="10dp"
        android:background="#FFFFFF"
        android:text="Denim for 10.7$" />

</RelativeLayout>
3)manifest.xml
<?xml version="1.0" encoding="utf-8"?>
<manifest xmlns:android="http://schemas.android.com/apk/res/android"
    package="com.manish.inapppurchase"
    android:versionCode="1"
    android:versionName="1.0" >

    <uses-sdk
        android:minSdkVersion="7"
        android:targetSdkVersion="16" />

    <uses-permission android:name="com.android.vending.BILLING" />
    <uses-permission android:name="android.permission.INTERNET" />

    <application
        android:allowBackup="true"
        android:icon="@drawable/ic_launcher"
        android:label="@string/app_name"
        android:theme="@style/AppTheme" >
        <activity
            android:name="com.manish.inapppurchase.MainActivity"
            android:label="@string/app_name" >
            <intent-filter>
                <action android:name="android.intent.action.MAIN" />

                <category android:name="android.intent.category.LAUNCHER" />
            </intent-filter>
        </activity>

        <service android:name=".BillingService" />

        <receiver android:name=".BillingReceiver" >
            <intent-filter>
                <action android:name="com.android.vending.billing.IN_APP_NOTIFY" />
                <action android:name="com.android.vending.billing.RESPONSE_CODE" />
                <action android:name="com.android.vending.billing.PURCHASE_STATE_CHANGED" />
            </intent-filter>
        </receiver>
    </application>

</manifest>
4) Zip Code
Reference: How to Integrate In App Purchase Billing in Android from our JCG partner Manish Srivastava at the Android Hub 4 you blog.

Hi Manish,
As illustrated in this example “http://developer.android.com/training/in-app-billing/preparing-iab-app.html#GetSample”, it uses “IInAppBillingService.aidl” file for InApp transactions. But your project does not contain this file. So how exactly your transactions take place. Also please let me know, if in my project, I am making one java package to be of type purchasable, then how to consume it and how to enable it.
Thanks
Yunus
hi Manish,
i will use your source but how to know transaction is complete or not..?
please give me detail overview regarding in-app purchase. i will want only selling
virtual coins. than how to i will check transaction is done. please help me,if its possible than
make me a demo source for me asa possible.