
[Notion Design Edition] 5 Ways to Use the Callout Feature!

Hello, I'm Bee, a university student!
I mentioned this briefly in my introduction post, but my concept for building Notion is Aesthetic × Productivity!
However, looking back at my posts, I realized that many of them are mainly about productivity, so today I would like to focus on the aesthetic side and share how to make Notion look stylish.
Among those, I will introduce 4 Notion designs you can create using the Callout feature, which I use more than any other!
By the way, the Callout feature can be output by selecting it from the plus sign in Notion (or by typing /callout).
It looks like the photo below, and it is designed to make text or characters stand out.

As a slightly stylish title
I think the most common way to use it is for titles or parts you want to emphasize.
You can also add an icon to the left edge, so you can add a ⚠️ mark to write notes, or add your favorite emoji that matches the title, and just by doing that, you can make your Notion look stylish.

Furthermore, you can easily change both the text color and the background color, so you can control the design quite freely!
By matching the color with the overall theme color of your Notion, you can create a sense of unity throughout!
Changing it is easy! Just select "Color" from the six-dot mark that appears next to the plus sign when you bring the cursor to the left edge!

Changing text color and background color
One thing to be careful about here is when you want to change both the text color and the background color.
If you select the text color and then the background color, the changed text color will return to the default black, and conversely, if you select the background color and then the text color, the changed background color will return to the default white. So, when you want to change both, first change the background color.

How to change the text color after changing the background colorThen, as shown in the photo below, you will be able to change both the text color and the background color, and you will be able to further customize the design to your own style!

As a framework
In particular, don't you find that pages like Dashboards, where you place various databases and pages, can get too cluttered?
In such cases, Callouts are also a huge help!
I use the Callout feature as a framework on almost every page.
For example, it actually plays a major role in the job hunting template I introduced previously.
In this template, I have placed three databases—a Task DB, a Company DB, and a Note DB—using various views, but by placing each database inside a Callout, I make them easier to see and clearer about what each database represents.
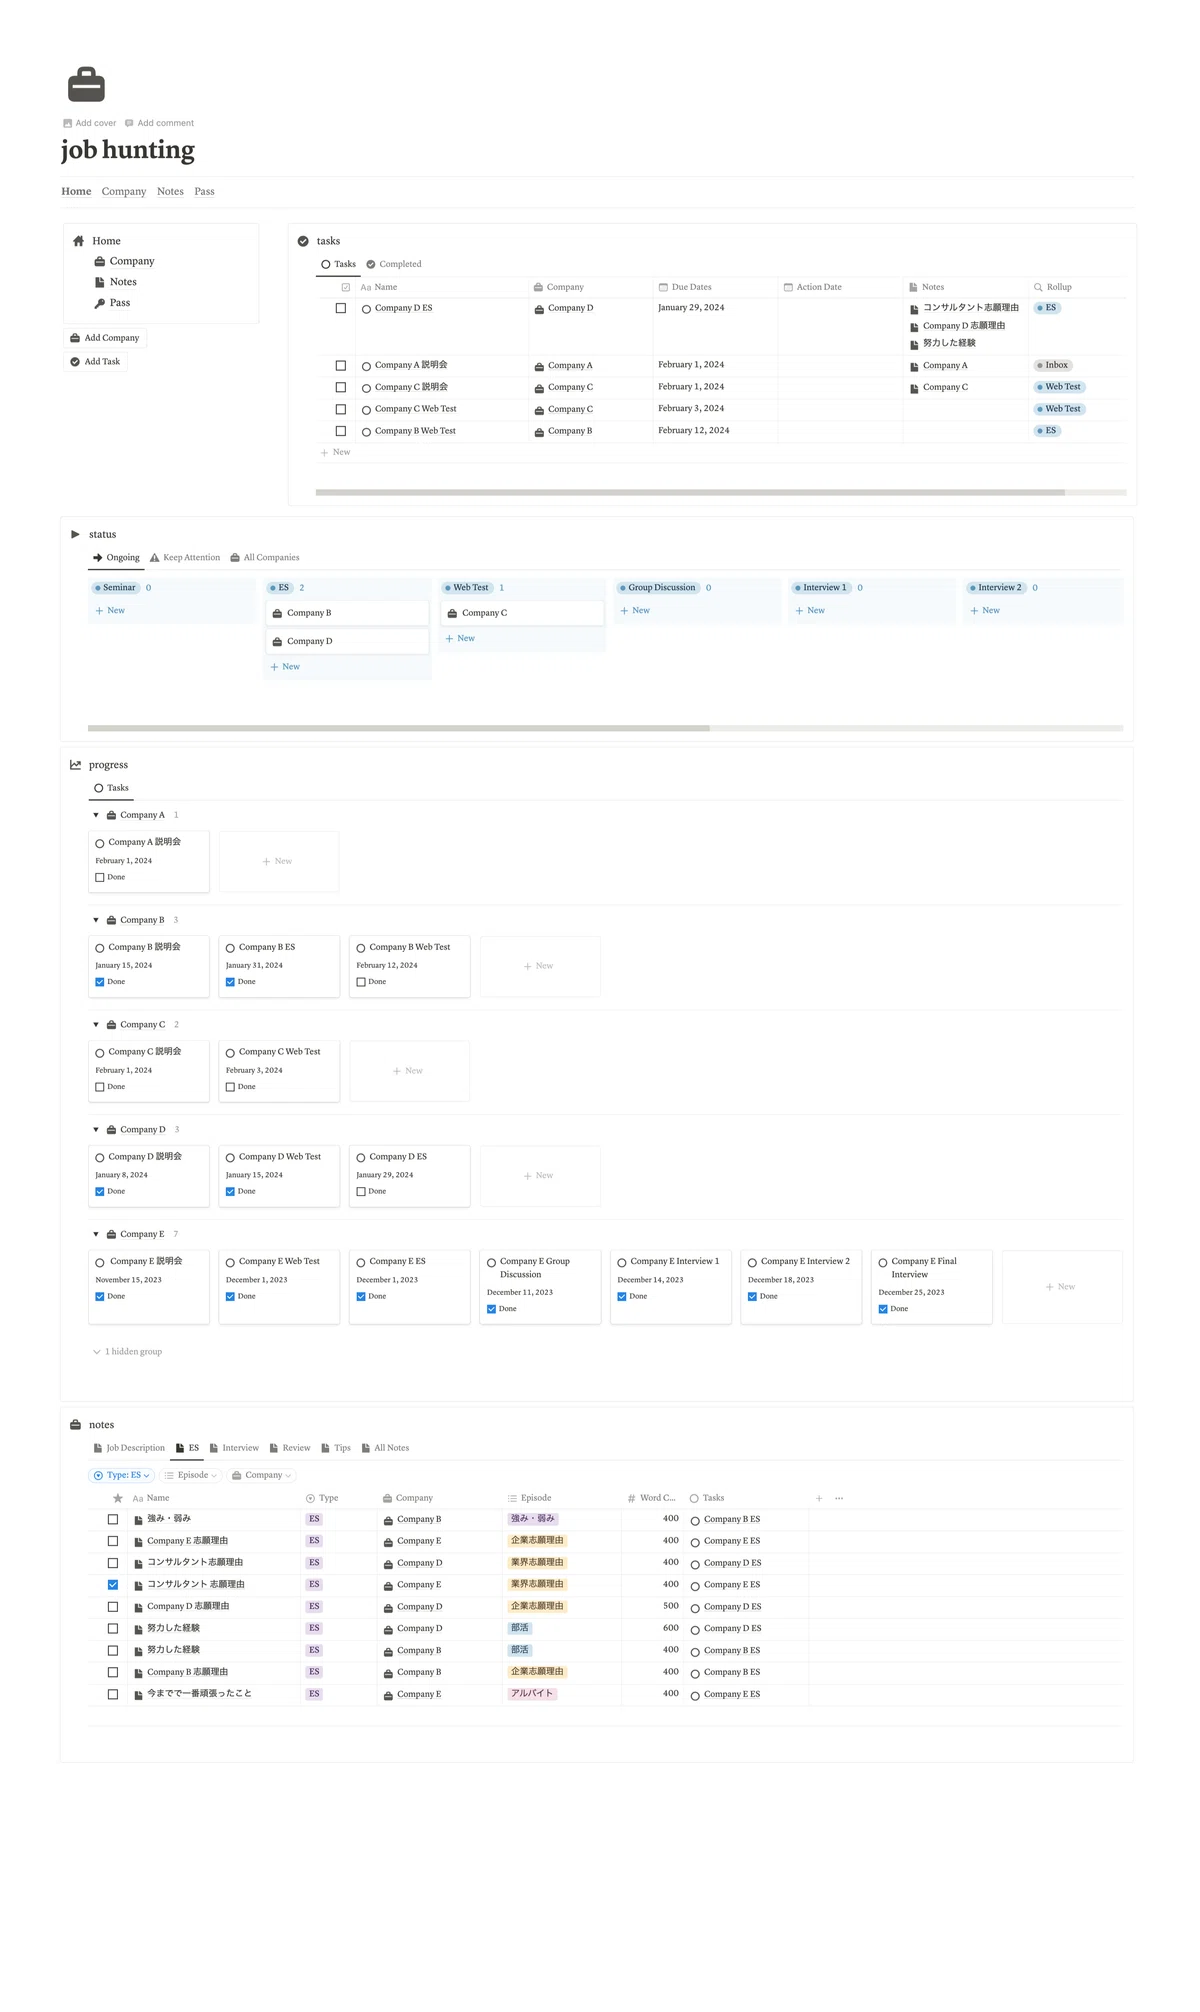
The steps are very simple.
First, create a Callout and enter the content name or similar information for the database you want to include so that it is easy to understand.
At that time, if you also set the icon to match the title, it will be even easier to understand and look more stylish.
Then, create the database or database view on the same page, and simply click the six dots on the left and drag it under the Callout title.
As a navigation bar
The framework and idea are the same, but instead of a database, you can also insert pages to recreate something like a navigation bar.
Following the example of the job hunting template from earlier, this refers to the area under the title enclosed in this 'Home' frame!

The creation method is the same here too!
Create a Callout and just drag the page into it! If you enter an emoji into the page itself, the page will be displayed along with the icon as shown in the photo above, further increasing the design quality!
As presentation slides
Actually, yesterday I participated in a Notion student event for the first time, and I gave a lightning talk (LT). (I will post my thoughts on the event soon 🎵)
Since this is a Notion event, I thought I would try using Notion to create a presentation, so I made slides as follows.

It's almost the same as using a Callout as a framework, but the point is that you can set the Callout icon to your own company or brand icon.
I prepared a presentation titled "Improving QOL with Notion!", so I imagined a sparkling life and added a sparkling emoji.
For the Callout title section, just typing a "." period is fine.
You can also extend the vertical height of the Callout even without writing anything by using Shift + Return, so I create the materials while making good use of the whitespace.
By using "headings" or creating two columns as shown in the image below, you can do things like having text on the left and photos on the right, just like I did.

Slides made with Callouts are stored under a Toggle, giving you the same feeling as flipping through slides.

As a Polaroid-style album
Finally, the three Polaroid-style photos in the middle, which are familiar from my Dashboard, are actually done using Callouts!

The basic creation method doesn't change, but since you're making it look like a Polaroid, the Callout icon feels a bit in the way, right?
In such cases, when setting the icon, go to the custom field and try typing just a "." period!

By doing this, the icon becomes blank, and you can enter only the title! If you don't want to include a title either, I think setting the title to just a "." period is the least distracting!
Next, drag in your favorite photos! I think it looks neat if you unify the size of the photos!
Try making a few similar ones, line them up in a row, and adjust the width!
Finally, since it's a Polaroid, I want a little blank space under the photo.
You can extend the vertical height of the Callout even without writing anything by using Shift + Return!
I use it to visualize my annual goals with images, but you could also input one photo per month to create an album of your memories for the year!
How was it?
This was my first post focusing on design, but I hope you all try these out for yourselves!
I really think it will make you want to look at Notion every day! lol
Well then, until the next post! I'll be waiting!