
[Kind to People and the Planet] Summer Birthday Cake with Plums Made in a Rice Cooker, Plus Handmade Nameplates & Candles

● Gluten-free, wheat/soy/dairy allergy-friendly, additive-free, organic, animal welfare-conscious, non-GMO options available
● Chemical-free natural organic beeswax birthday candles
°𖤐Namekko Seijin's Recipes𖤐°
↑ I also write my articles independently in English.
If you prefer not to read articles automatically translated by AI, I apologize for the inconvenience, but please read the article from this link.

I write these by hand, not with AI.
I choose my words carefully so that as many people as possible can read them easily, but there may be typos, omissions, or unique quirks in the writing.
I also take the photos myself.
I have included photos I have actually taken in the past, as well as photos I have taken specifically for this purpose. Therefore, please refrain from unauthorized reproduction of photos or text (including illustrations) and from using them for AI training.
The summer birthday party that comes every year
I make everything from scratch, including the birthday nameplate, but when I go to buy ingredients for the cake, there are no strawberries to be found.
Instead, bright red plums (Oishi Wase) are lined up on the shelves.
Oishi Wase plums are characterized by their strong acidity, juicy, bursting flesh, and subtle fragrance.
If you are eating them as they are, other varieties are sweeter and more delicious, but their vibrant color and strong acidity are actually perfect for cakes.
…Huh?
Peaches are better?
You like melons or mangoes better because they are sweeter?
Wait a minute!
Don't say that!
Summer means plums.
Plums are peaches too, right!?
It's so delicious when you make the sponge from scratch…

A cake that is minor in the world.
But for me, it has always been a staple.
I want more people to know its charm!
So, this time, I would like to write about:
A recipe for a colorful birthday cake using Oishi Wase plums
Tips for decoration that will look professional even for beginners
A recipe for cake decorations that are kind to people and the planet
I would like to write about these topics in my own way.

● How to make the cake
・About the sponge
Always use one baked the day before.
If you bake it on the day, it will be powdery and not very tasty, so please make sure to bake it the day before.
I always bake mine in a rice cooker.
I whip the whole eggs together without separating them, and I make it without adding butter.
Of course, you can also whip the egg yolks and egg whites separately. Please choose according to your preference.
My recipe for the genoise method, where you don't separate the egg yolks and whites, is below ↓
My recipe for the biscuit method, where you separate the egg yolks and whites, is below ↓
About the eggs used for the sponge cake
The simpler the ingredients, the more the choice of what to use affects the deliciousness.
However, if you ask whether high-end eggs are better, that cannot be said unconditionally.
Ultimately, which one you choose is a matter of personal freedom, but if you want to be particular about your eggs, I have written an article about it before, so please take a look ↓
Since it greatly affects the aeration of the batter, be sure to use fresh ones.
Although it has become possible to purchase ready-made sponge cakes that are gluten-free or additive-free, you can easily make them by hand with simple ingredients and tools, so please use this as a reference.
Try to finish the decoration 3 to 6 hours before eating.
It is delicious to eat freshly made, but it becomes much more delicious after resting in the refrigerator, as the moisture from the cream and ingredients blends well into the sponge.
Plan your schedule and work backward from the time.
It is important to take your time and not rush.
・About Japanese plums (sumomo)
Since you eat them with the skin on, organic or pesticide-free Oishi Wase plums are recommended. The sales period is very short and there are still few producers, but they can also be purchased online.
The taste and size of Japanese plums vary depending on the variety, but you can use other varieties as long as they are reddish in color.
The method for removing the pit is almost the same as for peaches.
The video by Tabegoro Kajuen is very easy to understand, so please use it as a reference ↓
1. Wash well under running water and make a vertical cut all the way around along the seam with a knife.
2. Make another vertical cut all the way around so that it forms a cross when viewed from above.
3. Twist the flesh off with both hands as if turning a Rubik's cube.
(If it doesn't come off well, insert the knife little by little along the pit to remove it.)
You can choose your preferred cutting and arrangement method.
This time, I used 10 pieces of flesh cut into quarters for decoration, and used the rest cut into bite-sized pieces in between. One pack of Oishi Wase (about 8 pieces in total).
You can also use smaller ones and increase the number.
Use the red and well-shaped ones for decoration.
If you taste it and find the acidity is intense, you can balance it by reducing the amount or making the cream sweeter. When making three layers, it is also delicious to reduce the plums and use other fruits like bananas.
I have omitted it this time, but if you want to reduce discoloration, soak them in about 1% salt water for about 10 minutes or sprinkle an appropriate amount of lemon juice to blend.
Once the preparation is finished, keep them in the refrigerator until just before use.
・About heavy cream
The richness changes depending on whether you use low-fat or high-fat heavy cream.
(Around 30% is moderate, and around 50% is rich.)
Heavy cream containing additives is less likely to lose its shape after being whipped, such as in summer, but I think it is unnecessary if you are thinking about your health.
Among the products that can be purchased at general supermarkets, Takanashi's heavy cream is additive-free and personally recommended ↓
If you are concerned about genetically modified organisms, Tanna or Yotsuraku's heavy cream is recommended ↓
For domestic grass-fed additive-free heavy cream, Nakahora Farm ↓
What is grass-fed beef?
It refers to cattle raised freely in a natural environment, eating pasture grass.
Compared to grain-fed, which is mainstream in Japan, it is characterized by less stress and environmental impact. Many meats and dairy products allow you to feel their original deliciousness.
Although it is for commercial use, there is also a shop called Setana Organic where you can purchase organic JAS-certified heavy cream ↓
If you want to reduce the fat content of high-fat heavy cream, the Q&A from Yotsuba is a helpful reference ↓
If you want to make dairy-free cream, please refer to the "Ingredients and Instructions for Dairy-Free Whipped Cream" described later.

・How to cut the sponge cake
Be sure to chill it thoroughly in the refrigerator before placing it on a plate.
Make one vertical and three horizontal guide cuts about 1 cm deep.
While rotating the cake, make small cuts to create a shallow incision all the way around first.
Continue rotating and cutting little by little, and finally cut through the center.
Once you have cut it into three horizontal layers, stack them back together according to your initial guide marks.
This is my own method, but I always rest my pinky finger on the table to keep the height of the knife as steady as possible while rotating and cutting little by little.
There are other methods, such as placing two sticks of the same height parallel to each other on either side of the sponge to guide the knife straight across, or wrapping paper around it before cutting, but I don't use them because preparing the tools is a hassle.
The method of cutting from one direction often doesn't work well with short kitchen knives because the sponge can ride up, so I recommend rotating it and cutting little by little to get a clean cut with everyday tools.
Since you are cutting securely from the perimeter, it significantly reduces the chance of the knife veering off or the cake crumbling. Once finished, wrap it again to prevent it from drying out and put it in the refrigerator until you are done whipping the cream.

・How to make the cream
Ingredients and instructions for animal-based whipped cream
Heavy cream: 200 ml x 2
Strawberry jam: about 4 to 5 tablespoons
Using jam will slightly change the color of the cream, but because the pectin helps it whip faster, I am using organic strawberry jam this time.
(If there are large pieces of fruit, they tend to splatter when whipping, so it is easier to make with smaller pieces of fruit.)
Ingredients and Instructions for Dairy-Free Cream
Instead of using store-bought vegetable-based heavy cream, which often contains many additives, you can make it by hand using coconut milk or rice flour. Soy milk or almond milk are also acceptable.
↓ The video by Mori no Komepan is very helpful, so please take a look if you like.
(Since handling cream differs from animal-based versions, be sure to refer to the description box.)
・Always taste and adjust
Be sure to taste each of the ingredients used for the cream before adjusting them.
Many people suffer from summer fatigue during this season, so if using animal-based cream, I recommend using heavy cream with 35% fat content to keep the sweetness moderate.
In addition to the season, please decide while considering preferences and the timing of when it will be eaten.
・Sweetening is up to your preference
It is also delicious with honey or maple syrup.
Even in small amounts, you can taste a sweetness comparable to sugar, and the overall flavor is enhanced.
Since I am health-conscious, I basically use organic beet sugar, and for things that can be substituted, I often use organic maple syrup, honey, organic strawberry jam, etc.
*Caution when using honey
Honey may contain bacteria called Clostridium botulinum, so never give it to infants under one year old whose intestinal environment is not yet developed.
It is heat-resistant and cannot be sterilized by cooking.
Please wait until after they are one year old to give it to them.
・No need to whip to stiff peaks in summer
Put plenty of ice or ice packs into a large bowl and add water. Place another bowl on top and be sure to whip while keeping it chilled.
Heavy cream is sensitive to heat, so whipping it a bit more firmly during hot weather makes it easier to achieve a good final result.
Even after whipping, please continue to keep it chilled in the refrigerator or with ice packs.

・Layering order and tips
Cream → Plum → Cream → Sponge
Repeat this twice.
The amount you put in between is a matter of preference, but if you avoid placing too much in the center, the tip will be less likely to collapse when cut.

★Tips for spreading cream
First, place a generous amount on top
Spread it thickly over the whole surface, thinking of it as placing rather than spreading
Fill any gaps between the layers thoroughly with cream
Smooth the top surface by sliding the spatula while rotating the plate
Smooth the cream on the sides while rotating the plate
Smooth out any cream from the sides that has poked up onto the top
Finally, wipe off any cream on the plate to finish
If there are gaps or hollows, it will look like holes are forming while you are spreading, so the key is to focus on placing the cream first to fill them in.
↓ Although some parts are different, the Kurashiru video might help you get a better idea of the overall process, so please use it as a reference.
It's like a record player in the old days.
The key is to rotate the plate without moving the hand holding the spatula too much.
If it's difficult, you can also create a stylish finish by adding random textures.
Do not pat it down, as the bottom layer will peel off.
Since the name plate will be decorated in the center, pile up the leftover cream there.
Arrange the plums radially with the pointed ends facing outward. It will look beautiful if you avoid repositioning them once placed.
★Tips for making it look good even if it's simple
・Make other ingredients the star rather than the cream
If you decorate with larger fruits or a message plate, you won't notice the random shape of the cream as much. If you aren't looking for perfection, you don't need a piping bag.
・Keep the plate at the base clean at all times
Even if you are dressed casually, if your shoes are shiny, you look well-dressed.
A cake is the same in a sense; if you keep the plate at the base free of cream smudges, it will look neat even if the top is spread roughly.
If it gets dirty, fold a clean tissue or cloth and wipe around the edge in one go.
Although I don't really recommend it in the summer, if you do use a piping bag, please refer to this way of presenting it as well ↓
●How to make a simple handmade name plate
・Ingredients for the plate
Since most commercially available ones contain many additives and artificial colors, I often make them by hand.
You can use a chocolate bar as a base, but in summer, the temperature difference between the refrigerator and the room is extreme, making it prone to condensation. Personally, I recommend using a biscuit as a base because it is less likely to lose its appearance.
Biscuits go relatively well with any kind of cake ingredients.
↓ These are the ones I often use

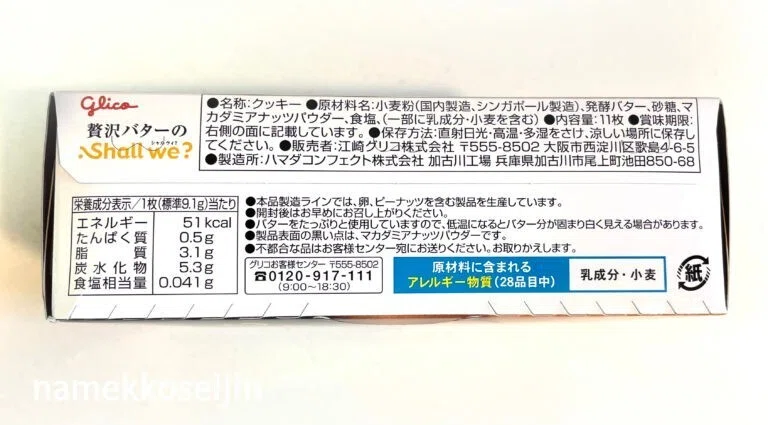
・Glico Fermented Butter Shortbread
[Ingredients]Wheat flour (domestically produced, Singapore produced), fermented butter, sugar, macadamia nut powder, salt (contains milk ingredients and wheat in part)
Since there is no further information on the origin, I cannot say for sure, but as of now, it is one of the few additive-free biscuits that can be purchased at supermarkets.
It also contains no shortening or baking powder.

・Walkers Shortbread
[Ingredients]Wheat flour, butter, sugar, salt
Although the saltiness is a bit strong, British biscuits are also becoming easier to buy at Japanese supermarkets. Depending on the size of the cake, using 2 to 4 pieces is just right.
There are organic biscuits, but there are few square ones and few with simple ingredients, so I hope there will be more in the future.

↑ If you want to choose rice flour cookies instead of wheat, I also recommend this one.
These are wheat-free and dairy-free rice flour cookies that are made with ingredients that are kind to the body.
Genki Town Gentle Soy Milk Cookies Plain
[Ingredients]Rice flour (domestic), beet sugar (domestic), rapeseed oil (non-GMO), organic soy milk, soybean flour (domestic), sweet potato starch (domestic), organic coconut, natural salt
・You can also make them by hand with rice flour cookies
This is a body-friendly cookie recipe that is free of eggs, butter, soy milk, nuts, and sugar.
kinako's recipe is very helpful ↓

While the cake is resting in the refrigerator, I write the letters.
Since they are individually wrapped, it is easy to adjust the number of pieces according to the letters. The small holes are also convenient as a guide when writing.
A total of 11 pieces. I used 4 this time.
The point is to write slightly towards the top because it will be fixed to the cake. If you use a large, orthodox font, even a beginner can write it easily.
The leftover chocolate can be used to glue the biscuits. Put it in the refrigerator after you finish writing.
- Various Deco Pens
Even natural pigments can cause allergies or discomfort in some people, so I recommend using standard brown deco pens.
If you want to make your own deco pens, this video by a pastry chef is easy to understand and helpful ↓
Please make sure to use tools sold for food preparation.
For how to choose the chocolate to use, please refer to the article below. I also write about organic chocolate and chocolate that does not contain any of the 28 major allergens.
If you want to write with something other than chocolate, there is also Joyvege made from vegetables ↓

You can make your own deco pens, but I hope the day comes soon when additive-free or organic ones are commonly available in supermarkets.

- Decorate and it's done
If you like a crunchy texture, it's best to add them when you decorate with candles.
This makes for a very voluminous cake.
It's incredibly satisfying.


★ Tips for cutting cleanly
Chill the cake thoroughly before cutting
Make sure to sharpen your knife well beforehand
Warm the knife over a stove or in hot water, wipe off the moisture well, and then cut
Wipe the knife each time it gets dirty, and warm it again before cutting
Try to move the knife in small, short strokes as much as possible when cutting
If the plums are difficult to cut, take them out onto a separate plate and cut them individually
If cream gets into the gap between the sponge cross-section and the knife, it will look messy, so try to keep the knife from wobbling left or right as much as possible.
The key is to cut with small strokes while keeping the knife pressed against both sides of the cross-section.
No matter how much you cut, the cross-section remains fluffy!
Juicy and tart Oishiwase plums go very well with whipped cream and sponge cake.
I would be happy if those of you who are thinking, "Huh? Are plums really okay?" could use this as a reference.
● About Birthday Candles

・Thinking about birthday candles that are kind to people and the planet
From here on, it's a bit of a digression.
I think about this every time I use birthday cake candles, but the smell of the smoke after blowing them out bothers me a little.
Even with ventilation, I'd rather not breathe in this smoke...
I used to work as a prototype maker and handled wax frequently, so I have various thoughts on this.
Back then, I would melt modeling wax containing synthetic fragrances and petroleum-derived paraffin using wax pens or high-temperature soldering irons to create prototypes every day.
Smoke was an everyday occurrence.
It was normal back then, so I didn't think much of it...
But now, I really feel that it's not good for the body.
At some point, I started wanting to buy or make my own birthday candles using safe wax instead of paraffin.
Looking only at the price, it may seem unrealistic, but I believe that as one option, it is something that could naturally exist in the coming era.
And,
if the skills I have cultivated so far can be used to improve the dining table shared with loved ones on special days, I want to make something myself and share it.
First, I would like to write about something that is easy to make even for beginners.
Hmm, I see. I would be happy if you could take even a little interest, thinking, "Oh, there are things like this too."
・Beeswax is recommended for candle wax

To put it simply, beeswax is the material for honeybee hives.
It is a natural wax secreted from the bodies of honeybees that have eaten honey and pollen. Those who have eaten honeycomb honey might already know this.
Since it is made by removing impurities after harvesting honey, it has the sweet scent of honey. It is also used in lip balm and sweets (canelés).
・If making it the traditional way
Orthodox candles made by dipping them in wax little by little are called taper candles. If you want to handcraft thin, short birthday candles with beeswax, this method is simple and easy to do.
↓ The video by Lutron is easy to understand and serves as a good reference for how to make them.
・If using a DIY kit
There are also kits that allow you to have fun making them like a craft project, even without a pot or special tools.
In the past, it was standard to melt, pour, and mold them, so I was shocked when I first found beeswax sheets.
They are convenient because they can be handled like paper or clay.
↓ Next is for intermediate users
・If making them using molds
If you create a prototype of your favorite shape and make a mold, you can make many candles at once.
Konjac mold
This is a body-friendly mold made from food-grade materials.
It is not suitable for molding fine details or for long-term storage, but it is very convenient when you want to make things with small children or create a base shape in a short amount of time.
↓ This video is a helpful reference for detailed usage instructions
However, it seems they are no longer being sold.
Purchasing them might be difficult.
If I see them back on sale or find other products, I will introduce them here again.
Silicone mold
↓ Although it is a bit large to put on top of a cake, I will also introduce a video from a honey shop because it provides a good reference for how to handle molds and beeswax
About how to make silicone molds
If you have a prototype in a shape you like, you can enjoy it even more by taking a mold of it.
I have written an article before on how to make molds, so please read it ↓
This shows the process when I made it using wax for soft vinyl prototypes, but I am posting it here because it can be applied to beeswax sculpting to some extent.
■■■ Precautions when making with beeswax for food use ■■■
When using them for food, you need to pay more attention to hygiene and safety than usual.
Even if you have tools you are used to using, please pay close attention to the following points.
・Do not make them for babies under 1 year old
・Make them in a hygienic environment such as a kitchen
・Do not use anything other than food-safe materials
・Always use cooking utensils and food-grade materials
・Do not share tools or materials for other purposes
Please try to work with the mindset of making food from start to finish.
■Examples of tool substitutes
・Cutting mat → Wooden cutting board / Thick food-grade silicone sheet
・Cutter → Steak knife or fruit knife
・Acrylic ruler → Stainless steel ruler
・Awl → Toothpick / Barbecue skewer
・Spatula → Stainless steel spatula / Disposable chopsticks
・Silicone → Food-grade silicone
・Cardboard → Food-grade cardboard
・Thermometer → Food-grade thermometer
・Marker → Food-grade marker
・Adhesive → Melted beeswax / Rice / Food-grade adhesive
・Packaging material → Plastic wrap / Aluminum foil / Parchment paper
・Cleaning solution → Alcohol / Dish soap
・Straining cloth → Dish towel / Tea bag / Kitchen paper
・Work gloves → Oven mitts
↓ When choosing silicone, it is safer to use silicone that has undergone component analysis
・If you want to make it without a mold
If you have a container with the right shape, you don't need a mold. However, while containers like paper cups are convenient, almost all of them are coated with plastic. Please check before purchasing.
Since you will be pouring in hot wax, I use tableware that is dishwasher and microwave safe when making it without a mold.
Heat resistant
Safe for food use
Suitable for hot water baths or microwave use
Smooth surface
No grooves or constrictions
Vertical walls
Has a suitable height
Not used on a daily basis
If you have tableware like this, it is just right.
Since it will be used for a cake, please avoid using ones for aromatherapy.
・You can also make molds by hand with ingredients you have at home
For a simple, single-use clay mold, you can also make it with rice flour, oil, and water.
Mix rice flour and water in a 3:1 ratio and add a small amount of oil to knead it together. Since the water absorption rate and firmness vary depending on the rice flour, please adjust the amounts while checking the consistency.
It is not suitable for making precise prototypes because the size changes when it dries, but people with allergies or sensitive skin can work with it safely.
Once the clay is ready, press your desired prototype directly into it to create an indentation to use as a mold.
Pour the wax in before it dries, and once it has hardened, remove the surrounding clay.
◆ Tips for making it by hand
・Gather gentle materials

Organic beeswax
For children over one year old, I recommend beeswax, which is gentle on the environment and the body and produces little soot.
And just like honey, there is also organic beeswax. Rather than beeswax made by bees that are routinely fed antibiotics or artificial sugar water, I choose beeswax from bees that live as close to nature as possible.
Characteristics of Beeswax
・The kindest and least burdensome wax for the body
・Does not produce unpleasant odors when burned
・Has a delicious, sweet scent even while working with it
・Has moderate hardness, making it relatively easy to shape
・Has moderate stickiness, making it resistant to cracking
・Must be heated and melted to attach, otherwise it will peel off
・Can be a bit difficult to clean if it gets on other things
・Color fades when exposed to sunlight
・Melting point is relatively low
・Volume decreases when cooled

Block-type beeswax is easier to melt if you shave it like peeling skin using a steak knife, which can also be bought at a 100-yen shop.
For those who find that troublesome, there is also beeswax available in pellet form.

No synthetic fragrances or synthetic colorings added
I wanted to stick to natural organic materials for the colors, so I chose items from my kitchen.
I will put about 5g of beeswax and the dye into the container on the left, melt them, and try making 8 types as a test.
From top left: beet, coffee, plain
No matter how much I mix it, it stays the same color as plain and sinks.
From middle left: turmeric, cinnamon, paprika
Spices used in curry powder are easy to color with.
From bottom left: matcha, pure cocoa, cayenne pepper
These are oil-soluble and provide solid colors.
I omitted black sesame seeds as they have a high oil content and seem likely to affect the hardness. I also omitted purple cabbage as it is not often sold at supermarkets. (It is likely water-soluble.)
Beet and coffee are water-soluble and do not melt at all.
Cafe au lait that I drink casually every day. Coffee is actually dissolved in whey, not in the milk fat.
For brown, cocoa has better color development and blends more easily than cinnamon. The beeswax acts as a substitute for cocoa butter, making it just like chocolate.
If you are interested in other natural pigments, the research data from the Rokko Biological Science Research Institute might be somewhat helpful. It is interesting because there are so many kinds.
・Gather gentle tools

Use food-safe materials for the wick as well
I use metal-free materials that are less likely to produce harmful substances when burned.
Since this is not a candle for food use or long-term use, I will use kitchen twine, which is often used for tying meat.

Prepare tools for shaping
From the top:
・100-yen shop steak knife
・100-yen shop barbecue skewer
・100-yen shop parfait spoon
・100-yen shop crab fork
・100-yen shop small fork
・Self-made pure copper wax pen
・Three handmade disposable chopstick spatulas
Others:
・Toothpick
・Kitchen paper
・Parchment paper
・Stainless steel tray
・Alcohol spray
I also clean and disinfect the tools before using them. Since beeswax is relatively soft, you can work with tools made by hand from disposable chopsticks. If the tip of the chopstick is slanted, it can be used just by splitting it.
Although not in the photo, I use a hole-punching tool made by cutting the tip of a toothpick handle to half its thickness.
You can easily make holes by pressing it down while rotating it with your hand.

★A little trick for the wax pen
A convenient wax pen that can melt wax.
The pen tip for shaping is made of brass with nickel plating.
Since there are concerns about nickel causing metal allergies, I arranged it to be made of pure copper.
I couldn't find a highly safe material like copper for the wax pen tip, so I chose a pure copper tip for a soldering iron.
I wrapped aluminum foil around the existing pen tip and covered it with the new one to fix it in place.
Copper is a highly safe metal also used in pots and tableware.
It becomes longer and the thermal conductivity drops slightly, but it is sufficient for beeswax if you set the temperature a little higher.
(I hope that pure copper pen tips will also be manufactured for wax pens.)
● How to make handmade candles

1. Make the main body
Break the beeswax into small pieces as you would chocolate, and place them in a container.
It is common to melt it in a double boiler on a small stove, but if you are using a small amount, you can also melt it in a double boiler in the microwave.

It has the property of shrinking in volume as it cools, so the center will become concave.
Once it has cooled and hardened thoroughly in the refrigerator, take it out.
Warm the sides and bottom with a double boiler or a hair dryer to melt them, and flip it onto parchment paper just like you would when removing pudding from a mold.

2. Drill a hole with a toothpick and thread the wick through
It is easier if you moisten the tip beforehand, just like with regular thread.

3. Add beeswax to the bottom to seal it
Add pieces of beeswax and work while melting them with a wax pen. The key is to embed the wick so that it stands upright.
Wax cannot be completely bonded unless the wax surfaces are melted and mixed together.
Simply pouring it from above is not enough, so having a wax pen is reassuring.

4. Repeatedly apply beeswax to the wick to make a candle
Thin, short ones are finished quickly.
For larger ones, fold the tip of the wick before applying, and melt it out later.

5. Shape the entire piece
Place chunks of beeswax on areas that need more, and melt them to add volume.
If you find bubbles or cavities inside, melt them with a wax pen and add more wax to fill them as cleanly as possible, as these can cause cracks.
When finished, shave the whole thing and polish the surface.
■ Tips for comfortable beeswax modeling
・Trim your nails and remove rings, etc.
(Because it is easy to scratch the wax if you hit it)
・Cut paper towels, etc., beforehand
(To make it easier to wipe away shavings and oil)
・Basically, never pour wax down the sink
(It will stick and clog the drain, so dispose of it in burnable trash)
■ Polishing with a paper towel dampened with alcohol
Actually, it would be much faster to use chemicals like A-Benzine used for stain removal, but that is taboo for birthday candles.
Although alcohol does not have the power to melt unevenness, if you combine it with a paper towel, you can make it shiny without compromising safety.

6. Apply color wax to the parts you want to color and blend it in
If you just place it on, it will peel off, so mix and melt the bonding surface appropriately. You can use color wax for everything, but since it will produce an odor when burned, for better or worse, the key is to melt it thinly only on the surface as much as possible.

7. Trim the wick, wash, and wrap with aluminum foil
If the wick is too thick, melt away the excess wax, and if it is too short, add more. Don't forget to cut it to an appropriate length. When finished, wash with dish soap, wipe off the moisture, and once dry, wrap it in aluminum foil.
Adjust the length as you like. This time, I cut 4cm aluminum foil into four equal parts, making them 4x6cm.
Fold one side of the length and width inward by 5mm, and roll it from the unfolded side.
Finally, shape the tip so that it becomes thin.

From the left: turmeric, paprika, cayenne pepper, cinnamon, matcha, pure cocoa, and the original character candle are also complete!
The character that is the motif for this original candle is my own character, Love-Me. Details and background are below ↓

Since it is made with body-friendly materials, it is safe even if it accidentally melts and drips onto the cake, but beeswax birthday candles melt a bit quickly, so please blow them out early.
The flame size and burn time will vary depending on the type and amount of dye mixed in, as well as the length of the candle and wick. It is quite difficult to make them uniform when making various types, but I hope you can enjoy that as a unique charm of handmade items.

Storage and Usage
Beeswax is sensitive to sunlight and humidity, so after wrapping it in a paper towel, wrap it in something that can block light, such as aluminum foil, and store it in an airtight container with a desiccant.
When using it next time, check carefully for mold or dirt on the surface, wash it again, disinfect it with alcohol, and then wrap it in new aluminum foil.
Over time, a whitish oily substance may appear on the surface of the wax, but you can wipe it off with alcohol and reuse it.

Cake is not just delicious to eat.
Eating it is just a moment. But, for that precious moment.
For the person cooking,
for the person eating,
for the person making,
for the person producing,
and for the environment.
There are things we can do to reduce the burden on each of them.
A single birthday cake is packed with care and thoughts.
This time, I wrote about it in my own way, including the inedible decorative parts.
(After all, I returned to my roots as a model maker.)
I am deeply moved that in the process of making birthday candles, I also created a highly safe wax that can be used for modeling.

When you color beeswax with matcha, it becomes easier to see the shape, making it a wax suitable for modeling.Strain it with a tea bag or use wax other than the bottom part where powder tends to accumulate. Chocolate lovers can use pure cocoa to color it, but depending on the storage conditions, insects might come, so please be careful after making it just in case.
If you want more firmness,
add your preferred amount of carnauba wax, which is plant-based and highly safe.
While it becomes more prone to cracking when force is applied, it becomes more resistant to wear and contact, and it also becomes easier to create fine, sharp details.
While there is an increasing number of food products that are well-considered for safety and the environment, when it comes to candle and wax prototype production, price and efficiency are often prioritized, and the health of the creator and environmental considerations tend to be secondary.
Even though there are some workplaces that use beeswax, the reality is that they are still few and far between.
I know that production costs are limited and it is difficult in reality, but I hope that more flexible material selection and consideration will be practiced in manufacturing workplaces as well.
I don't think there are many people who make candles from scratch in the first place, but since the barrier to entry for handmade items has lowered, I hope this article will be of some help to you as one option.
Thank you for reading.
About Updates
(I will write here if there are major changes.)
2024.6.25
Updated to better accommodate various allergies.
Pursuing sustainable recipes that are easy to adapt even if the people eating or the production environment changes.
2024.7.9
Added detailed information about eggs, fresh cream, and plums.
2024.7.10
Added Walkers Shortbread.
Added photos and explanations using handmade candles.
2024.8.11
Created an English version of the article and added a link.
Last updated: 2026.5.15
I am not a shill or an ambassador.
When I talk about specific products, people suspect I am a shill or an ambassador, but I am writing about products that I genuinely like or can recommend. I would be happy if I could share information about good things with everyone.
Product details and sales status change little by little.
Even if I write the latest information, it becomes past information, so there are products whose contents have been changed, or which have been discontinued or are no longer sold.
I update the article as needed when I find other good things, but if I don't find anything better, I will leave it as information on good products from the past. Please be sure to check the latest information carefully before purchasing.
I write articles with sufficient consideration for allergies, but it is not always perfect. If someone with allergies is going to eat it, I recommend checking with the manufacturer before purchasing.
I will continue to update this article.
I don't think it's something you read once and finish, so I would be happy if you could refer to this article whenever you have the opportunity.
Thank you for your continued support.
↑ List of all articles & magazines
いいなと思ったら応援しよう!
 「面白かった」「参考になった」と感じていただけたら、いいねやコメント、チップをいただけると大変励みになります。
皆さまからの応援が、記事の執筆や継続的な情報発信の大きな原動力になっています。
いつも温かく見守ってくださり、本当にありがとうございます。
「面白かった」「参考になった」と感じていただけたら、いいねやコメント、チップをいただけると大変励みになります。
皆さまからの応援が、記事の執筆や継続的な情報発信の大きな原動力になっています。
いつも温かく見守ってくださり、本当にありがとうございます。