
Supplementary Guide for Using FLUX.1 on ComfyUI (NF4, GGUF support, etc.)

* Last update 9-7-2024
* (9-7) Fixed some confusing parts.
* (8-15) I wrote an article about the FLUX.1 generation features integrated into X's Grok. For your reference.
* This mainly contains information for using "split models (see 1.-2.)","NF4 models (see 3.)", and "GGUF models (see 4.)". "Launch options (see 6.)" are also included.
■ 0. Overview
▼ 0-0. About this article
This article focuses on providing additional information to the already published explanatory articles.
The article above
explains how to use the FP8 model integrated into a single file and the workflow designed for it.This article
provides supplementary information for using split-file models (available in FP16 and FP8 versions) and the workflow designed for them. For reference, integrated models are also mentioned.
Furthermore, it explains how to support NF4 models and GGUF models that appeared later.
▼ 0-1. References
For models, please refer to the articles below (and the older articles linked from them).
■ 1. Downloading split models
These are models where CLIP, UNET, and VAE are not integrated, including the original release. If you use a workflow that utilizes these, you need to download each file and place them in the appropriate directories.
▼ 1-1. Files to place in ComfyUI\models\clip\
The URLs and files to download are as follows. It is recommended to use t5xxl_fp16 if you have 32GB or more of main RAM.
-
https://huggingface.co/comfyanonymous/flux_text_encoders/tree/main
clip_l.safetensors (234MB)
t5xxl_fp16.safetensors (9.11GB) or
t5xxl_fp8_e4m3fn.safetensors (4.55GB)
▼ 1-2. Files to place in ComfyUI\models\vae\
The URL and file to download are as follows.
▼ 1-3a. Files to place in ComfyUI\models\unet\
When using FLUX.1 [schnell], the URL and file to download are as follows. For FLUX.1 [dev], please refer to the next section.
https://huggingface.co/black-forest-labs/FLUX.1-schnell/tree/main
flux1-schnell.sft (22.1GB)
Models pruned to FP8 (reducing precision to save space) are also available. The benefits may include reduced dedicated GPU memory (VRAM) usage and faster loading times.
https://huggingface.co/Kijai/flux-fp8/tree/main
flux1-schnell-fp8.safetensors (11.0GB)
▼ 1-3b. When using FLUX.1 [dev] (Reference)
If you are using FLUX.1 [dev] instead of FLUX.1 [schnell], the download location is different.
https://huggingface.co/black-forest-labs/FLUX.1-dev/tree/main
flux1-dev.sft (22.1GB)
Models pruned to FP8 (reducing precision to save space) are also available. The benefits may include reduced dedicated GPU memory (VRAM) usage and faster loading times.
https://huggingface.co/Kijai/flux-fp8/tree/main
flux1-dev-fp8.safetensors (11.0GB)
■ 2. Downloading the workflow
There are four types of workflows posted in this section.
To note in advance, as of the time of writing, the "workflow for split models (schnell)" still contains outdated content (perhaps it was forgotten to be updated?), so I recommend using the workflow for split models (Dev).
▼ 2-1. ComfyUI official workflow
Download the workflow released by the ComfyUI team that supports split models. First, please access the URL below.
Flux Examples (ComfyUI_examples)
https://comfyanonymous.github.io/ComfyUI_examples/flux/
▼ 2-2. Workflow for split models (Dev)
You can use it by downloading the image posted under "Flux Examples > Regular Full Version > Flux Dev" to any location and dragging and dropping it onto the ComfyUI screen.

The initial state of the workflow is as shown in the image below. You can also change the "weight_dtype" to use the model at FP8 precision. Note that if you are using the FP8 version of the model, you can leave it as "default".
With this workflow, don't forget to change the steps to 4 if you are using the Schnell version of the model.

▼ 2-3. Workflow for split models (Schnell)
You can use it by downloading the image posted in "Flux Examples > Regular Full Version > Flux Schnell" to any location and dragging and dropping it onto the ComfyUI screen.

Upon checking, this was still outdated. While it can still be used, the Dev version workflow is recommended.

▼ 2-4. Workflow for integrated models (Dev)
For reference, I have also posted the workflow for integrated models.
You can use it by downloading the image posted in "Flux Examples > Simple to use FP8 Checkpoint version > Flux Dev" to any location and dragging and dropping it onto the ComfyUI screen.

The workflow for integrated models has a simple structure.

▼ 2-5. Workflow for integrated models (Schnell)
You can use it by downloading the image posted in "Flux Examples > Simple to use FP8 Checkpoint version > Flux Schnell" to any location and dragging and dropping it onto the ComfyUI screen.

The only difference from the Dev version is the initial value.

■ 3. Support for NF4 models
▼ 3-1. About NF4
Stable Diffusion WebUI Forge has recently gained attention for proposing a format called NF4, which is different from the conventional FP16 or FP8, at the same time as it added support for FLUX.1. Please check the topic below for details.
[Major Update] BitsandBytes Guidelines and Flux #981
https://github.com/lllyasviel/stable-diffusion-webui-forge/discussions/981
Since there are already multiple NF4 models available, we will enable generation using them. I referred to the article below.
▼ 3-2. Preparing ComfyUI
Install the extension at the URL below to introduce the necessary packages. Just to be safe, please update ComfyUI first.
Open the command prompt, navigate to "ComfyUI\custom_nodes", and execute the command below.
git clone https://github.com/comfyanonymous/ComfyUI_bitsandbytes_NF4Next, install the necessary packages. The command below is for the portable version.
..\..\python_embeded\python.exe ..\..\python_embeded\Scripts\pip.exe install -r ComfyUI_bitsandbytes_NF4\requirements.txtFor the standard version (where there is a venv directory in the ComfyUI installation folder), please execute the following commands in order.
..\venv\Scripts\activate
pip install -r ComfyUI_bitsandbytes_NF4\requirements.txt
deactivate
If the execution finishes with a display like the one below, it is successful. Please close the command prompt.
(略)
Requirement already satisfied: MarkupSafe>=2.0 in d:\aiwork\comfyui_windows_portable\python_embeded\lib\site-packages (from jinja2->torch->bitsandbytes>=0.43.0->-r ComfyUI_bitsandbytes_NF4\requirements.txt (line 1)) (2.1.5)
Requirement already satisfied: mpmath<1.4,>=1.1.0 in d:\aiwork\comfyui_windows_portable\python_embeded\lib\site-packages (from sympy->torch->bitsandbytes>=0.43.0->-r ComfyUI_bitsandbytes_NF4\requirements.txt (line 1)) (1.3.0)
Using cached bitsandbytes-0.43.3-py3-none-win_amd64.whl (136.5 MB)
Installing collected packages: bitsandbytes
Successfully installed bitsandbytes-0.43.3
▼ 3-3. Downloading and installing the model
Download the file from the URL below and move it to "ComfyUI\models\checkpoints\". Other models that have been confirmed to work will be mentioned later.
https://huggingface.co/lllyasviel/flux1-dev-bnb-nf4
flux1-dev-bnb-nf4.safetensors (10.7GB)
or
flux1-dev-bnb-nf4-v2.safetensors (11.2GB)
(the latter is an adjusted version, which is recommended)
▼ 3-4. Obtaining and loading the workflow
Access the URL below and download the image. You can save it anywhere. This workflow seems to be exclusively for NF4 models.
Launch ComfyUI and load the workflow. You can also load it using the "Load" button.
▼ 3-5. Executing generation
If the steps up to this point are correct, you should be able to generate images.

In my environment (Ryzen 5 3600, DDR4-3200 32GB, GeForce RTX 3060 12GB), the generation times for a 1024x1024 resolution were as follows. You can see that even with the same number of steps, NF4 generates faster than FP8 (this may be because the resource shortage has been improved).
4 Steps - NF4 (flux1-bitte-guidance-bnb-nf4.safetensors)
16 seconds4 Steps - FP8 (reference for comparison)
approx. 35 seconds20 Steps - NF4 (flux1-dev-bnb-nf4.safetensors)
approx. 78 seconds20 Steps - FP8 (reference for comparison)
approx. 145 seconds
▼ 3-6. Other available NF4 models
Upon verification, it seems that bnb-nf4 models can be used.
flux1-nf4-weights
https://huggingface.co/silveroxides/flux1-nf4-weights/tree/main
flux1-bitte-bnb-nf4.safetensors
flux1-bitte-guidance-bnb-nf4.safetensors
flux1-salto-v***-bnb-nf4.safetensors
flux1-schnell-bnb-nf4.safetensors
flux1-schnell-nf4.safetensors (*)
(*) Cannot be loaded on the ComfyUI
■ 4. Support for GGUF models
▼ 4-1. About GGUF
GGUF is a format mainly used for LLMs. As the number of parameters increases, models become massive, so by quantizing and reducing the bit count in this format, they can be easily used even in environments with limited VRAM.
▼ 4-2. How to support the GGUF format
For ComfyUI to support the GGUF format, you need to install both the extension node and the necessary packages. The following is a replacement for the NF4 support procedure, so please forgive me if there are any errors.
Install the extension from the URL below and introduce the necessary packages. Just to be safe, please update ComfyUI first.
Open the command prompt, navigate to "ComfyUI\custom_nodes", and execute the following command.
git clone https://github.com/city96/ComfyUI-GGUFNext, install the necessary packages. The following command is for the portable version.
..\..\python_embeded\python.exe ..\..\python_embeded\Scripts\pip.exe install -r ComfyUI-GGUF\requirements.txtFor the standard version (where there is a venv directory in the ComfyUI installation folder), please execute the following commands in order.
..\venv\Scripts\activate
pip install -r ComfyUI-GGUF\requirements.txt
deactivate
Once the procedure is complete, close the command prompt. If you are closing it without doing anything after "deactivate", you do not need to run deactivate.
▼ 4-3. Downloading and Installing the Model
Please download the file from the URL below and move it to "ComfyUI\models\unet".
Which one is best depends on your environment, but since FP8 and NF4 already exist, I think the ones with Q4 or lower are the most beneficial to use. If you have a sufficiently rich environment, Q5 or higher, Q8, and F16 are also options.
[GGUF/unet] FLUX.1 Dev
https://huggingface.co/city96/FLUX.1-dev-gguf
flux1-dev-Q2_K.gguf (3.8GB)
flux1-dev-Q3_K_S.gguf (4.9GB)
flux1-dev-Q4_0.gguf (6.3GB)
~[GGUF/unet] FLUX.1 Schnell
https://huggingface.co/city96/FLUX.1-schnell-gguf
flux1-schnell-Q2_K.gguf (3.7GB)
flux1-schnell-Q3_K_S.gguf (4.9GB)
flux1-schnell-Q4_0.gguf (6.3GB)
~
There is also a GGUF version of the model "Flux Fusion DS," which can generate images in fewer steps, so I will introduce it here.
Flux-Fusion-DS-merge-gguf-nf4-fp4-fp8-fp16
https://huggingface.co/Anibaaal/Flux-Fusion-DS-merge-gguf-nf4-fp4-fp8-fp16
gguf/FusionDS_v0_Q4.gguf (6.3GB)
gguf/FusionDS_v0_Q5.gguf (7.7GB)
gguf/FusionDS_v0_Q8.gguf (11.8GB)
▼ 4-4. Creating a Workflow
If you do not have a workflow that supports GGUF format models, you will need to prepare one yourself. We will modify the workflow released by the ComfyUI team that supports split models. First, please access the URL below.
Flux Examples (ComfyUI_examples)
https://comfyanonymous.github.io/ComfyUI_examples/flux/
Download the image posted under "Regular Full Version > Flux Dev" to any location, and drag and drop it onto the ComfyUI screen.

Once the workflow is loaded, click on the "Load Diffusion Model" node at the top left and press Delete, or right-click and select "Remove" to delete the node that loads the model.

If you want to keep the node, you can disconnect it by dragging and dropping the connected point to an empty area, or by clicking the point in the middle of the connecting line and selecting "Delete".

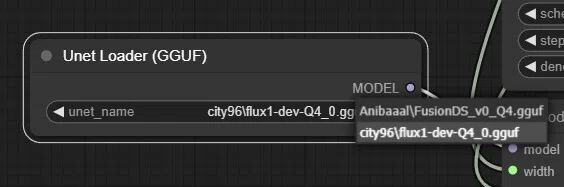
Next, double-click in an empty area and search for "gguf." You will find "Unet Loader (GGUF)"; click the name to add the node.

Drag and drop from the point on the "MODEL" section of the added node to the "model" section of the "ModelSamplingFlux" node to connect them. The workflow is now complete.

▼ 4-5. Generating images with GGUF models
Now that everything is ready, let's try generating an image. If you want to save the workflow just in case, please do so from the "Save" menu.
First, set the file in the loader. You can select it using the left and right arrows, or double-click the field where the settings are displayed to select from a list.
If everything is correct up to this point, you can generate images with the GGUF model as shown in the screen below. The CLIP and VAE settings may differ from the defaults, so please check them if an error occurs.

Finally, let's compare the GGUF models. There don't seem to be any particular issues with "flux1-dev-Q4_0.gguf".

Next is "flux1-dev-Q3_K_S.gguf". It still seems okay for now, but there might be differences if we investigate further.

Finally, there is "flux1-dev-Q2_K.gguf". It looks like it has become messy.

■ 5. Bonus
▼ 5-1. Bonus image
Generated using the FP8 version of FLUX.1 [dev] with 20 steps. The size is 1440x816. In the author's environment, it takes about 125 to 140 seconds to generate (excluding model loading time). Please feel free to use the prompt (including modifications, etc.).

■ 6. Launch options
▼ 6-1. List of launch options
ComfyUI startup options can be displayed by running "python main.py -h". For reference, the output as of 8-19-2024 is provided below.
usage: main.py [-h] [--listen [IP]] [--port PORT] [--tls-keyfile TLS_KEYFILE]
               [--tls-certfile TLS_CERTFILE] [--enable-cors-header [ORIGIN]]
               [--max-upload-size MAX_UPLOAD_SIZE]
               [--extra-model-paths-config PATH [PATH ...]]
               [--output-directory OUTPUT_DIRECTORY]
               [--temp-directory TEMP_DIRECTORY]
               [--input-directory INPUT_DIRECTORY] [--auto-launch]
               [--disable-auto-launch] [--cuda-device DEVICE_ID]
               [--cuda-malloc | --disable-cuda-malloc]
               [--force-fp32 | --force-fp16]
               [--bf16-unet | --fp16-unet | --fp8_e4m3fn-unet | --fp8_e5m2-unet]
               [--fp16-vae | --fp32-vae | --bf16-vae] [--cpu-vae]
               [--fp8_e4m3fn-text-enc | --fp8_e5m2-text-enc | --fp16-text-enc | --fp32-text-enc]
               [--force-channels-last] [--directml [DIRECTML_DEVICE]]
               [--disable-ipex-optimize]
               [--preview-method [none,auto,latent2rgb,taesd]]
               [--cache-classic | --cache-lru CACHE_LRU]
               [--use-split-cross-attention | --use-quad-cross-attention | --use-pytorch-cross-attention]
               [--disable-xformers]
               [--force-upcast-attention | --dont-upcast-attention]
               [--gpu-only | --highvram | --normalvram | --lowvram | --novram | --cpu]
               [--default-hashing-function {md5,sha1,sha256,sha512}]
               [--disable-smart-memory] [--deterministic]
               [--dont-print-server] [--quick-test-for-ci]
               [--windows-standalone-build] [--disable-metadata]
               [--disable-all-custom-nodes] [--multi-user] [--verbose]
               [--front-end-version FRONT_END_VERSION]
               [--front-end-root FRONT_END_ROOT]

options:
  -h, --help            show this help message and exit
  --listen [IP]         Specify the IP address to listen on (default:
                        127.0.0.1). If --listen is provided without an
                        argument, it defaults to 0.0.0.0. (listens on all)
  --port PORT           Set the listen port.
  --tls-keyfile TLS_KEYFILE
                        Path to TLS (SSL) key file. Enables TLS, makes app
                        accessible at https://... requires --tls-certfile to
                        function
  --tls-certfile TLS_CERTFILE
                        Path to TLS (SSL) certificate file. Enables TLS, makes
                        app accessible at https://... requires --tls-keyfile
                        to function
  --enable-cors-header [ORIGIN]
                        Enable CORS (Cross-Origin Resource Sharing) with
                        optional origin or allow all with default '*'.
  --max-upload-size MAX_UPLOAD_SIZE
                        Set the maximum upload size in MB.
  --extra-model-paths-config PATH [PATH ...]
                        Load one or more extra_model_paths.yaml files.
  --output-directory OUTPUT_DIRECTORY
                        Set the ComfyUI output directory.
  --temp-directory TEMP_DIRECTORY
                        Set the ComfyUI temp directory (default is in the
                        ComfyUI directory).
  --input-directory INPUT_DIRECTORY
                        Set the ComfyUI input directory.
  --auto-launch         Automatically launch ComfyUI in the default browser.
  --disable-auto-launch
                        Disable auto launching the browser.
  --cuda-device DEVICE_ID
                        Set the id of the cuda device this instance will use.
  --cuda-malloc         Enable cudaMallocAsync (enabled by default for torch
                        2.0 and up).
  --disable-cuda-malloc
                        Disable cudaMallocAsync.
  --force-fp32          Force fp32 (If this makes your GPU work better please
                        report it).
  --force-fp16          Force fp16.
  --bf16-unet           Run the UNET in bf16. This should only be used for
                        testing stuff.
  --fp16-unet           Store unet weights in fp16.
  --fp8_e4m3fn-unet     Store unet weights in fp8_e4m3fn.
  --fp8_e5m2-unet       Store unet weights in fp8_e5m2.
  --fp16-vae            Run the VAE in fp16, might cause black images.
  --fp32-vae            Run the VAE in full precision fp32.
  --bf16-vae            Run the VAE in bf16.
  --cpu-vae             Run the VAE on the CPU.
  --fp8_e4m3fn-text-enc
                        Store text encoder weights in fp8 (e4m3fn variant).
  --fp8_e5m2-text-enc   Store text encoder weights in fp8 (e5m2 variant).
  --fp16-text-enc       Store text encoder weights in fp16.
  --fp32-text-enc       Store text encoder weights in fp32.
  --force-channels-last
                        Force channels last format when inferencing the
                        models.
  --directml [DIRECTML_DEVICE]
                        Use torch-directml.
  --disable-ipex-optimize
                        Disables ipex.optimize when loading models with Intel
                        GPUs.
  --preview-method [none,auto,latent2rgb,taesd]
                        Default preview method for sampler nodes.
  --cache-classic       Use the old style (aggressive) caching.
  --cache-lru CACHE_LRU
                        Use LRU caching with a maximum of N node results
                        cached. May use more RAM/VRAM.
  --use-split-cross-attention
                        Use the split cross attention optimization. Ignored
                        when xformers is used.
  --use-quad-cross-attention
                        Use the sub-quadratic cross attention optimization .
                        Ignored when xformers is used.
  --use-pytorch-cross-attention
                        Use the new pytorch 2.0 cross attention function.
  --disable-xformers    Disable xformers.
  --force-upcast-attention
                        Force enable attention upcasting, please report if it
                        fixes black images.
  --dont-upcast-attention
                        Disable all upcasting of attention. Should be
                        unnecessary except for debugging.
  --gpu-only            Store and run everything (text encoders/CLIP models,
                        etc... on the GPU).
  --highvram            By default models will be unloaded to CPU memory after
                        being used. This option keeps them in GPU memory.
  --normalvram          Used to force normal vram use if lowvram gets
                        automatically enabled.
  --lowvram             Split the unet in parts to use less vram.
  --novram              When lowvram isn't enough.
  --cpu                 To use the CPU for everything (slow).
  --default-hashing-function {md5,sha1,sha256,sha512}
                        Allows you to choose the hash function to use for
                        duplicate filename / contents comparison. Default is
                        sha256.
  --disable-smart-memory
                        Force ComfyUI to agressively offload to regular ram
                        instead of keeping models in vram when it can.
  --deterministic       Make pytorch use slower deterministic algorithms when
                        it can. Note that this might not make images
                        deterministic in all cases.
  --dont-print-server   Don't print server output.
  --quick-test-for-ci   Quick test for CI.
  --windows-standalone-build
                        Windows standalone build: Enable convenient things
                        that most people using the standalone windows build
                        will probably enjoy (like auto opening the page on
                        startup).
  --disable-metadata    Disable saving prompt metadata in files.
  --disable-all-custom-nodes
                        Disable loading all custom nodes.
  --multi-user          Enables per-user storage.
  --verbose             Enables more debug prints.
  --front-end-version FRONT_END_VERSION
                        Specifies the version of the frontend to be used. This
                        command needs internet connectivity to query and
                        download available frontend implementations from
                        GitHub releases. The version string should be in the
                        format of: [repoOwner]/[repoName]@[version] where
                        version is one of: "latest" or a valid version number
                        (e.g. "1.0.0")
  --front-end-root FRONT_END_ROOT
                        The local filesystem path to the directory where the
                        frontend is located. Overrides --front-end-version.
■ 7. Other
Please navigate to my other articles via the menu.
My note account is linked to my main account @Mayu_Hiraizumi, but please direct any inquiries regarding these articles to my sub-account @riddi0908.