
A Guide to Smartphone Photography (Product Shots) of the Naoshima Red Pumpkin

Many people visiting Naoshima plan to take photos of the "Red Pumpkin." As a photographer who has lived on Naoshima for a month, I have tested how to take cute photos of it.
If you are planning a trip to Naoshima, please be sure to check this out.
All photos in this post were taken with an iPhone 13 Pro. The key is having a telephoto camera (0.5, 1, and 3—this one). I assume those reading this note are camera-conscious. You are likely using a Pro or Pro Max model... (My apologies if you aren't!)
Differences in how photos look between the wide-angle lens (1x) and the telephoto lens (3x)
First, please compare the two photos below.

Now, look at these two. They are both the same Red Pumpkin, but they look different, don't they?The one on the left feels bloated, unlike how it looks to the naked eye. In contrast, the one on the right looks just as it does in person.
This is due to the difference in the lenses used.
Recent iPhone models mostly come with three lenses. When you open the camera app, the wide-angle lens (1x) is active. Let's first look at the characteristics of this wide-angle lens.
Pros and cons of the wide-angle lens
Pros
・Can capture a wide area
・Can shoot in tight spaces
Cons
・Photos look distorted compared to reality
This "distortion that differs from reality" is the difficult part of using a wide-angle lens. This is why photos can feel unnatural.

Now, let's move on to the characteristics of the telephoto lens.
Pros and cons of the telephoto lens
Pros
・Can take close-ups even from a distance
・Photos look natural and distortion-free, just like in reality
Cons
・Requires a certain amount of space
Because the telephoto lens captures the subject exactly as it appears, it doesn't feel unnatural. In other words, it captures images more naturally than a wide-angle lens.This is the main point and the conclusion of this post.
Conclusion: Use a telephoto lens (3x) to take the shot

That's all there is to it... But if I end it here, you might feel like, "Wait, that's it?" So, I'll share a few more points with you.
Should you shoot the Red Pumpkin from above or below?
Now, please compare these two photos.

These two photos give quite different impressions, don't they?
The one on the left was taken with the smartphone lowered close to the ground, while the one on the right was taken while I was standing.
It makes that much of a difference.
By the way, I often hear this Red Pumpkin art described as looking like a "ladybug 🐞." If you view it that way, it looks cuter and more like a ladybug if it appears to be standing on the grass.

What you need to be careful about here is the environment around the Red Pumpkin.


As you can see, the area around the Red Pumpkin is green concrete. The grassy area starts a little further away.
Therefore, the key to taking a cute photo that brings out the "ladybug 🐞" feel is to shoot from the grassy area.

Conclusion 2: Don't shoot from eye level; hold your smartphone low and include the grass in the frame
The trick is to crouch down, flip your camera upside down, and lower it as close to the ground as possible.

By the way, this is a photo taken by lowering the smartphone right to the edge of a puddle formed by the rain.

At this point, it is easy to fail at focusing, so I will share some tips.
When you lower the camera to the ground level to take the shot, it can be hard to see the screen, and the focus often ends up on the grass.

In times like this, let's use AE/AF lock!

Using the AE/AF lock function fixes the focus and brightness on the subject. Here, we will lock onto the Red Pumpkin. To use it, just long-press (tap) on the Red Pumpkin shown on the screen.
This will prevent the focus from shifting to the grass.
If you have read this far, I think most people will be able to take photos that bring out the cuteness of the Red Pumpkin!
From here on, I will share the shooting locations for those who are not sure from which position they should take the shot to make it look good.
Conclusion 3: Take the shot here
Please take the shot here.
(A slight margin of error is fine)
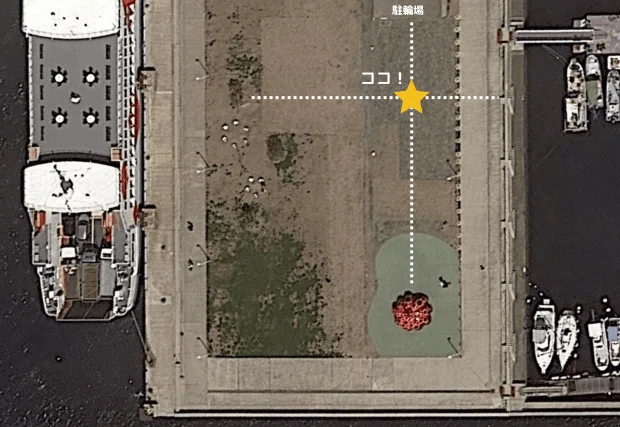
There is a pine tree on the right side.

There are stairs on the left side.

If you take the shot here, you can get a photo like this.

For those who thought, 'Wait, isn't the Red Pumpkin smaller than before?' You are sharp. I intentionally took it smaller here.The reason is that when you upload to Instagram Stories, the aspect ratio changes and the sides get cut off.


↓

↓

By the way, it also fits nicely as an iPhone wallpaper.

If you don't plan on using it as a wallpaper or uploading it to Instagram Stories, you can also take the shot from a little further back.
In that case, this area is recommended.


Now, finally, I will share some points of caution and countermeasures.
Points of caution and countermeasures when shooting from a distance
When taking photos from a distance away from the Red Pumpkin, other people taking photos might get into the frame. Since it's a popular spot, there's nothing you can do about people gathering there.
However, don't give up!
Having lived just a 5-minute walk from the Naoshima Red Pumpkin for a month, I have found two main ways to avoid the crowds.
1. Shoot early in the morning
This is an effective method if you are staying on Naoshima. First thing in the morning, the number of tourists is low, and many are still having breakfast. Naturally, fewer people come to the Red Pumpkin, so it's a prime time to aim for.
*Personally, I especially recommend this.
2. Avoid the times around ferry arrivals and departures
I often see many tourists head straight for the Red Pumpkin as soon as they arrive on Naoshima. Also, when returning to the port to catch the ferry home, many people arrive a bit early. Since there isn't much else to do at the port, I get the impression that many people are taking photos at the Red Pumpkin.
Therefore, it is best to avoid those times. Here is the ferry timetable, so please use it as a reference.

Reference: Differences in Red Pumpkin photos based on direction
All the photos of the Red Pumpkin introduced so far were taken from the same direction. There is, of course, a reason for that.It is the direction that makes the Red Pumpkin stand out the most.

To show you why, I will introduce photos taken from other angles.

This is a photo taken from the opposite side (the sea side). You cannot step back, there is no grass, and houses and the Sea Station appear in the background. (Though having the mountain in the shot is really nice.)

This is from the ferry side. Streetlights, fishing boats, and parked cars appear in the background.

I tried other angles as well, but things I didn't want in the shot ended up appearing anyway...
At the end of the day, this is still the recommended spot.

Summary
Now, let's summarize the key points from this guide.
Use a telephoto lens (3x)
Lower your smartphone to the ground
Shoot from the designated location
That's all! If you are planning to visit Naoshima, please use this as a reference!
If you have any questions, please leave a comment or send me a DM via the Instagram link below.
Also, if there is demand in the future, I will introduce tips for taking portraits with the Red Pumpkin and recommended ways to photograph the Pavilion.
I live on Naoshima, so if we happen to meet, let's have fun taking photos together! Please also follow me on Instagram!
いいなと思ったら応援しよう!
 いただいたサポートは直島での活動に使わせていただきます!