
★[Defense] Defensive Movements and Covering (Runner on 1st, Batted Ball to Infield)

(In this note, I simulate the method of 'building a strong high school baseball team' from various angles using a virtual high school. I hope this will be of some help to everyone involved in baseball.)
Thinking about the 'Kudo Note High School Baseball Team' team development process to Koshien and becoming Japan's best | Yasuhiro Kudo

This covers the responses and covering movements when a batted ball is hit to the 'near-standard position' of each defensive position.
<<Basic Concept>>
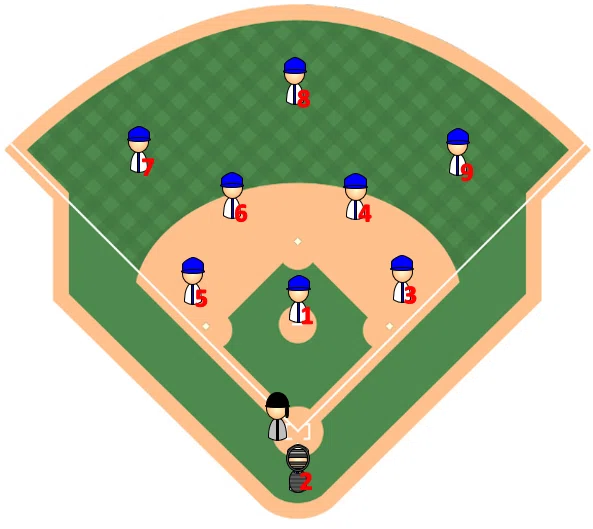
● The numbers for each position and their basic defensive positions are shown in the diagram below.
1 Pitcher 2 Catcher
3 First Baseman 4 Second Baseman
5 Third Baseman 6 Shortstop
7 Left Fielder 8 Center Fielder
9 Right Fielder
● All fielders must move in response to a batted ball.
There is no position that does nothing.
(Covering the ball, covering throws, covering bases)
● Do not perform covering for balls that are clearly foul. However,
always perform covering for balls that are on the edge of being fair or foul.

The latest high school baseball magazines are summarized in this link
(Updated once a month) 👇


We clarify the basic diagrams so that all players understand how to move for covering in each case, and repeatedly simulate them in practice (to the point where they can move unconsciously in games).
If even one of the nine players makes a different move here, it will lead to an open position (base) or a lack of coordination, so 'a state where everyone understands and can move according to the basic diagram' is a major point for the team.
However, it is okay to make different moves in a game depending on the situation (based on split-second judgment).
※ If there are 2 outs, you only need to get the batter-runner out, so the movement is the same as when there are no runners.
Here, we are considering the situation with 0 or 1 out.
The pre-positioning when there is a runner on 1st is...
↓ Click here for items related to defense!
★[Defense: Start Here] Dominate the game with your team's defensive strength | Yasuhiro Kudo
※ By case
★[Defense] Covering: No runners, batted ball to infield | Yasuhiro Kudo
★[Defense] Covering: No runners, batted ball to outfield | Yasuhiro Kudo
★[Defense] Covering: Runner on 1st, batted ball to infield | Yasuhiro Kudo
★[Defense] Covering: Runner on 1st, batted ball to outfield | Yasuhiro Kudo
★[Defense] Covering: Runner on 2nd, batted ball to infield | Yasuhiro Kudo
★[Defense] Covering: Runner on 2nd, batted ball to outfield | Yasuhiro Kudo
★[Defense] Covering: Runner on 3rd, batted ball to infield | Yasuhiro Kudo
★[Defense] Covering: Runner on 3rd, batted ball to outfield | Yasuhiro Kudo
★[Defense] Covering: Runners on 1st & 2nd, batted ball to infield | Yasuhiro Kudo
★[Defense] Covering: Runners on 1st & 2nd, batted ball to outfield | Yasuhiro Kudo
★[Defense] Covering: Runners on 1st & 3rd, batted ball to infield | Yasuhiro Kudo
★[Defense] Covering: Runners on 1st & 3rd, batted ball to outfield | Yasuhiro Kudo
★[Defense] Covering: Runners on 2nd & 3rd | Yasuhiro Kudo
★[Defense] Covering: Runners on 1st, 2nd & 3rd, batted ball to infield | Yasuhiro Kudo
★[Defense] Covering: Runners on 1st, 2nd & 3rd, batted ball to outfield | Yasuhiro Kudo

🥎 Pitcher-grounder (1 to 6, 1 to 3, 1 to 6 to 3)

◉ Movements for each position
<<Priority>>
1 Covering for grounder fielding
2 Covering for throw to 2nd base
3 Covering for throw to 1st base
● Field the ground ball and throw to 2nd base ... 1
Throw to match the timing of 6 (4) entering the base.
Throw toward the base or slightly toward the 1st base side so that 6 (4) who catches it can smoothly throw to 1st base.
Throwing toward the 3rd base side makes it difficult for 6 (4) to catch and throw.
In the case of a slow roller, 2 may instruct to throw to 1st base, so in that case, throw to 1st base as instructed.
● Touch 2nd base and catch the throw ... 6
You will see the base, the throw from 1, and the 1st base runner, but do not panic and take a catching stance that can handle even an off-target throw. If you are aiming for a double play but the throw to 1st base will not be in time, do not make a wasted throw.
● Covering for wild throws when throwing to 2nd base ... 4, 7, 8
If the batted ball is toward the 3rd base side, 4 may enter 2nd base. * It is good to decide in advance how to enter 2nd base.
(Example) 4 enters for a right-handed batter, 6 enters for a left-handed batter. 4 enters for a ball to the 3rd base side, 6 enters for a ball to the 1st base side.
However, basically 6 enters 2nd base.
(6 is easier to throw from in the flow of movement)
● Touch 1st base and catch the throw ... 3
Take a catching stance that can handle even an off-target throw. (Prioritize catching, then touch the base)
● Covering for wild throws when throwing to 1st base ... 2, 9
9 in particular should enter at full speed.
● Covering 3rd base ... 5
Covering 3rd base when the throw to 2nd base is erratic and the 1st base runner advances to 3rd.
🥎 1st base grounder (3→6, 3/3 or 3→1, 3→6→3, 3→6→1, 3/3→6)

◉ Movement of each position
<<Priority>>
1. Covering for fielding ground balls
2. Covering for throws to 2nd base
3. Covering for throws to 1st base
● Field the ground ball, throw to 2nd base, and step on 1st base ... 3
For ground balls between 1st and 2nd base, go for it aggressively without worrying about 1st base.
For ground balls close to 1st base, step on the base first before throwing to 2nd base.
(When aiming for a double play, should you step on 1st base before throwing?
Or throw to 2nd base first? Making the appropriate judgment is the key.
Do not hesitate. The priority is to get the 1st base runner out.)
When aiming for a double play, unless you can return to 1st base immediately,
leave entering 1st base to 1.
● Covering for errors when fielding a 1st base grounder ... 4, 9
4 covers 1st base after confirming the catch. 9 enters to cover at full speed.
● Covering 2nd base, catching the throw and touching 2nd base ... 6
Enter 2nd base, receive the throw from 3, and throw to 1st base (double play).
If 3 steps on 1st base first and then throws, it is a tag play.
● Covering for wild throws when throwing to 2nd base ... 7, 8
● Covering 1st base ... 1
Head to 1st base at the same time the ball is hit toward the 1st base side.
Since 3 leaves 1st base to handle the ball,
1 enters 1st base to receive the throw from 6.
Call out at the timing you want the toss.
After stepping on the base, run through to the fair ground side
to avoid colliding with the batter-runner.

● Covering for wild throws when throwing to 1st base ... 2, 4, 9
If 1's coverage of 1st base is delayed, 4 enters 1st base.
● Covering 3rd base ... 5
Covering 3rd base when the throw to 2nd base is erratic and the 1st base runner advances to 3rd.
🥎 2nd base grounder (4→6, 4→3, 4→6→3)

◉ Movement of each position
<<Priority>>
1. Covering for fielding ground balls
2. Covering for throws to 2nd base
3. Covering for throws to 1st base
● Field the ground ball and throw to 2nd base ... 4
Throw to match the timing of 6 entering the base.
Judge whether to toss or throw so that 6 who catches it can smoothly throw to 1st base, and throw toward the base.
In the case of a slow roller, 2 may instruct to throw to 1st base, so in that case, throw to 1st base as instructed.
* When tagging the 1st base runner after fielding a ground ball
If the 1st base runner is right in front of you after fielding, a tag out is possible. After the tag, throw to 1st base.
Be careful not to let the ball come out of the glove due to the impact when tagging.
(The 1st base runner is running at full speed)
If the 1st base runner runs backward when you try to tag,
throw to 1st base (to get the batter-runner out) ->
then perform a rundown between 1st and 2nd base (to trap the 1st base runner).
Do not panic and throw to 2nd base.
● Covering for errors when fielding a 2nd base grounder ... 9
9 covers 1st base after confirming the catch.
● Touch 2nd base and catch the throw ... 6
You will see the base, the throw from 4, and the 1st base runner, but do not panic and take a catching stance that can handle even an off-target throw. If you are aiming for a double play but the throw to 1st base will not be in time, do not make a wasted throw.
● Covering for wild throws when throwing to 2nd base ... 7, 8
● Touch 1st base and catch the throw ... 3
If you cannot return to 1st base because you are chasing the ball, leave it to 1. Take a catching stance that can handle even an off-target throw. (Prioritize catching, then touch the base)
● Covering for wild throws when throwing to 1st base ... 1, 2, 9
1 heads to 1st base at the same time the ball is hit toward the 1st base side. If 3 heads toward the ball and leaves 1st base,
1 enters 1st base to receive the throw from 6. 2 enters at full speed because 9's coverage will inevitably be late.
● Covering 3rd base ... 5
Covering 3rd base when the throw to 2nd base is erratic and the 1st base runner advances to 3rd.
🥎 Shortstop grounder (6→4, 6→3, 6→4→3, 6/6→3)
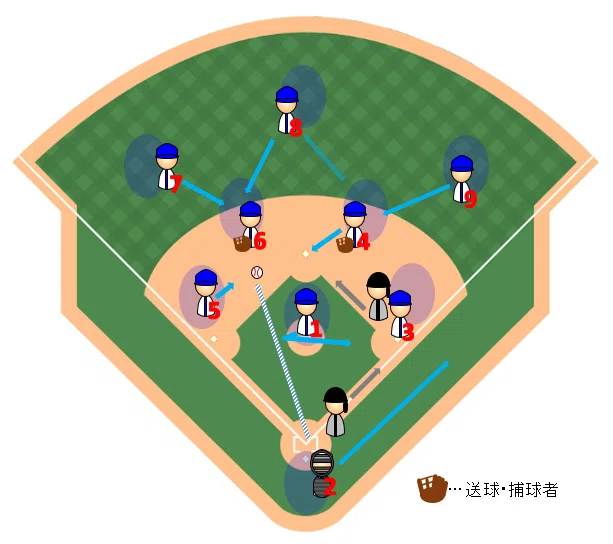
◉ Movement of each position
<<Priority>>
1. Covering for fielding ground balls
2. Covering for throws to 2nd base
3. Covering for throws to 1st base
● Field the ground ball and throw to 2nd base ... 6
Throw the ball in time for 4 to reach the base.
Judge whether to toss or throw the ball so that 4, who caught it, can smoothly throw to 1st base, and throw it over the base.
If the fielding position is near the base, you may tag the base yourself instead of using 4.
In the case of a slow roller, 2 may instruct a throw to 1st base, so in that case, throw to 1st base as instructed.
● Covering for errors when fielding a shortstop grounder ... 7, 8
If the ball is hit toward the hole between 3rd and shortstop and 8 is too far to cover, 8 should leave the covering to 7 and move to cover the throw to 2nd base.
● Touch 2nd base and catch the throw ... 4
Take a catching stance that allows you to handle even an off-target throw. However, since the direction toward 2nd base and the direction of the throw to 1st base are opposite, be careful of bad throws when throwing to 1st base. If you are aiming for a double play but the throw to 1st base will not be in time, do not make a wasted throw.
● Covering for wild throws when throwing to 2nd base ... 8, 9
8 should move to cover the throw to 2nd base if the ball is hit toward the hole between 3rd and shortstop and 8 is too far to cover.
● Touch 1st base and catch the throw ... 3
Take a catching stance that allows you to handle even an off-target throw. (Prioritize catching, then touch the base)
● Covering for wild throws when throwing to 1st base ... 1, 2
After chasing the ball, 1 heads toward 1st base. 2 is an important cover since 9 will not be coming to cover, so enter with full effort.
● Covering 3rd base ... 5
After chasing a ball hit to the hole between 3rd and shortstop, cover 3rd base if the throw to 2nd base goes wild and the 1st base runner advances to 3rd.
🥎 Grounder to 3rd base (5→4, 5→3, 5→4→3)

◉ Movement of each position
≪Priority≫
① Covering for ground ball fielding
② Covering for throws to 2nd base
③ Covering for throws to 1st base
● Field the ground ball and throw to 2nd base ... 5
Throw the ball in time for 4 to reach the base.
Throw the ball over the base so that 4, who caught it, can smoothly throw to 1st base.
In the case of a slow roller, 2 may instruct a throw to 1st base, so in that case, throw to 1st base as instructed.
● Covering for errors when fielding a 3rd base grounder ... 6, 7
● Touch 2nd base and catch the throw ... 4
Take a catching stance that allows you to handle even an off-target throw. However, since the direction toward 2nd base and the direction of the throw to 1st base are opposite, be careful of bad throws when throwing to 1st base. If you are aiming for a double play but the throw to 1st base will not be in time, do not make a wasted throw.
● Covering for wild throws when throwing to 2nd base ... 8
Always get on the extension line of the throw. If the cover position is poor, there is a possibility that the runner will score all the way to home plate.
● Touch 1st base and catch the throw ... 3
Take a catching stance that allows you to handle even an off-target throw. (Prioritize catching, then touch the base)
● Covering for wild throws when throwing to 1st base ... 1, 2, 9
● Covering 3rd base ... 5
After handling the ball, cover 3rd base if the throw to 2nd base goes wild and the 1st base runner advances to 3rd.
※ In this note, I earn income through qualifying sales as an Amazon Associate.
↓ Article updates will also be announced on X and our Facebook page.
「工藤note高校 野球部」甲子園・日本一までのチーム育成プロセス を考える|工藤 @kud1021 #note #高校野球 https://t.co/pOiXB1K2lV
— 工藤 (@kud1021) August 30, 2023
↓ These are recommended books to understand high school baseball and Koshien.
↓ I am registered with the Popular Blog Ranking (High School Baseball).
Please click the link.

いいなと思ったら応援しよう!
 よろしくお願いします!いただいたチップは、画像購入・AI利用等より充実したnoteを作るために使わせていただきます。